添加节点层次结构并在 3D 场景的多个节点之间共享网格的几何数据

在 3D 场景文档中添加节点层次结构

Aspose.3D for Python via .NET 提供生成节点层次结构。节点是场景的基本构建块。节点层次结构定义场景的逻辑结构,并通过将几何图形、灯光和摄影机附加到节点来提供可见内容。

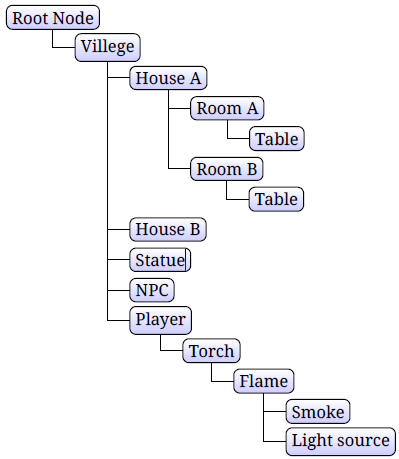
场景图示例

一个示例场景层次结构看起来像:

todo: 图像 _ alt_text

在 Aspose.3D 中,每个 Node 实例可以有多个子节点,在这个例子中,我们创建了一个有两个立方体节点的节点,如果我们旋转根节点,所有子节点也会受到影响:

from aspose.threed import FileFormat, Scene
from aspose.threed.utilities import Quaternion, Vector3
import math

#  For complete examples and data files, please go to https:# github.com/aspose-3d/Aspose.3D-for-.NET
#  Initialize scene object
scene = Scene()
#  Get a child node object
top = scene.root_node.create_child_node()
#  Each cube node has their own translation
cube1 = top.create_child_node("cube1")
#  Call Common class create mesh using polygon builder method to set mesh instance
mesh = Common.CreateMeshUsingPolygonBuilder()
#  Point node to the mesh
cube1.entity = mesh
#  Set first cube translation
cube1.transform.translation = Vector3(-10, 0, 0)
cube2 = top.create_child_node("cube2")
#  Point node to the mesh
cube2.entity = mesh
#  Set second cube translation
cube2.transform.translation = Vector3(10, 0, 0)
#  The rotated top node will affect all child nodes
top.transform.rotation = Quaternion.from_euler_angle(math.pi, 4, 0)
#  The path to the documents directory.
output = "out"  + "NodeHierarchy.fbx"
#  Save 3D scene in the supported file formats
scene.save(output, FileFormat.FBX7500ASCII)

在多个节点之间共享网格的几何数据

为了减少内存需求,可以将 Mesh 类的单个实例绑定到 Node 类的各个实例。设想您需要一个系统,其中所有 3D 立方体似乎都无法区分,但是您需要大量的立方体。您可以通过在系统开始时制作一个网格对象来节省内存。此时,每次需要另一个形状时,都要创建另一个节点对象,然后将该节点指向一个网格。这称为实例化。Aspose.3D for Python via .NET api允许执行实例化。

实例化示例

在RTS (实时策略) 游戏中,我们总是可以看到多个npc (非玩家角色) 具有相同的 3D 模型,可能是不同的颜色,渲染引擎通常在不同的npc之间共享相同的网格几何数据,这种技术称为实例化。

演示示例代码:

from aspose.threed import FileFormat, Node, Scene
from aspose.threed.shading import LambertMaterial
from aspose.threed.utilities import Vector3

#  For complete examples and data files, please go to https:# github.com/aspose-3d/Aspose.3D-for-.NET
#  Initialize scene object
scene = Scene()
#  Define color vectors
colors = [Vector3(1, 0, 0), Vector3(0, 1, 0), Vector3(0, 0, 1)]
#  Call Common class create mesh using polygon builder method to set mesh instance
mesh = Common.CreateMeshUsingPolygonBuilder()
idx = 0
for color in colors:
    #  Initialize cube node object
    cube = Node("cube")
    cube.entity = mesh
    mat = LambertMaterial()
    #  Set color
    mat.diffuse_color = color
    #  Set material
    cube.material = mat
    #  Set translation
    cube.transform.translation = Vector3(idx * 20, 0, 0)
    idx = idx + 1
    #  Add cube node
    scene.root_node.child_nodes.append(cube)
#  The path to the documents directory.
output = "out"  + "MeshGeometryData.fbx"
#  Save 3D scene in the supported file formats
scene.save(output, FileFormat.FBX7400ASCII)

在此示例中,我们创建了3个多维数据集节点共享相同的网格,每个节点具有不同的材质和不同的颜色。