วิธีการใช้ Aspose.CAD ใน Angular
Contents
[
Hide
]ข้อกำหนดเบื้องต้น
- Angular CLI
- Visual Code
- Node.js
แปลงภาพ dgn เป็น png และแสดงในเบราว์เซอร์
ในตัวอย่างนี้ คุณจะสร้างโปรแกรมการแปลงง่ายๆ ที่แปลงภาพวาดและบันทึกเป็นภาพ
การสร้างโปรเจกต์ Angular
- ตรวจสอบให้แน่ใจว่าคุณไม่ได้อยู่ในไดเรกทอรีที่เป็นพื้นที่ทำงานของ Angular
- สร้างใหม่และตั้งชื่อโปรแกรม หรือใช้โปรแกรมอื่นๆ เช่น Visual Code หรือ WebStorm เพื่อสร้างโปรเจกต์:
ng new angular-example - ติดตั้ง Aspose.CAD จาก npm package
npm install aspose-cad - เปิดไฟล์ angular.json และเพิ่มรายการในฟิลด์สคริปต์ สคริปต์นี้เริ่มโหลดพร้อมโปรเจกต์ จะต้องใช้เพื่อเริ่มการประมวลผลไฟล์
"scripts": [ "node_modules/aspose-cad/dotnet.js" ] - ใน app.component.html สร้าง input type file และ img tags เพื่อโหลดและแสดงภาพวาด
<span style="background-color: red"> <input type="file" class="file-upload" (change)="onFileSelected($event)" /> <img alt="" id="image" [src]="imageUrl" /> </span> - ใน app.component.ts เราจะอธิบายกระบวนการเริ่มต้นกระบวนการช่วยเหลือ การประมวลผล และการบันทึกภาพ
import {Component} from '@angular/core'; import {DomSanitizer} from '@angular/platform-browser'; import {Image} from "aspose-cad/commonjs/Core/Image"; import {PngOptions} from "aspose-cad/commonjs/Options/PngOptions"; //จำเป็นต้องบูตกระบวนการ dotnet declare let dotnet: any; @Component({ selector: 'app-root', templateUrl: './app.component.html', styleUrls: ['./app.component.css'] }) export class AppComponent { title = 'angular-example'; imageUrl: any; imgFile: Uint8Array | null | undefined; constructor(private sanitizer: DomSanitizer) { } // @ts-ignore async ngOnInit() { console.log("aspose-cad WASM กำลังโหลด..."); await dotnet.boot().then((ex: any) => { console.log("aspose-cad WASM ได้ถูกโหลด"); }); } // @ts-ignore async onFileSelected(event) { const file: File = event.target.files[0]; file.arrayBuffer().then(async buff => { let x = new Uint8Array(buff); this.imgFile = await Image.Load(x); //โหลดภาพ console.log(this.imgFile); var exportedFile = await Image.Save(this.imgFile, new PngOptions()); //บันทึกภาพเป็น png var urlCreator = window.URL || window.webkitURL; var blob = new Blob([exportedFile], { type: 'application/octet-stream' }); //สร้าง src สำหรับภาพที่แปลง this.imageUrl = this.sanitizer.bypassSecurityTrustUrl(urlCreator.createObjectURL(blob)); //ดาวน์โหลดภาพ png let url = window.URL.createObjectURL(blob); let a = document.createElement('a'); document.body.appendChild(a); a.setAttribute('style', 'display: none'); a.href = url; a.download = "file.png"; a.click(); window.URL.revokeObjectURL(url); a.remove(); }); } } - เริ่มแอปพลิเคชัน
npm start
//หรือ
ng serve
คำสั่ง ng serve:
- สร้างแอปพลิเคชัน
- เริ่มเซิร์ฟเวอร์พัฒนา
- ตรวจสอบไฟล์แหล่งที่มา
- สร้างแอปพลิเคชันใหม่เมื่อคุณทำการเปลี่ยนแปลง
ธง –open จะเปิดเบราว์เซอร์ไปที่ http://localhost:4200.
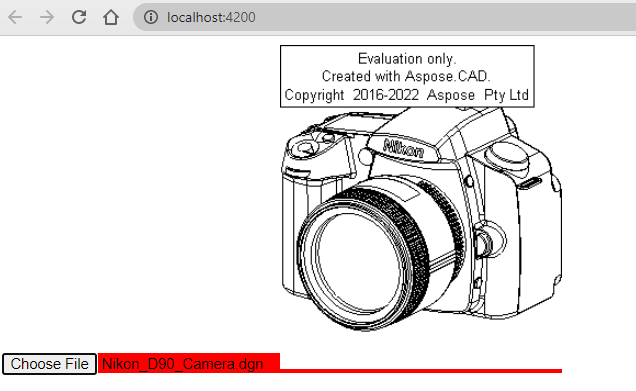
ตัวอย่างการดำเนินการ
- เลือกไฟล์.
- เลือกไฟล์ DXF, DWG, DGN, DWF, DWFX, IFC, STL, DWT, IGES, PLT, CF2, OBJ, HPGL, IGS, PCL, FBX, PDF, SVG อะไรก็ได้
- หากคำตอบสำเร็จ ไฟล์จะแสดงบนหน้าจอและจะเสนอให้ดาวน์โหลด