
Gmail उपयोगिता सुविधाएँ
FreeBusy क्वेरी के साथ काम करना
Aspose.Email एक क्वेरी तंत्र प्रदान करता है जिससे यह जांचा जा सके कि कोई अपॉइंटमेंट मानदंड के अनुसार देय है या नहीं। FreebusyQuery इस उद्देश्य के लिए एक क्लास प्रदान की गई है जो किसी विशिष्ट कैलेंडर के लिए क्वेरी तैयार करने की अनुमति देती है।
कैलेंडर को क्वेरी करना
यह कोड उदाहरण कैलेंडर क्वेरी करने की सुविधा को दर्शाता है। इस नमूने में निम्नलिखित कार्य किए जाते हैं:
- कैलेंडर बनाएं और सम्मिलित करें
- एक अपॉइंटमेंट बनाएं
- अपॉइंटमेंट सम्मिलित करें
- तैयार करें एक FreebusyQuery
- प्राप्त करें FreebusyResponse
// Use the OAuthUser and GoogleOAuthHelper classes below to receive an access token
IGmailClient client = GmailClient.getInstance(accessToken, "user@domain.com");
try {
    Calendar newCalendar = new Calendar("summary", null, null, "Europe/Kiev");

    // Insert calendar and get back id of newly inserted calendar and Fetch the same calendar using calendar id
    String id = client.createCalendar(newCalendar);
    Calendar fetchedCalendar = client.fetchCalendar(id);
    String calendarId = fetchedCalendar.getId();
    try {
        // Get list of appointments in newly inserted calendar. It should be zero
        Appointment[] appointments = client.listAppointments(calendarId);

        // Create a new appointment and Calculate appointment start and finish time
        java.util.Calendar c = java.util.Calendar.getInstance();
        Date startDate = c.getTime();
        c.add(java.util.Calendar.HOUR_OF_DAY, 1);
        Date endDate = c.getTime();

        // Create attendees list for appointment
        MailAddressCollection attendees = new MailAddressCollection();
        attendees.add("user1@domain.com");
        attendees.add("user2@domain.com");

        // Create appointment
        Appointment app1 = new Appointment("Location", startDate, endDate, MailAddress.to_MailAddress("user2@domain.com"), attendees);
        app1.setSummary("Summary");
        app1.setDescription("Description");
        app1.setStartTimeZone("Europe/Kiev");
        app1.setEndTimeZone("Europe/Kiev");

        // Insert the newly created appointment and get back the same in case of successful insertion
        Appointment newAppointment = client.createAppointment(calendarId, app1);

        // Create Freebusy query by setting min/max timeand time zone
        FreebusyQuery query = new FreebusyQuery();
        c = java.util.Calendar.getInstance();
        c.add(java.util.Calendar.DATE, -1);
        query.setTimeMin(c.getTime());
        c.add(java.util.Calendar.DATE, 2);
        query.setTimeMax(c.getTime());
        query.setTimeZone("Europe/Kiev");

        // Set calendar item to search and Get the reponse of query containing
        query.getItems().add(calendarId);
        FreebusyResponse resp = client.getFreebusyInfo(query);

        client.deleteAppointment(calendarId, newAppointment.getUniqueId());
    } finally {
        client.deleteCalendar(calendarId);
    }
} finally {
    client.dispose();
}
Google Developer Console में प्रोजेक्ट बनाना
एक उपयोगकर्ता जिसके पास Gmail अकाउंट है, उसके लिए Google Developer Console पर एक प्रोजेक्ट बनाना होगा। Google प्रोजेक्ट के API & auth -> Credentials पेज पर क्लाइंट आईडी और क्लाइंट सीक्रेट जैसी जानकारी नोट करनी होगी। यह जानकारी, Gmail अकाउंट के उपयोगकर्ता नाम और पासवर्ड के साथ, इस खंड में कोड चलाने के लिए आवश्यक होगी, जैसे Google कैलेंडर, एक्सेस कंट्रोल लिस्ट, अपॉइंटमेंट्स, कॉन्टेक्ट्स, सेटिंग्स आदि।
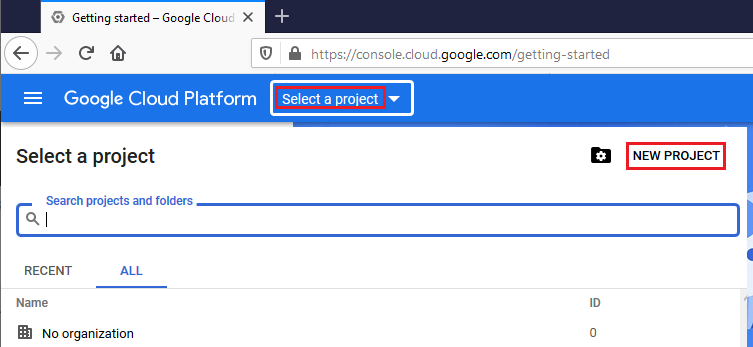
Google Developer Console में प्रोजेक्ट बनाने के चरण
Google Developer Console में प्रोजेक्ट बनाने के लिए नीचे चरण दर चरण ट्यूटोरियल दिया गया है।
-
लिंक https://console.cloud.google.com पर जाएँ और अपने जीमेल क्रेडेंशियल्स का उपयोग करके लॉगिन करें
-
"मैंने Google Cloud Platform उत्पादों की सभी सेवा शर्तें पढ़ ली हैं और उनसे सहमत हूँ" इस चेक बॉक्स को चुनें और न्यू प्रोजेक्ट बटन दबाएँ
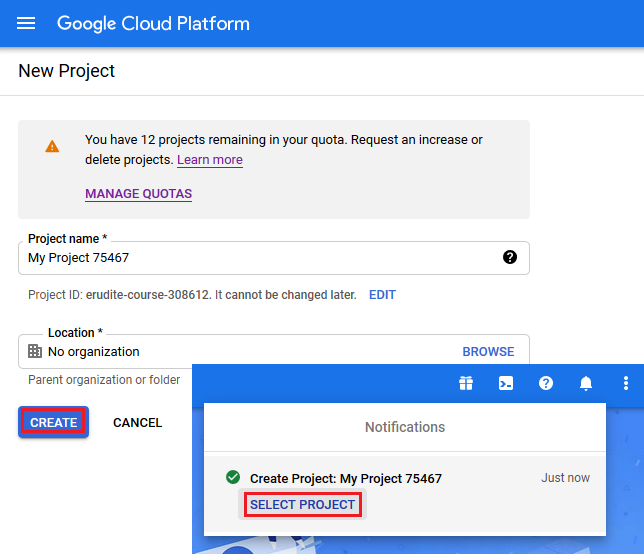
- क्रिएट और सेलेक्ट नया प्रोजेक्ट
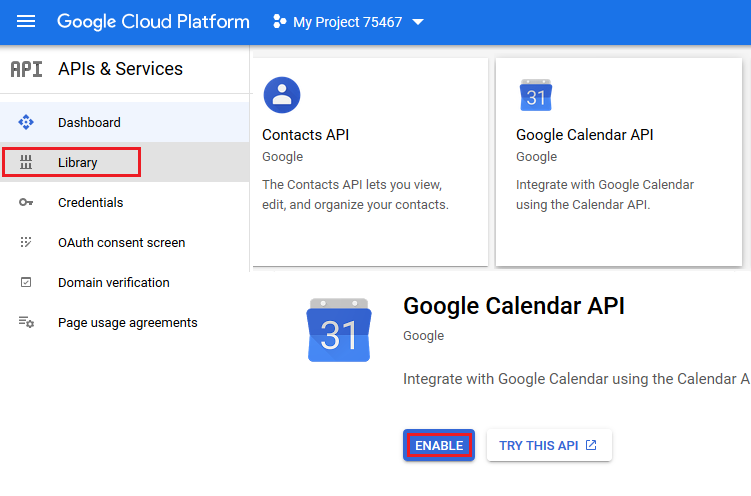
- लाइब्रेरी चुनें और कॉन्टेक्ट तथा कैलेंडर API सक्षम करें
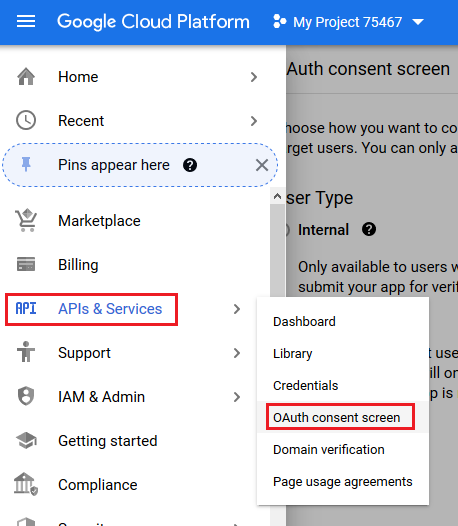
- OAuth कंज़ेंट स्क्रीन खोलें
- एक्सटर्नल चेक बॉक्स चुनें और क्रिएट बटन दबाएँ

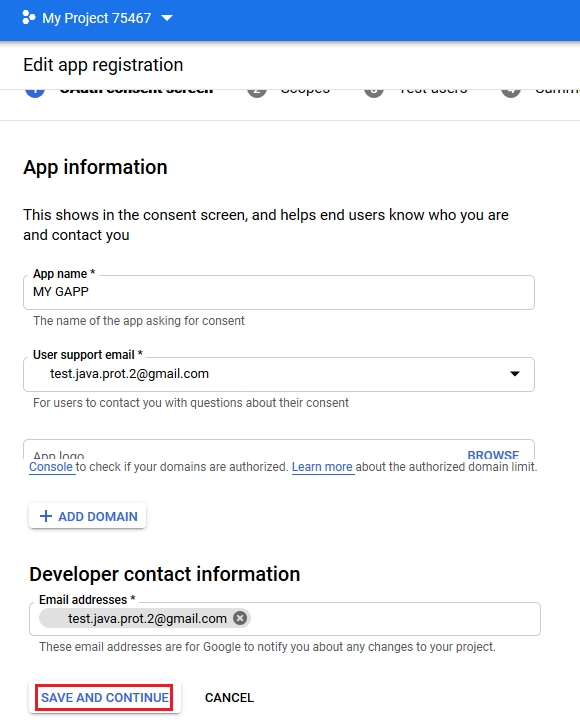
- ऐप पंजीकरण संपादित करें और सेव एंड कंटिन्यू बटन दबाएँ
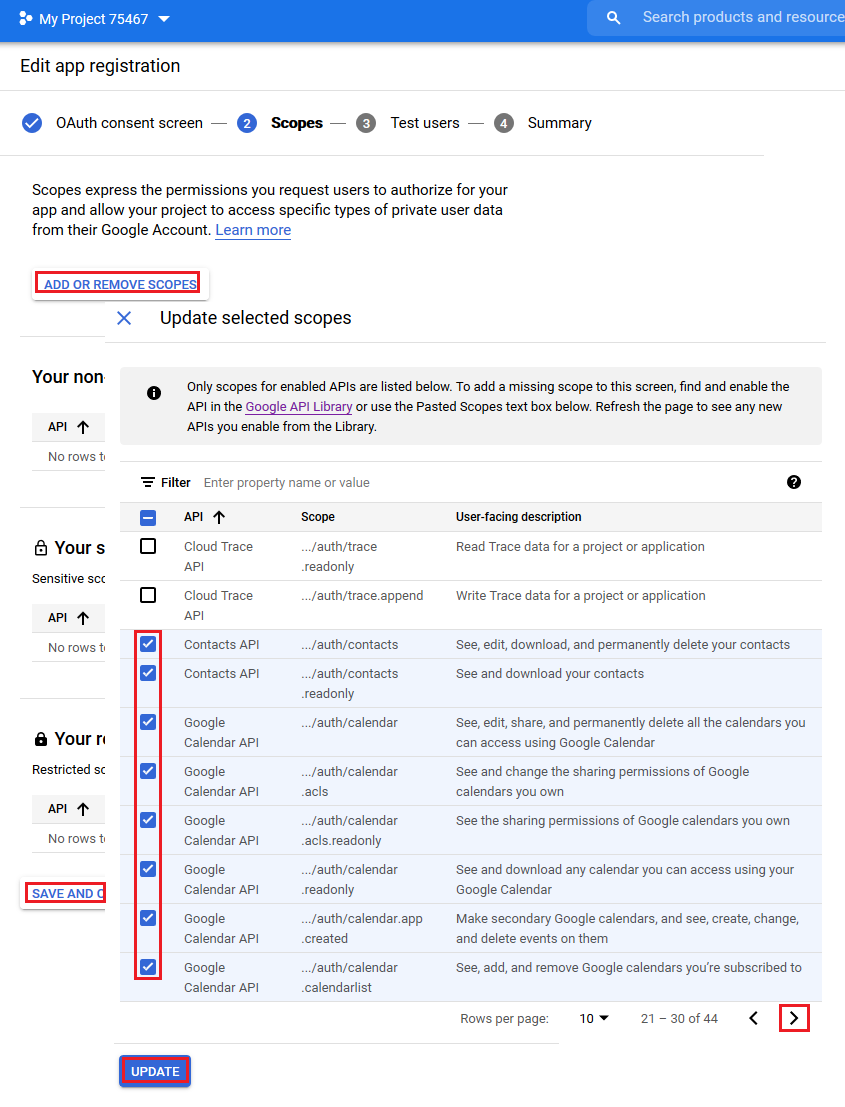
- स्कोप जोड़ें और अपडेट बटन दबाएँ
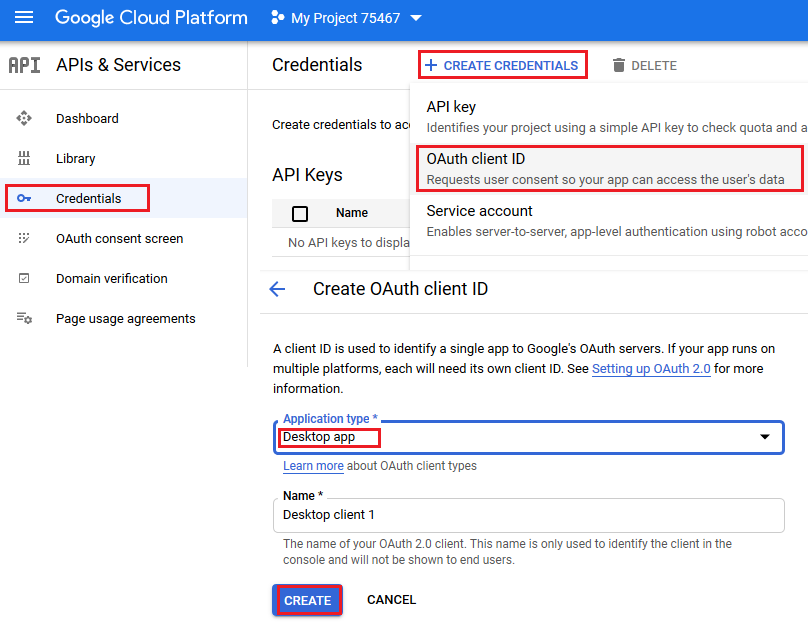
- OAuth प्रमाणपत्र बनाएं
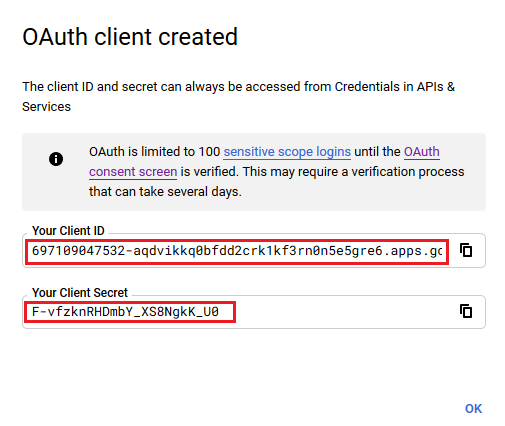
- यहाँ क्लाइंट आईडी और क्लाइंट सीक्रेट हैं जो इस खंड के नमूना कोड में उपयोग किए जाएंगे।
हेल्पर क्लासेज
इस खंड में कोड उदाहरण चलाने के लिए निम्नलिखित हेल्पर क्लासेज आवश्यक हैं। ये क्लासेज GoogleOAuthHelper और OAuthUser ये केवल प्रदर्शन को सरल बनाने के लिए हैं। इन क्लासों में मेथड्स वेब-पेजों की गैर-सरकारी संरचना का उपयोग करते हैं जो कभी भी बदल सकती है।
GoogleOAuthHelper क्लास
निम्नलिखित कोड स्निपेट दर्शाता है कि कैसे लागू किया जाए GoogleOAuthHelper क्लास।
import java.io.BufferedReader;
import java.io.IOException;
import java.io.InputStream;
import java.io.InputStreamReader;
import java.io.OutputStream;
import java.io.UnsupportedEncodingException;
import java.net.HttpURLConnection;
import java.net.URL;
import java.net.URLDecoder;
import java.net.URLEncoder;
import java.nio.charset.StandardCharsets;
import java.security.MessageDigest;
import java.security.NoSuchAlgorithmException;
import java.util.HashMap;
import java.util.Map;
import java.util.UUID;

import javax.xml.bind.DatatypeConverter;

/**
 * <p>
 * Developers console https://console.developers.google.com/projectselector/apis/credentials?pli=1
 * Documentation https://developers.google.com/identity/protocols/OAuth2InstalledApp
 * </p>
 */
class GoogleOAuthHelper {
    public static final String AUTHORIZATION_URL = "https://accounts.google.com/o/oauth2/v2/auth";
    public static final String TOKEN_REQUEST_URL = "https://oauth2.googleapis.com/token";
    public static final String REDIRECT_URI = "urn:ietf:wg:oauth:2.0:oob";
    public static final String REDIRECT_TYPE = "code";
    public static final String SCOPE = "https%3A%2F%2Fwww.googleapis.com%2Fauth%2Fcalendar" // Calendar
            + "+https%3A%2F%2Fwww.google.com%2Fm8%2Ffeeds%2F" // Contacts
            + "+https%3A%2F%2Fmail.google.com%2F"; // IMAP & SMTP

    static class OAuthUser {
        String email;
        String clientId;
        String clientSecret;
        String refreshToken;
    }

    static String createCodeChalange() {
        String verifierStr = UUID.randomUUID().toString() + "-" + UUID.randomUUID().toString();
        System.out.println("Code Verifier: " + verifierStr);

        MessageDigest digest;
        try {
            digest = MessageDigest.getInstance("SHA-256");
        } catch (NoSuchAlgorithmException e) {
            throw new IllegalAccessError(e.getMessage());
        }
        byte[] hash = digest.digest(verifierStr.getBytes(StandardCharsets.UTF_8));
        String base64Hash = DatatypeConverter.printBase64Binary(hash);

        base64Hash = base64Hash.split("=")[0];
        base64Hash = base64Hash.replace('+', '-').replace('/', '_');
        return base64Hash;
    }

    static String getAuthorizationCodeUrl(OAuthUser acc) {
        return getAuthorizationCodeUrl(acc, SCOPE, REDIRECT_URI, REDIRECT_TYPE);
    }

    static String getAuthorizationCodeUrl(OAuthUser acc, String scope, String redirectUri, String responseType) {
        System.out.println("---------------------------------------------------------");
        System.out.println("------------- OAuth 2.0 AuthorizationCodeUrl -------------");
        System.out.println("---------------------------------------------------------");
        System.out.println("Login: " + acc.email);
        String codeChallenge = createCodeChalange();

        String state = urlEncode(UUID.randomUUID().toString());
        String approveUrl = AUTHORIZATION_URL + "?client_id=" + acc.clientId + "&redirect_uri=" + redirectUri + "&response_type=" + responseType + "&scope=" + scope
                + "&code_challenge=" + codeChallenge + "&code_challenge_method=S256&state=" + state;

        System.out.println("Approve Url: " + approveUrl);
        return approveUrl;
    }

    static String urlEncode(String value) {
        try {
            return URLEncoder.encode(value, StandardCharsets.UTF_8.toString());
        } catch (UnsupportedEncodingException e) {
            throw new IllegalAccessError(e.getMessage());
        }
    }

    static String urlDecode(String value) {
        try {
            return URLDecoder.decode(value, StandardCharsets.UTF_8.toString());
        } catch (UnsupportedEncodingException e) {
            throw new IllegalAccessError(e.getMessage());
        }
    }

    static String getAccessTokenByAuthCode(String authorizationCode, String codeVerifier, OAuthUser user) {
        String encodedParameters = "client_id=" + urlEncode(user.clientId) + "&client_secret=" + urlEncode(user.clientSecret) + "&code=" + urlEncode(authorizationCode)
                + "&code_verifier=" + codeVerifier + "&redirect_uri=" + urlEncode(REDIRECT_URI) + "&grant_type=authorization_code";
        System.out.println("---------------------------------------------------------");
        System.out.println("------------- OAuth 2.0 AccessTokenByAuthCode -------------");
        System.out.println("---------------------------------------------------------");
        System.out.println("Authorization code: " + authorizationCode);

        String result = "";
        Map<String, String> token = geToken(encodedParameters);
        for (String key : token.keySet()) {
            System.out.println(key + ": " + token.get(key));
            if (key.equals("refresh_token")) {
                result = token.get(key);
            }
        }

        System.out.println("---------------------------------------------------------");

        return result;
    }

    static String getAccessTokenByRefreshToken(OAuthUser user) {
        String encodedParameters = "client_id=" + urlEncode(user.clientId) + "&client_secret=" + urlEncode(user.clientSecret) + "&refresh_token=" + urlEncode(user.refreshToken)
                + "&grant_type=refresh_token";
        System.out.println("---------------------------------------------------------");
        System.out.println("----------- OAuth 2.0 AccessTokenByRefreshToken -----------");
        System.out.println("---------------------------------------------------------");
        System.out.println("Login: " + user.email);

        String result = "";
        Map<String, String> token = geToken(encodedParameters);
        for (String key : token.keySet()) {
            System.out.println(key + ": " + token.get(key));
            if (key.equals("access_token")) {
                result = token.get(key);
            }
        }

        System.out.println("---------------------------------------------------------");

        return result;
    }

    static Map<String, String> geToken(String encodedParameters) {
        try {
            HttpURLConnection connection = (HttpURLConnection) new URL(TOKEN_REQUEST_URL).openConnection();
            connection.setRequestMethod("POST");

            byte[] requestData = encodedParameters.getBytes(StandardCharsets.UTF_8);

            connection.setUseCaches(false);
            connection.setDoInput(true);
            connection.setDoOutput(true);
            connection.setRequestProperty("Content-Type", "application/x-www-form-urlencoded");
            connection.setRequestProperty("Content-Length", "" + requestData.length);

            final OutputStream st = connection.getOutputStream();
            try {
                st.write(requestData, 0, requestData.length);
            } finally {
                st.flush();
                st.close();
            }

            connection.connect();

            if (connection.getResponseCode() >= HttpURLConnection.HTTP_BAD_REQUEST) {
                throw new IllegalAccessError("Operation failed: " + connection.getResponseCode() + "/" + connection.getResponseMessage() + "\r\nDetails:\r\n{2}"
                        + readInputStream(connection.getErrorStream()));
            }

            String responseText = readInputStream(connection.getInputStream());

            Map<String, String> result = new HashMap<String, String>();
            System.out.println(responseText);
            String[] strs = responseText.replace("{", "").replace("}", "").replace("\"", "").replace("\r", "").replace("\n", "").split(",");
            for (String sPair : strs) {
                String[] pair = sPair.split(":");
                String name = pair[0].trim().toLowerCase();
                String value = urlDecode(pair[1].trim());
                result.put(name, value);
            }

            return result;
        } catch (IOException e) {
            throw new IllegalAccessError(e.getMessage());
        }
    }

    static String readInputStream(InputStream is) {
        if (is == null)
            return "";

        BufferedReader reader = new BufferedReader(new InputStreamReader(is));
        StringBuilder result = new StringBuilder();
        String line;
        try {
            while ((line = reader.readLine()) != null) {
                result.append(line);
            }
        } catch (IOException e) {
            // ignore
        }
        return result.toString();
    }
}
Google OAuth Helper को इस प्रकार उपयोग किया जाना चाहिए:
- पहले एक प्राधिकरण कोड URL उत्पन्न करना होगा।
- URL को ब्राउज़र में खोलें और सभी संचालन पूर्ण करें। परिणामस्वरूप, आपको एक प्राधिकरण कोड प्राप्त होगा।
- एक रीफ़्रेश टोकन प्राप्त करने के लिए प्राधिकरण कोड का उपयोग करें।
- जब रीफ़्रेश टोकन मौजूद हो, आप इसका उपयोग एक्सेस टोकन प्राप्त करने के लिए कर सकते हैं।
static class OAuthUser {
    String email;
    String clientId;
    String clientSecret;
    String refreshToken;
}

static void getRefreshToken() {
    Scanner inputReader = new Scanner(System.in);
    OAuthUser user = new OAuthUser();

    // Set clientId, clientSecret and email
    System.out.println("Set clientId: ");
    user.clientId = inputReader.nextLine();
    System.out.println("Set clientSecret: ");
    user.clientSecret = inputReader.nextLine();
    System.out.println("Set email: ");
    user.email = inputReader.nextLine();

    // Generate AuthorizationCodeUrl
    String authorizationCodeUrl = GoogleOAuthHelper.getAuthorizationCodeUrl(user);

    System.out.println("You have to retrieve AuthorizationCode manually with generated AuthorizationCodeUrl");
    System.out.println("Set authorizationCode: ");
    String authorizationCode = inputReader.nextLine();
    System.out.println("Copy Code Verifier from the previous step output");
    System.out.println("Set codeVerifier: ");
    String codeVerifier = inputReader.nextLine();

    // Get "Refresh Token"
    String refreshToken = GoogleOAuthHelper.getAccessTokenByAuthCode(authorizationCode, codeVerifier, user);
    user.refreshToken = refreshToken;

    // Get "Access Token"
    String accessToken = GoogleOAuthHelper.getAccessTokenByRefreshToken(user);

    // Use "Access Token" in API
    IGmailClient client = GmailClient.getInstance(accessToken, user.email);
}