Analyzing your prompt, please hold on...
An error occurred while retrieving the results. Please refresh the page and try again.
Wie wir bereits im Artikel HTML-Dokument erstellen erwähnt haben, basieren die Implementierung des HTMLDocument sowie das gesamte DOM auf dem WHATWG DOM Standard. Mit Grundkenntnissen in den Sprachen HTML und JavaScript ist es also einfach, Aspose.HTML for .NET zu verwenden.
Ein DOM-Baum ist eine speicherinterne Darstellung eines Dokuments. Das DOM ist eine API für den Zugriff auf und die Bearbeitung von Dokumenteninhalten. HTML-Dokumente bestehen aus einem Baum, der verschiedene Arten von Knoten enthält, deren Wurzel ein Dokument ist. Der DOM-Namensraum wird mit den folgenden grundlegenden Datentypen dargestellt:
| Data type | Description |
|---|---|
| Document | The Document class represents the entire HTML, XML or SVG document. Conceptually, it is the root of the document tree and provides the primary access to the document’s data. |
| EventTarget | The EventTarget class is implemented by all Nodes in an implementation that supports the DOM Event Model. An EventTarget object represents a target to which an event can be dispatched when something has occurred. |
| Node | The Node class is the primary datatype for the entire Document Object Model. It represents a single node in the document tree. |
| Element | The element type is based on node and represents a base class for HTML, XML or SVG DOM. |
| Attr | The Attr class represents an attribute in an Element object. Typically the allowable values for the attribute are defined in a schema associated with the document. |
Im Folgenden finden Sie eine kurze Liste nützlicher API-Methoden, die von den Kerndatentypen bereitgestellt werden:
| Method | Description |
|---|---|
Document.GetElementById(elementId) | The method, when invoked, must return the first element whose ID is elementId and null if there is no such element otherwise. |
Document.GetElementsByTagName(tagname) | The method must return the list of elements with the given name. |
Document.CreateElement(localname) | The method creates an element of the type specified, or an HTMLUnknownElement if tagname isn’t recognized. |
Node.AppendChild(node) | The method adds a node to the end of the list of children of a specified parent node. |
Element.SetAttribute(name, value) | Sets the value of an attribute on the specified element. |
Element.GetAttribute(name) | The method returns the value of a specified attribute on the element. |
| Element.InnerHTML | The property returns a fragment of markup contained within the element. |
Eine vollständige Liste der Schnittstellen und Methoden, die im DOM-Namensraum vertreten sind, finden Sie unter API-Referenzquelle.
Es gibt viele Möglichkeiten, wie Sie HTML mit unserer Bibliothek bearbeiten können. Sie können das Dokument ändern, indem Sie neue Knoten einfügen, entfernen oder den Inhalt bestehender Knoten bearbeiten. Wenn Sie einen neuen Knoten erstellen müssen, sind die folgenden Methoden aufzurufen:
| Method | Description |
|---|---|
Document.CreateCDATASection(data) | Creates a CDATASection node whose value is the specified string. |
Document.CreateComment(data) | Creates a Comment node given the specified string. |
| Document.CreateDocumentFragment() | Creates an empty DocumentFragment object. |
Document.CreateElement(localname) | Creates an element of the type specified. |
Document.CreateEntityReference(name) | Creates an EntityReference object. |
Document.CreateProcessingInstruction(target, data) | Creates an ProcessingInstruction with the specified name and data. |
Document.CreateTextNode(data) | Creates a Text node given the specified string. |
Sobald Sie neue Knoten erstellt haben, gibt es mehrere Methoden im DOM, die Ihnen helfen können, Knoten in den Dokumentbaum einzufügen. Die folgende Liste beschreibt die gängigsten Methoden zum Einfügen von Knoten:
| Method | Description |
|---|---|
Node.InsertBefore(node, child) | Inserts the node before the reference child node. |
Node.AppendChild(node) | Adds the node to the list of children of the current node. |
Node.RemoveChild(child) | Removes the child node from the list of children. |
| Element.Remove() | Removes this instance from the HTML DOM tree. |
Sie können die vollständigen Beispiele und Datendateien von GitHub herunterladen.
HTML-Dokumente bestehen aus einem Baum von Elementen. Jedes Element wird im Quelltext durch ein Start-Tag, wie z.B. <body>, und ein End-Tag, wie z.B. </body>, gekennzeichnet. Elemente können Attribute haben, die die Funktionsweise der Elemente steuern. Aspose.HTML for .NET API unterstützt eine Reihe von HTML-Elementen, die im HTML-Standard definiert sind, zusammen mit Regeln darüber, wie die Elemente verschachtelt werden können.
Betrachten Sie einfache Schritte zum Erstellen und Bearbeiten von HTML. Das Dokument wird einen Textabsatz mit dem Attribut id enthalten:
<p>.id für das Absatzelement. 1// Edit HTML document using DOM Tree
2
3// Create an instance of an HTML document
4using (HTMLDocument document = new HTMLDocument())
5{
6 HTMLElement body = document.Body;
7
8 // Create a paragraph element
9 HTMLParagraphElement p = (HTMLParagraphElement)document.CreateElement("p");
10
11 // Set a custom attribute
12 p.SetAttribute("id", "my-paragraph");
13
14 // Create a text node
15 Text text = document.CreateTextNode("my first paragraph");
16
17 // Attach the text to the paragraph
18 p.AppendChild(text);
19
20 // Attach the paragraph to the document body
21 body.AppendChild(p);
22
23 // Save the HTML document to a file
24 document.Save(Path.Combine(OutputDir, "edit-document-tree.html"));
25}Schauen wir uns nun die Erstellung eines komplexeren HTML-Dokuments an. Jedes HTML-Dokument wird als Knotenbaum dargestellt, und einige der Knoten in einem Baum können Kinder haben. Der folgende Codeschnipsel zeigt, wie man ein HTML-Dokument mit Hilfe des DOM-Baums und der oben erwähnten Funktion bearbeiten kann:
 1// Create and add new HTML elements using C#
 2
 3// Create an instance of an HTML document
 4using (HTMLDocument document = new HTMLDocument())
 5{
 6    // Create a <style> element and assign the green color for all elements with class-name equals 'gr'.
 7    Element style = document.CreateElement("style");
 8    style.TextContent = ".gr { color: green }";
 9
10    // Find the document <head> element and append the <style> element to it
11    Element head = document.GetElementsByTagName("head").First();
12    head.AppendChild(style);
13
14    // Create a paragraph element with class-name 'gr'.
15    HTMLParagraphElement p = (HTMLParagraphElement)document.CreateElement("p");
16    p.ClassName = "gr";
17
18    // Create a text node
19    Text text = document.CreateTextNode("Hello World!!");
20
21    // Append the text node to the paragraph
22    p.AppendChild(text);
23
24    // Append the paragraph to the document <body> element
25    document.Body.AppendChild(p);
26
27    // Save the HTML document to a file
28    document.Save(Path.Combine(OutputDir, "using-dom.html"));
29
30    // Create an instance of the PDF output device and render the document into this device
31    using (PdfDevice device = new PdfDevice(Path.Combine(OutputDir, "using-dom.pdf")))
32    {
33        // Render HTML to PDF
34        document.RenderTo(device);
35    }
36}Mit DOM-Objekten haben Sie ein mächtiges Werkzeug, um mit einem HTML-Dokument zu manipulieren. Manchmal ist es jedoch viel besser, nur mit System.String zu arbeiten. Der folgende Codeschnipsel zeigt Ihnen, wie Sie die Eigenschaften InnerHTML & OuterHTML zur Bearbeitung von HTML verwenden können.
 1// Edit HTML body content and get modified document as string
 2
 3// Create an instance of an HTML document
 4using (HTMLDocument document = new HTMLDocument())
 5{
 6    // Write the content of the HTML document into the console output
 7    Console.WriteLine(document.DocumentElement.OuterHTML); // output: <html><head></head><body></body></html>
 8
 9    // Set the content of the body element
10    document.Body.InnerHTML = "<p>HTML is the standard markup language for Web pages.</p>";
11
12    // Set an html variable for the document content viewing
13    string html = document.DocumentElement.OuterHTML;
14
15    // Write the content of the HTML document into the console output
16    Console.WriteLine(html); // output: <html><head></head><body><p>HTML is the standard markup language for Web pages.</p></body></html>
17}Cascading Style Sheets (CSS) ist eine Stylesheet-Sprache, mit der beschrieben wird, wie Webseiten im Browser aussehen. CSS kann zu HTML-Dokumenten inline, intern und extern hinzugefügt werden. Auf diese Weise können Sie einem einzelnen HTML-Element mit Hilfe von Inline-CSS einen einzigartigen Stil verleihen oder mehrere Webseiten gemeinsam formatieren, indem Sie das entsprechende CSS in einer separaten .css-Datei angeben. Aspose.HTML unterstützt nicht nur CSS out-of-the-box, sondern gibt Ihnen auch Instrumente an die Hand, mit denen Sie die Dokumentstile vor der Konvertierung des HTML-Dokuments in andere Formate verwalten können, wie unten gezeigt.
Wenn CSS mit dem Attribut style innerhalb eines HTML-Tags geschrieben wird, nennt man es “Inline-CSS”. Mit dem Inline-CSS können Sie einen individuellen Stil auf jeweils ein HTML-Element anwenden. Sie legen CSS für ein HTML-Element fest, indem Sie das style-Attribut mit allen darin definierten CSS-Eigenschaften verwenden.
Im folgenden Codeschnipsel sehen Sie, wie Sie CSS-Stileigenschaften für ein HTML-Element <p> festlegen können.
 1// How to set inline CSS styles in an HTML element using C#
 2
 3// Create an instance of an HTML document with specified content
 4string content = "<p>InlineCSS </p>";
 5using (HTMLDocument document = new HTMLDocument(content, "."))
 6{
 7    // Find the paragraph element to set a style
 8    HTMLElement paragraph = (HTMLElement)document.GetElementsByTagName("p").First();
 9
10    // Set the style attribute
11    paragraph.SetAttribute("style", "font-size:250%; font-family:verdana; color:#cd66aa");
12
13    // Save the HTML document to a file
14    document.Save(Path.Combine(OutputDir, "edit-inline-css.html"));
15
16    // Create an instance of PDF output device and render the document into this device
17    using (PdfDevice device = new PdfDevice(Path.Combine(OutputDir, "edit-inline-css.pdf")))
18    {
19        // Render HTML to PDF
20        document.RenderTo(device);
21    }
22}In diesem speziellen Beispiel gelten Farbe, Schriftgröße und Schriftart für das Element “p”. Das Fragment der gerenderten PDF-Seite sieht wie folgt aus:

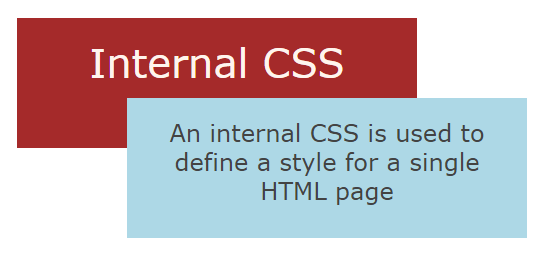
Die interne CSS-Styling-Option ist beliebt, um Eigenschaften auf einzelne Seiten anzuwenden, indem alle Stile in das <style>-Element eingeschlossen werden, das im <head> von HTML-Dokumenten platziert ist.
 1// Edit HTML with internal CSS using C#
 2
 3// Create an instance of an HTML document with specified content
 4string content = "<div><p>Internal CSS</p><p>An internal CSS is used to define a style for a single HTML page</p></div>";
 5using (HTMLDocument document = new HTMLDocument(content, "."))
 6{
 7    Element style = document.CreateElement("style");
 8    style.TextContent = ".frame1 { margin-top:50px; margin-left:50px; padding:20px; width:360px; height:90px; background-color:#a52a2a; font-family:verdana; color:#FFF5EE;} \r\n" +
 9                        ".frame2 { margin-top:-90px; margin-left:160px; text-align:center; padding:20px; width:360px; height:100px; background-color:#ADD8E6;}";
10
11    // Find the document header element and append the style element to the header
12    Element head = document.GetElementsByTagName("head").First();
13    head.AppendChild(style);
14
15    // Find the first paragraph element to inspect the styles
16    HTMLElement paragraph = (HTMLElement)document.GetElementsByTagName("p").First();
17    paragraph.ClassName = "frame1";
18
19    // Find the last paragraph element to inspect the styles
20    HTMLElement lastParagraph = (HTMLElement)document.GetElementsByTagName("p").Last();
21    lastParagraph.ClassName = "frame2";
22
23    // Set a color to the first paragraph
24    paragraph.Style.FontSize = "250%";
25    paragraph.Style.TextAlign = "center";
26
27    // Set a font-size to the last paragraph
28    lastParagraph.Style.Color = "#434343";
29    lastParagraph.Style.FontSize= "150%";
30    lastParagraph.Style.FontFamily = "verdana";
31
32    // Save the HTML document to a file
33    document.Save(Path.Combine(OutputDir, "edit-internal-css.html"));
34
35    // Create the instance of the PDF output device and render the document into this device
36    using (PdfDevice device = new PdfDevice(Path.Combine(OutputDir, "edit-internal-css.pdf")))
37    {
38        // Render HTML to PDF
39        document.RenderTo(device);
40    }
41}In diesem Beispiel verwenden wir internes CSS und deklarieren zusätzliche Stileigenschaften für einzelne Elemente mit der Eigenschaft Style der Klasse HTMLElement. Die Abbildung veranschaulicht das Fragment der gerenderten Datei “edit-internal-css.pdf”:
Ein externes Stylesheet kann in einem beliebigen Texteditor geschrieben und mit der Erweiterung .css gespeichert werden. Es handelt sich um eine eigenständige CSS-Datei, die von einer Webseite aus verlinkt wird. Der Vorteil von externem CSS ist, dass es einmal erstellt werden kann und die Regeln auf mehrere Webseiten angewendet werden können.
Schauen wir uns ein Beispiel für eine externe CSS-Umsetzung an, bei der wir einen Link zu einer URL-Adresse einer CSS-Datei verwenden:
 1// How to use an external CSS file in HTML using Aspose.HTML for .NET
 2
 3// Create an instance of HTML document with specified content
 4string htmlContent = "<link rel=\"stylesheet\" href=\"https://docs.aspose.com/html/net/edit-html-document/external.css\" type=\"text/css\" />\r\n" +
 5                     "<div class=\"rect1\" ></div>\r\n" +
 6                     "<div class=\"rect2\" ></div>\r\n" +
 7                     "<div class=\"frame\">\r\n" +
 8                     "<p style=\"font-size:2.5em; color:#ae4566;\"> External CSS </p>\r\n" +
 9                     "<p class=\"rect3\"> An external CSS can be created once and applied to multiple web pages</p></div>\r\n";
10
11using (HTMLDocument document = new HTMLDocument(htmlContent, "."))
12{
13    // Save the HTML document to a file
14    document.Save(Path.Combine(OutputDir, "external-css.html"));
15
16    // Create the instance of the PDF output device and render the document into this device
17    using (PdfDevice device = new PdfDevice(Path.Combine(OutputDir, "external-css.pdf")))
18    {
19        // Render HTML to PDF
20        document.RenderTo(device);
21    }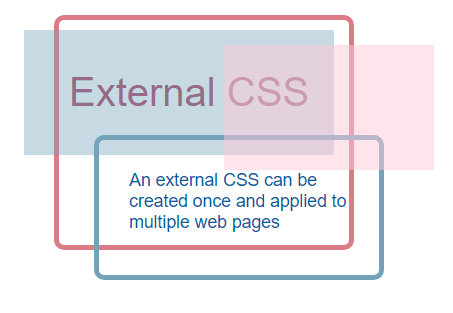
22}Das Ergebnis der externen CSS-Anwendung sieht wie folgt aus:
Sie können den Inhalt einer CSS-Datei in eine Zeichenkette schreiben und in einer separaten verknüpften Datei speichern, wie es im folgenden Beispiel gezeigt wird:
 1// Edit HTML with external CSS using C#
 2
 3// Prepare content of a CSS file
 4string styleContent = ".flower1 { width:120px; height:40px; border-radius:20px; background:#4387be; margin-top:50px; } \r\n" +
 5                      ".flower2 { margin-left:0px; margin-top:-40px; background:#4387be; border-radius:20px; width:120px; height:40px; transform:rotate(60deg); } \r\n" +
 6                      ".flower3 { transform:rotate(-60deg); margin-left:0px; margin-top:-40px; width:120px; height:40px; border-radius:20px; background:#4387be; }\r\n" +
 7                      ".frame { margin-top:-50px; margin-left:310px; width:160px; height:50px; font-size:2em; font-family:Verdana; color:grey; }\r\n";
 8
 9// Prepare a linked CSS file
10File.WriteAllText("flower.css", styleContent);
11
12// Create an instance of an HTML document with specified content
13string htmlContent = "<link rel=\"stylesheet\" href=\"flower.css\" type=\"text/css\" /> \r\n" +
14                     "<div style=\"margin-top: 80px; margin-left:250px; transform: scale(1.3);\" >\r\n" +
15                     "<div class=\"flower1\" ></div>\r\n" +
16                     "<div class=\"flower2\" ></div>\r\n" +
17                     "<div class=\"flower3\" ></div></div>\r\n" +
18                     "<div style = \"margin-top: -90px; margin-left:120px; transform:scale(1);\" >\r\n" +
19                     "<div class=\"flower1\" style=\"background: #93cdea;\"></div>\r\n" +
20                     "<div class=\"flower2\" style=\"background: #93cdea;\"></div>\r\n" +
21                     "<div class=\"flower3\" style=\"background: #93cdea;\"></div></div>\r\n" +
22                     "<div style =\"margin-top: -90px; margin-left:-80px; transform: scale(0.7);\" >\r\n" +
23                     "<div class=\"flower1\" style=\"background: #d5effc;\"></div>\r\n" +
24                     "<div class=\"flower2\" style=\"background: #d5effc;\"></div>\r\n" +
25                     "<div class=\"flower3\" style=\"background: #d5effc;\"></div></div>\r\n" +
26                     "<p class=\"frame\">External</p>\r\n" +
27                     "<p class=\"frame\" style=\"letter-spacing:10px; font-size:2.5em \">  CSS </p>\r\n";
28
29using (HTMLDocument document = new HTMLDocument(htmlContent, "."))
30{
31    // Save the HTML document to a file
32    document.Save(Path.Combine(OutputDir, "edit-external-css.html"));
33}Dieses Beispiel zeigt, wie Sie CSS-Grafiken von Grund auf neu erstellen können. Die Visualisierung der Datei “edit-external-css.html” ist in der Abbildung zu sehen:

Wie bereits erwähnt, ist die häufigste Anwendung von CSS die Gestaltung von Webseiten, die in HTML und anderen Auszeichnungssprachen geschrieben sind. Aber auch jenseits des Webdesigns können Sie CSS verwenden, um schöne Grafiken zu erstellen, wie die oben gezeigte. Das entscheidende Konzept des CSS-Zeichnens ist die Verwendung von Randradius, Drehung und Lokalisierung, um Kurven und Formen kreativ zu gestalten.
Sie können die vollständigen Beispiele und Dateien von GitHub herunterladen.
Analyzing your prompt, please hold on...
An error occurred while retrieving the results. Please refresh the page and try again.