Analyzing your prompt, please hold on...
An error occurred while retrieving the results. Please refresh the page and try again.
Как мы уже упоминали в статье Создание HTML-документа, реализация HTMLDocument, а также вся модель документа DOM основаны на стандарте WHATWG DOM. Таким образом, Aspose.HTML легко использовать, имея базовые знания языков HTML и JavaScript.
Дерево DOM – это представление документа в памяти. DOM – это API для доступа к содержимому документов и управления им. Документы HTML состоят из дерева, содержащего несколько типов узлов, корнем которых является Document. DOM namespace представлено следующими основными типами данных:
| Data type | Description |
|---|---|
| Document | The Document class represents the entire HTML, XML or SVG document. Conceptually, it is the root of the document tree and provides the primary access to the document’s data. |
| EventTarget | The EventTarget class is implemented by all Nodes in an implementation that supports the DOM Event Model. An EventTarget object represents a target to which an event can be dispatched when something has occurred. |
| Node | The Node class is the primary datatype for the entire Document Object Model. It represents a single node in the document tree. |
| Element | The element type is based on node and represents a base class for HTML, XML or SVG DOM. |
| Attr | The Attr class represents an attribute in an Element object. Typically the allowable values for the attribute are defined in a schema associated with the document. |
Ниже приведен краткий список полезных методов API, предоставляемых основными типами данных:
| Method | Description |
|---|---|
Document.GetElementById(elementId) | The method, when invoked, must return the first element whose ID is elementId and null if there is no such element otherwise. |
Document.GetElementsByTagName(tagname) | The method must return the list of elements with the given name. |
Document.CreateElement(localname) | The method creates an element of the type specified, or an HTMLUnknownElement if tagname isn’t recognized. |
Node.AppendChild(node) | The method adds a node to the end of the list of children of a specified parent node. |
Element.SetAttribute(name, value) | Sets the value of an attribute on the specified element. |
Element.GetAttribute(name) | The method returns the value of a specified attribute on the element. |
| Element.InnerHTML | The property returns a fragment of markup contained within the element. |
Полный список интерфейсов и методов, представленных в пространстве имен DOM, см. в Справочнике API.
Существует множество способов редактирования HTML с помощью нашей библиотеки. Вы можете изменить документ, вставив новые узлы, удалив или отредактировав содержимое существующих узлов. Если вам нужно создать новый узел, необходимо вызвать следующие методы:
| Method | Description |
|---|---|
Document.CreateCDATASection(data) | Creates a CDATASection node whose value is the specified string. |
Document.CreateComment(data) | Creates a Comment node given the specified string. |
| Document.CreateDocumentFragment() | Creates an empty DocumentFragment object. |
Document.CreateElement(localname) | Creates an element of the type specified. |
Document.CreateEntityReference(name) | Creates an EntityReference object. |
Document.CreateProcessingInstruction(target, data) | Creates an ProcessingInstruction with the specified name and data. |
Document.CreateTextNode(data) | Creates a Text node given the specified string. |
После создания новых узлов в DOM есть несколько методов, которые могут помочь вам вставить узлы в дерево документа. В следующем списке описывается наиболее распространенный способ вставки узлов:
| Method | Description |
|---|---|
Node.InsertBefore(node, child) | Inserts the node before the reference child node. |
Node.AppendChild(node) | Adds the node to the list of children of the current node. |
Node.RemoveChild(child) | Removes the child node from the list of children. |
| Element.Remove() | Removes this instance from the HTML DOM tree. |
Вы можете скачать полные примеры и файлы данных с GitHub.
Документы HTML состоят из дерева элементов. Каждый элемент обозначается в исходном коде начальным тегом, таким как <body>, и конечным тегом, таким как </body>. Элементы могут иметь атрибуты, управляющие работой элементов. Aspose.HTML API поддерживает набор элементов HTML, определенных в стандарте HTML, а также правила вложения элементов.
Рассмотрим простые шаги по созданию и редактированию HTML. Документ будет содержать текстовый абзац с атрибутом id:
<p>.id для элемента абзаца. 1// Edit HTML document using DOM Tree
2
3// Create an instance of an HTML document
4using (HTMLDocument document = new HTMLDocument())
5{
6 HTMLElement body = document.Body;
7
8 // Create a paragraph element
9 HTMLParagraphElement p = (HTMLParagraphElement)document.CreateElement("p");
10
11 // Set a custom attribute
12 p.SetAttribute("id", "my-paragraph");
13
14 // Create a text node
15 Text text = document.CreateTextNode("my first paragraph");
16
17 // Attach the text to the paragraph
18 p.AppendChild(text);
19
20 // Attach the paragraph to the document body
21 body.AppendChild(p);
22
23 // Save the HTML document to a file
24 document.Save(Path.Combine(OutputDir, "edit-document-tree.html"));
25}Давайте рассмотрим создание более сложного HTML-документа. Каждый HTML-документ представлен в виде дерева узлов, и некоторые узлы дерева могут иметь дочерние элементы. В следующем фрагменте кода показано, как редактировать HTML-документ с помощью DOM Tree и упомянутого выше функционала:
 1// Create and add new HTML elements using C#
 2
 3// Create an instance of an HTML document
 4using (HTMLDocument document = new HTMLDocument())
 5{
 6    // Create a <style> element and assign the green color for all elements with class-name equals 'gr'.
 7    Element style = document.CreateElement("style");
 8    style.TextContent = ".gr { color: green }";
 9
10    // Find the document <head> element and append the <style> element to it
11    Element head = document.GetElementsByTagName("head").First();
12    head.AppendChild(style);
13
14    // Create a paragraph element with class-name 'gr'.
15    HTMLParagraphElement p = (HTMLParagraphElement)document.CreateElement("p");
16    p.ClassName = "gr";
17
18    // Create a text node
19    Text text = document.CreateTextNode("Hello World!!");
20
21    // Append the text node to the paragraph
22    p.AppendChild(text);
23
24    // Append the paragraph to the document <body> element
25    document.Body.AppendChild(p);
26
27    // Save the HTML document to a file
28    document.Save(Path.Combine(OutputDir, "using-dom.html"));
29
30    // Create an instance of the PDF output device and render the document into this device
31    using (PdfDevice device = new PdfDevice(Path.Combine(OutputDir, "using-dom.pdf")))
32    {
33        // Render HTML to PDF
34        document.RenderTo(device);
35    }
36}Вы можете скачать полные примеры и файлы данных с GitHub.
Наличие объектов DOM дает вам мощный инструмент для работы с HTML-документом. Однако иногда гораздо лучше работать только с System.String. В следующем фрагменте кода показано, как использовать файлы InnerHTML и OuterHTML для редактирования HTML.
 1// Edit HTML body content and get modified document as string
 2
 3// Create an instance of an HTML document
 4using (HTMLDocument document = new HTMLDocument())
 5{
 6    // Write the content of the HTML document into the console output
 7    Console.WriteLine(document.DocumentElement.OuterHTML); // output: <html><head></head><body></body></html>
 8
 9    // Set the content of the body element
10    document.Body.InnerHTML = "<p>HTML is the standard markup language for Web pages.</p>";
11
12    // Set an html variable for the document content viewing
13    string html = document.DocumentElement.OuterHTML;
14
15    // Write the content of the HTML document into the console output
16    Console.WriteLine(html); // output: <html><head></head><body><p>HTML is the standard markup language for Web pages.</p></body></html>
17}Каскадные таблицы стилей ( CSS) – это язык таблиц стилей, используемый для описания того, как веб-страницы выглядят в браузере. CSS можно добавлять в HTML-документы встроенным, внутренним и внешним способом. Таким образом, вы можете установить уникальный стиль для одного элемента HTML, используя встроенный CSS, или для нескольких веб-страниц, чтобы использовать общее форматирование, указав соответствующий CSS в отдельном файле .css.
Aspose.HTML не только поддерживает CSS «из коробки», но также предоставляет вам инструменты для управления стилями документа «на лету» перед преобразованием HTML-документа в другие форматы, как показано ниже:
Когда CSS написан с использованием атрибута style внутри тега HTML, это называется «встроенным стилем CSS». Встроенный CSS позволяет применять индивидуальный стиль к одному HTML-элементу за раз. Вы устанавливаете CSS для элемента HTML, используя атрибут style с любыми свойствами CSS, определенными в нем.
В следующем фрагменте кода вы можете увидеть, как указать свойства стиля CSS для элемента HTML <p>.
 1// How to set inline CSS styles in an HTML element using C#
 2
 3// Create an instance of an HTML document with specified content
 4string content = "<p>InlineCSS </p>";
 5using (HTMLDocument document = new HTMLDocument(content, "."))
 6{
 7    // Find the paragraph element to set a style
 8    HTMLElement paragraph = (HTMLElement)document.GetElementsByTagName("p").First();
 9
10    // Set the style attribute
11    paragraph.SetAttribute("style", "font-size:250%; font-family:verdana; color:#cd66aa");
12
13    // Save the HTML document to a file
14    document.Save(Path.Combine(OutputDir, "edit-inline-css.html"));
15
16    // Create an instance of PDF output device and render the document into this device
17    using (PdfDevice device = new PdfDevice(Path.Combine(OutputDir, "edit-inline-css.pdf")))
18    {
19        // Render HTML to PDF
20        document.RenderTo(device);
21    }
22}В этом конкретном примере цвет, размер шрифта и семейство шрифтов применяются к элементу <p>. Фрагмент отрендеренной pdf-страницы выглядит так:

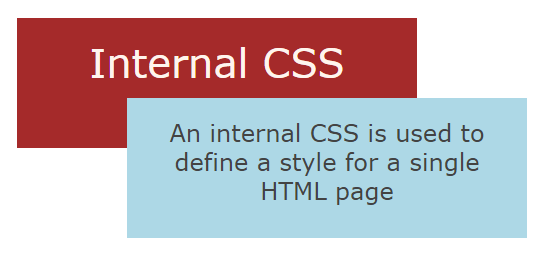
Параметр внутреннего стиля CSS популярен для применения свойств к отдельным страницам путем включения всех стилей в элемент <style>, помещенный в <head> HTML-документов.
 1// Edit HTML with internal CSS using C#
 2
 3// Create an instance of an HTML document with specified content
 4string content = "<div><p>Internal CSS</p><p>An internal CSS is used to define a style for a single HTML page</p></div>";
 5using (HTMLDocument document = new HTMLDocument(content, "."))
 6{
 7    Element style = document.CreateElement("style");
 8    style.TextContent = ".frame1 { margin-top:50px; margin-left:50px; padding:20px; width:360px; height:90px; background-color:#a52a2a; font-family:verdana; color:#FFF5EE;} \r\n" +
 9                        ".frame2 { margin-top:-90px; margin-left:160px; text-align:center; padding:20px; width:360px; height:100px; background-color:#ADD8E6;}";
10
11    // Find the document header element and append the style element to the header
12    Element head = document.GetElementsByTagName("head").First();
13    head.AppendChild(style);
14
15    // Find the first paragraph element to inspect the styles
16    HTMLElement paragraph = (HTMLElement)document.GetElementsByTagName("p").First();
17    paragraph.ClassName = "frame1";
18
19    // Find the last paragraph element to inspect the styles
20    HTMLElement lastParagraph = (HTMLElement)document.GetElementsByTagName("p").Last();
21    lastParagraph.ClassName = "frame2";
22
23    // Set a color to the first paragraph
24    paragraph.Style.FontSize = "250%";
25    paragraph.Style.TextAlign = "center";
26
27    // Set a font-size to the last paragraph
28    lastParagraph.Style.Color = "#434343";
29    lastParagraph.Style.FontSize= "150%";
30    lastParagraph.Style.FontFamily = "verdana";
31
32    // Save the HTML document to a file
33    document.Save(Path.Combine(OutputDir, "edit-internal-css.html"));
34
35    // Create the instance of the PDF output device and render the document into this device
36    using (PdfDevice device = new PdfDevice(Path.Combine(OutputDir, "edit-internal-css.pdf")))
37    {
38        // Render HTML to PDF
39        document.RenderTo(device);
40    }
41}В этом примере мы используем внутренний CSS, а также объявляем дополнительные свойства стиля для отдельных элементов, используя свойство Style элемента HTMLElement. На рисунке показан фрагмент отрендеренного файла «edit-internal-css.pdf»:
Вы можете скачать полные примеры и файлы данных с GitHub.
Внешнюю таблицу стилей можно написать в любом текстовом редакторе и сохранить с расширением .css. Это отдельный файл CSS, на который ссылается веб-страница. Преимущество внешнего CSS в том, что его можно создать один раз, а правила применить к нескольким веб-страницам.
Рассмотрим пример внешней реализации CSS, в которой мы используем ссылку на URL-адрес CSS-файла:
1// How to use an external CSS file in HTML using Aspose.HTML for .NET
2
3// Create an instance of HTML document with specified content
4string htmlContent = "<link rel=\"stylesheet\" href=\"https://docs.aspose.com/html/net/edit-html-document/external.css\" type=\"text/css\" />\r\n" +
5 "<div class=\"rect1\" ></div>\r\n" +
6 "<div class=\"rect2\" ></div>\r\n" +
7 "<div class=\"frame\">\r\n" +
8 "<p style=\"font-size:2.5em; color:#ae4566;\"> External CSS </p>\r\n" +
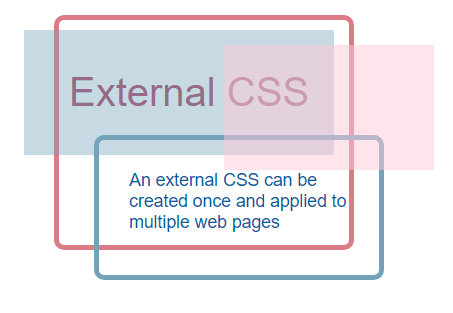
9 "<p class=\"rect3\"> An external CSS can be created once and applied to multiple web pages</p></div>\r\n";
10
11using (HTMLDocument document = new HTMLDocument(htmlContent, "."))
12{
13 // Save the HTML document to a file
14 document.Save(Path.Combine(OutputDir, "external-css.html"));
15
16 // Create the instance of the PDF output device and render the document into this device
17 using (PdfDevice device = new PdfDevice(Path.Combine(OutputDir, "external-css.pdf")))
18 {
19 // Render HTML to PDF
20 document.RenderTo(device);
21 }
22}Результат применения внешнего CSS выглядит так:
Вы можете записать содержимое для файла CSS в строку и сохранить его в отдельный связанный файл, как это показано в следующем примере:
 1// Edit HTML with external CSS using C#
 2
 3// Prepare content of a CSS file
 4string styleContent = ".flower1 { width:120px; height:40px; border-radius:20px; background:#4387be; margin-top:50px; } \r\n" +
 5                      ".flower2 { margin-left:0px; margin-top:-40px; background:#4387be; border-radius:20px; width:120px; height:40px; transform:rotate(60deg); } \r\n" +
 6                      ".flower3 { transform:rotate(-60deg); margin-left:0px; margin-top:-40px; width:120px; height:40px; border-radius:20px; background:#4387be; }\r\n" +
 7                      ".frame { margin-top:-50px; margin-left:310px; width:160px; height:50px; font-size:2em; font-family:Verdana; color:grey; }\r\n";
 8
 9// Prepare a linked CSS file
10File.WriteAllText("flower.css", styleContent);
11
12// Create an instance of an HTML document with specified content
13string htmlContent = "<link rel=\"stylesheet\" href=\"flower.css\" type=\"text/css\" /> \r\n" +
14                     "<div style=\"margin-top: 80px; margin-left:250px; transform: scale(1.3);\" >\r\n" +
15                     "<div class=\"flower1\" ></div>\r\n" +
16                     "<div class=\"flower2\" ></div>\r\n" +
17                     "<div class=\"flower3\" ></div></div>\r\n" +
18                     "<div style = \"margin-top: -90px; margin-left:120px; transform:scale(1);\" >\r\n" +
19                     "<div class=\"flower1\" style=\"background: #93cdea;\"></div>\r\n" +
20                     "<div class=\"flower2\" style=\"background: #93cdea;\"></div>\r\n" +
21                     "<div class=\"flower3\" style=\"background: #93cdea;\"></div></div>\r\n" +
22                     "<div style =\"margin-top: -90px; margin-left:-80px; transform: scale(0.7);\" >\r\n" +
23                     "<div class=\"flower1\" style=\"background: #d5effc;\"></div>\r\n" +
24                     "<div class=\"flower2\" style=\"background: #d5effc;\"></div>\r\n" +
25                     "<div class=\"flower3\" style=\"background: #d5effc;\"></div></div>\r\n" +
26                     "<p class=\"frame\">External</p>\r\n" +
27                     "<p class=\"frame\" style=\"letter-spacing:10px; font-size:2.5em \">  CSS </p>\r\n";
28
29using (HTMLDocument document = new HTMLDocument(htmlContent, "."))
30{
31    // Save the HTML document to a file
32    document.Save(Path.Combine(OutputDir, "edit-external-css.html"));
33}В этом примере показано, как создать графику CSS с нуля. Визуализация файла «edit-external-css.html» представлена на рисунке:

Как уже упоминалось, наиболее распространенным применением CSS является стилизация веб-страниц, написанных на HTML и других языках разметки. Но помимо веб-дизайна вы можете использовать CSS для создания красивой графики, подобной той, что мы показываем вам выше. Критическая концепция рисования CSS заключается в использовании радиуса границы, поворота и определения местоположения для творческого создания кривых и форм.
Вы можете скачать полные примеры и файлы данных с GitHub.
Analyzing your prompt, please hold on...
An error occurred while retrieving the results. Please refresh the page and try again.