Usando utilidades gráficas XPS | C++
Cómo fácilmente producir formas simples en XPS
La especificación XPS define elementos gráficos primitivos que se pueden utilizar para componer cualquier forma compleja. Aspose.Page para C++ proporciona clases que encapsulan estos elementos. Sin embargo, usarlos puede resultar un poco tedioso cuando se necesita producir incluso formas relativamente simples, como un sector circular o un segmento, o un n-gon regular inscrito o circunscrito alrededor de un círculo. Incluso dibujar un círculo o una elipse no es tan sencillo como podría y probablemente debería ser. Es por eso que Aspose.Page proporciona además un conjunto de métodos de utilidad que probablemente le ahorrarán tiempo al realizar dichas tareas.
En el siguiente ejemplo, utilizamos todas las utilidades de formas disponibles. Observe que todos devuelven un objeto de XpsPathGeometry, que luego puede usarse para construir rutas XPS. Y para estos trazados, puede especificar propiedades de apariencia: pinceles, patrón de trazo, opacidad, etc.
 1    // ExStart:UsingShapeUtils
 2    // For complete examples and data files, please go to https://github.com/aspose-page/Aspose.Page-for-C
 3    // The path to the documents directory.
 4    System::String dataDir = RunExamples::GetDataDir_WorkingWithShapes();
 5    // Create new XPS Document
 6    {
 7        System::SharedPtr<XpsDocument> doc = System::MakeObject<XpsDocument>();
 8        // Clearing resources under 'using' statement
 9        System::Details::DisposeGuard<1> __dispose_guard_0({ doc});
10        // ------------------------------------------
11
12        try
13        {
14            // Set first page's size.
15            doc->get_Page()->set_Width(650.f);
16            doc->get_Page()->set_Height(240.f);
17
18            // Draw a circle with center (120, 120) and radius 100.
19            System::SharedPtr<XpsPath> path = doc->CreatePath(doc->get_Utils()->CreateCircle(System::Drawing::PointF(120.f, 120.f), 100.f));
20            path->set_Fill(doc->CreateSolidColorBrush(System::Drawing::Color::get_Green()));
21            doc->Add<System::SharedPtr<XpsPath>>(path);
22
23            // Inscribe a regular pentagon in the circle.
24            path = doc->CreatePath(doc->get_Utils()->CreateRegularInscribedNGon(5, System::Drawing::PointF(120.f, 120.f), 100.f));
25            path->set_Fill(doc->CreateSolidColorBrush(System::Drawing::Color::get_Red()));
26            doc->Add<System::SharedPtr<XpsPath>>(path);
27
28            // Circumscribe a regular hexagon around the circle.
29            path = doc->CreatePath(doc->get_Utils()->CreateRegularCircumscribedNGon(6, System::Drawing::PointF(120.f, 120.f), 100.f));
30            path->set_Stroke(doc->CreateSolidColorBrush(System::Drawing::Color::get_Magenta()));
31            path->set_StrokeThickness(3.f);
32            doc->Add<System::SharedPtr<XpsPath>>(path);
33
34            // Draw a sector of the circle centered at (340, 120), starting at -45 degrees and ending at +45 degrees.
35            path = doc->CreatePath(doc->get_Utils()->CreatePieSlice(System::Drawing::PointF(340.f, 120.f), 100.f, -45.f, 45.f));
36            path->set_Stroke(doc->CreateSolidColorBrush(System::Drawing::Color::get_Red()));
37            path->set_StrokeThickness(5.f);
38            doc->Add<System::SharedPtr<XpsPath>>(path);
39
40            // Draw a segment of the circle centered at (340, 120), starting at -45 degrees and ending at +45 degrees.
41            path = doc->CreatePath(doc->get_Utils()->CreateCircularSegment(System::Drawing::PointF(340.f, 120.f), 100.f, -45.f, 45.f));
42            path->set_Fill(doc->CreateSolidColorBrush(System::Drawing::Color::get_Black()));
43            doc->Add<System::SharedPtr<XpsPath>>(path);
44
45            // Draw a rectangle with the top left vertex (530, 20), width 100 units and height 200 units.
46            path = doc->CreatePath(doc->get_Utils()->CreateRectangle(System::Drawing::RectangleF(530.f, 20.f, 100.f, 200.f)));
47            path->set_Stroke(doc->CreateSolidColorBrush(System::Drawing::Color::get_Red()));
48            doc->Add<System::SharedPtr<XpsPath>>(path);
49
50            // Draw an ellipse with center (580, 120) and radii 50 and 100.
51            path = doc->CreatePath(doc->get_Utils()->CreateEllipse(System::Drawing::PointF(580.f, 120.f), 50.f, 100.f));
52            path->set_Fill(doc->CreateSolidColorBrush(System::Drawing::Color::get_Yellow()));
53            doc->Add<System::SharedPtr<XpsPath>>(path);
54
55            doc->Save(dataDir + u"UseShapeUtilsXPS_out.xps");
56        }
57        catch(...)
58        {
59            __dispose_guard_0.SetCurrentException(std::current_exception());
60        }
61    }
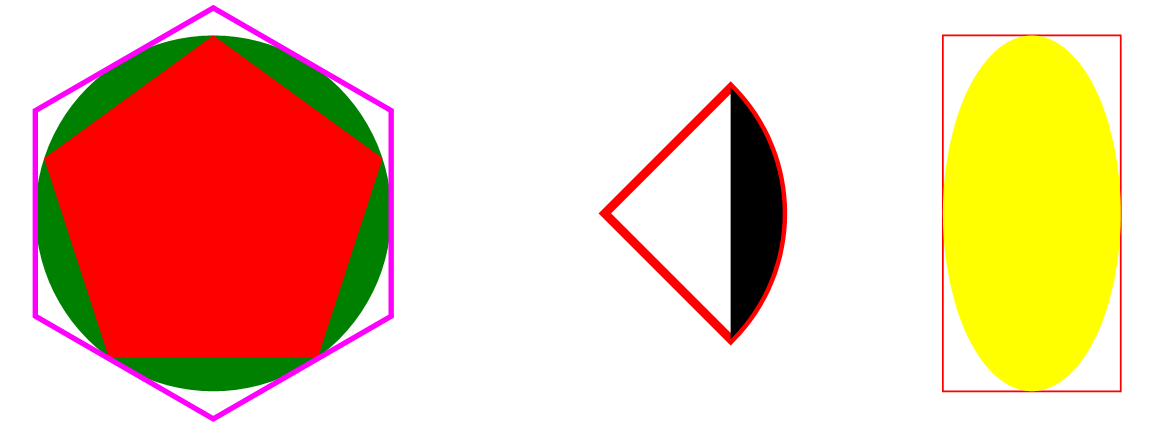
62 // ExEnd:UsingShapeUtilsComenzamos con un nuevo documento XPS, ajustando luego el tamaño de la primera página. La primera forma que colocamos en la página es un círculo (especificado por su centro y radio) relleno de color verde sólido. A continuación, inscribimos un pentágono regular rojo vacío en ese círculo. Luego viene un hexágono regular circunscrito trazado de magenta.
A la derecha, primero dibujamos un sector circular rojo (o un “porción circular”) entre -45 y +45 grados, y luego un segmento circular negro con los mismos parámetros sobre el sector.
La última parte del dibujo consta de un rectángulo rojo (especificado por el vértice superior izquierdo y las dimensiones) y una elipse amarilla (especificada por el centro y los radios), inscrita en el rectángulo. Aquí controlamos la inscripción “a mano”.
Esto es lo que se supone que debemos ver en el archivo XPS guardado:

Cómo fácilmente agregar una imagen en una página XPS
Con las primitivas definidas por la especificación XPS, agregar una imagen a una página consta de dos pasos:
- Agregar un camino rectangular que desea llenar con la imagen;
- Configuración de un pincel de imagen para la ruta, donde debe especificar un cuadro de vista y una ventana gráfica. Generalmente, necesitará conocer la resolución y el tamaño en píxeles de su imagen para proporcionar con precisión los dos primeros parámetros.
Pero, afortunadamente, existe un método conveniente entre las utilidades gráficas XPS de la API Aspose.Page para C++ que puede hacer todo (casi) el trabajo por usted. También te ofrece varios modos de ajuste. Veamos el siguiente ejemplo:
 1    // ExStart:UsingImageUtils
 2    // For complete examples and data files, please go to https://github.com/aspose-page/Aspose.Page-for-C
 3    // The path to the documents directory.
 4    System::String dataDir = RunExamples::GetDataDir_WorkingWithImages();
 5    // Create new XPS Document
 6    {
 7        System::SharedPtr<XpsDocument> doc = System::MakeObject<XpsDocument>();
 8        // Clearing resources under 'using' statement
 9        System::Details::DisposeGuard<1> __dispose_guard_0({ doc});
10        // ------------------------------------------
11
12        try
13        {
14            // Set first page's size.
15            doc->get_Page()->set_Width(540.f);
16            doc->get_Page()->set_Height(220.f);
17
18            // Draw the image box.
19            System::Drawing::RectangleF imageBox(10.f, 10.f, 200.f, 200.f);
20            System::SharedPtr<XpsPath> path = doc->AddPath(doc->get_Utils()->CreateRectangle(imageBox));
21            path->set_Stroke(doc->CreateSolidColorBrush(System::Drawing::Color::get_Black()));
22            // Add an image to fit width.
23            path = doc->get_Utils()->CreateImage(dataDir + u"R08LN_NN.jpg", imageBox, Aspose::Page::XPS::ImageMode::FitToWidth);
24            // Prevent tiling.
25            (System::ExplicitCast<Aspose::Page::XPS::XpsModel::XpsImageBrush>(path->get_Fill()))->set_TileMode(Aspose::Page::XPS::XpsModel::XpsTileMode::None);
26            doc->Add<System::SharedPtr<XpsPath>>(path);
27
28            // Add an image to fit width.
29            doc->Add<System::SharedPtr<XpsPath>>(doc->get_Utils()->CreateImage(dataDir + u"R08LN_NN.jpg", System::Drawing::RectangleF(220.f, 10.f, 200.f, 100.f), Aspose::Page::XPS::ImageMode::FitToHeight));
30
31            // Add an image to fit width.
32            doc->Add<System::SharedPtr<XpsPath>>(doc->get_Utils()->CreateImage(dataDir + u"R08LN_NN.jpg", System::Drawing::RectangleF(430.f, 10.f, 100.f, 200.f), Aspose::Page::XPS::ImageMode::FitToBox));
33
34            // Save resultant XPS document
35            doc->Save(dataDir + u"UseImageUtilsXPS_out.xps");
36        }
37        catch(...)
38        {
39            __dispose_guard_0.SetCurrentException(std::current_exception());
40        }
41    }
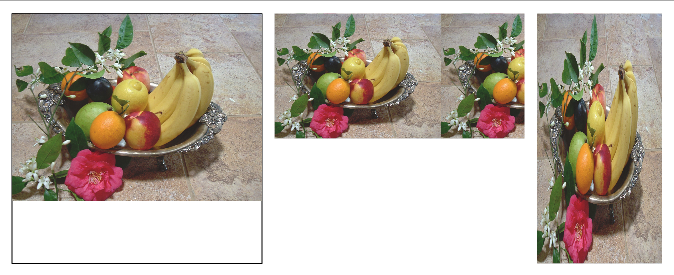
42 // ExEnd:UsingImageUtilsNuevamente, comenzamos con un nuevo documento XPS y ajustamos el tamaño de la primera página. Vale la pena señalar en este punto que, de forma predeterminada, la imagen que se usa como pincel se colocará en mosaico en el área rectangular de la misma manera que si se usara en el modo XpsTileMode.Tile. Sin embargo, en la primera parte del ejemplo, demostramos cómo evitar este mosaico.
Entonces, primero queremos que la imagen aparezca en (10, 10) y que se ajuste al ancho de la caja rectangular que tiene 200 unidades de ancho y 200 unidades de alto. Para ver más claro el resultado, primero dibujamos el propio cuadro. A continuación, creamos la imagen (tenga en cuenta que en realidad es un camino relleno). Finalmente, después de obtener el relleno de la ruta y convertirlo en
XpsImageBrush, configuramos la propiedad TileMode en XpsTileMode.None.
A la derecha colocamos la misma imagen y la hacemos ajustar a la altura del cuadro de imagen. Tenga en cuenta el mosaico.
Finalmente, volvemos a colocar la misma imagen a la derecha y hacemos que se ajuste tanto al alto como al ancho del cuadro de imagen, lo que distorsiona la imagen.
Y aquí está el resultado en el archivo XPS guardado:
