Trabajar con transparencia en un archivo XPS | Java
Agregar objeto transparente dentro del documento XPS
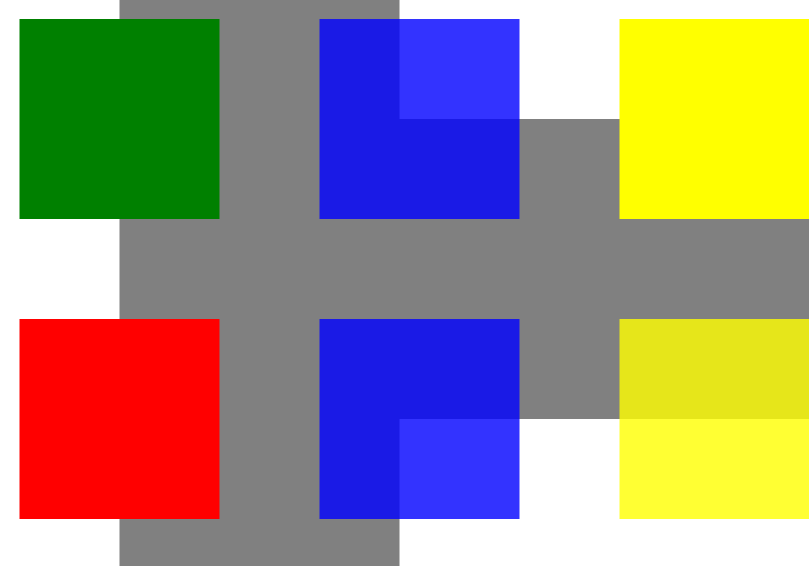
Aspose.Page para Java ofrece la clase XpsPath , con la que puedes agregar objetos transparentes en documentos XPS. Debe especificar PathGeometry y agregarlo a XpsPath. El siguiente fragmento de código muestra la funcionalidad completa para agregar un objeto transparente en un documento XPS:
 1// Demonstrates transparency in shapes in XPS document.
 2
 3// Create new XPS Document
 4XpsDocument doc = new XpsDocument();
 5
 6String outputFileName = "AddTransparentObject_outXPS.xps";
 7
 8// Just to demonstrate transparency - draw background rectangles
 9doc.addPath(doc.createPathGeometry("M120,0 H400 v1000 H120")).setFill(doc.createSolidColorBrush(doc.createColor(128,128,128)));
10doc.addPath(doc.createPathGeometry("M300,120 h600 V420 h-600")).setFill(doc.createSolidColorBrush(doc.createColor(128,128,128)));
11
12// Create path with closed rectangle geometry
13XpsPath path1 = doc.createPath(doc.createPathGeometry("M20,20 h200 v200 h-200 z"));
14// Set blue solid brush to fill path1
15path1.setFill(doc.createSolidColorBrush(doc.createColor(0, 0, 255)));
16// Add it to the current page
17XpsPath path2 = doc.add(path1);
18
19// path1 and path2 are the same as long as path1 has no parent. Setting fill on path2 affects shared brush
20path2.setFill(doc.createSolidColorBrush(doc.createColor(0, 128, 0)));
21
22// Now add path2 once again. Now path2 has parent. So path3 won't be the same as path2.
23XpsPath path3 = doc.add(path2);
24// shift it 300 units lower
25path3.setRenderTransform(doc.createMatrix(1f, 0f, 0f, 1f, 0f, 300f));
26// set red solid brush to fill it
27path3.setFill(doc.createSolidColorBrush(doc.createColor(255, 0, 0)));
28
29// Create new path4 with path2's geometry ...
30XpsPath path4 = doc.addPath(path2.getData());
31// shift it 300 units to the right ...
32path4.setRenderTransform(doc.createMatrix(1f, 0f, 0f, 1f, 300f, 0f));
33// and set blue solid fill
34path4.setFill(doc.createSolidColorBrush(doc.createColor(0, 0, 255)));
35
36// Add path4 once again.
37XpsPath path5 = doc.add(path4);
38// move path5 300 units lower and disconnect render transform from path4
39path5.setRenderTransform(path5.getRenderTransform().deepClone());
40path5.getRenderTransform().translate(0f, 300f);
41// set the opacity of Fill property - this will affect both path5 and path4 if brush instance is shared
42path5.getFill().setOpacity(0.8f);
43
44// Create new path6 with path2's geometry ...
45XpsPath path6 = doc.addPath(path2.getData());
46// shift it 600 units to the right ...
47path6.setRenderTransform(doc.createMatrix(1f, 0f, 0f, 1f, 600f, 0f));
48// and set yellow solid fill
49path6.setFill(doc.createSolidColorBrush(doc.createColor(255, 255, 0)));
50
51// Now add path6's clone ...
52XpsPath path7 = doc.add(path6.deepClone());
53// move it 300 units lower
54path7.setRenderTransform(path7.getRenderTransform().deepClone());
55path7.getRenderTransform().translate(0f, 300f);
56// set opacity for path7
57path7.getFill().setOpacity(0.8f);
58
59// Save resultant XPS document
60doc.save(getOutputDir() + outputFileName);El resultado
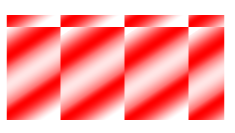
Establecer máscara de opacidad
La solución ofrece la propiedad setOpacityMask() , con la que puede configurar la máscara de opacidad en un documento XPS. Debe crear PathGeometry y agregarlo a XpsPath. Se puede usar una imagen como máscara de opacidad y el componente Alfa de cada píxel se usa para aplicar sobre el relleno subyacente. El documento XPS generado mostrará franjas degradadas inclinadas como un archivo de imagen de origen presente. El siguiente fragmento de código muestra la funcionalidad completa para configurar la máscara de opacidad:
 1// Apply opacity mask for texture pattern in XPS document.
 2
 3// Create new XPS Document
 4XpsDocument doc = new XpsDocument();
 5
 6String outputFileName = "OpacityMask_out.xps";
 7
 8//Add Canvas to XpsDocument instance
 9XpsCanvas canvas = doc.addCanvas();
10// Rectangle with opacity masked by ImageBrush
11XpsPath path = canvas.addPath(doc.createPathGeometry("M 10,180 L 228,180 228,285 10,285"));
12path.setFill(doc.createSolidColorBrush(doc.createColor(255, 0, 0)));
13path.setOpacityMask((XpsImageBrush)doc.createImageBrush(getDataDir() + "R08SY_NN.tif", new Rectangle2D.Float(0f, 0f, 128f, 192f),
14        new Rectangle2D.Float(0f, 0f, 64f, 96f)));
15((XpsImageBrush)path.getOpacityMask()).setTileMode(XpsTileMode.Tile);
16// Save resultant XPS document
17doc.save(getOutputDir() + outputFileName);El resultado
Puede descargar ejemplos y archivos de datos desde GitHub.