Trabajar con imágenes en archivos XPS | Python
Aquí encontrarás el código que te explica cómo trabajar con imágenes en archivos XPS usando Python.
Agregar imágenes dentro de documentos XPS
Aspose.Page para Python vía .NET proporciona la clase XpsPath, que le permite incorporar imágenes en documentos XPS. Para lograr esto, debe crear una Matriz y un ImageBrush, y luego guardar el XpsDocument. El siguiente fragmento de código demuestra la funcionalidad completa para agregar una imagen a un documento XPS:
 1from aspose.page.xps import *
 2from aspose.page.xps.xpsmodel import *
 3import aspose.pydrawing
 4from util import Util
 5# The path to the documents directory.
 6data_dir = Util.get_data_dir_working_with_images()
 7# Create a new XPS Document
 8doc = XpsDocument()
 9# Add an Image
10path = doc.add_path(doc.create_path_geometry("M 30,20 l 258.24,0 0,56.64 -258.24,0 Z"))
11# Creating a matrix is optional, it can be used for the proper positioning
12path.render_transform = doc.create_matrix(0.7, 0, 0, 0.7, 0, 20)
13# Create an Image Brush
14path.fill = doc.create_image_brush(data_dir + "QL_logo_color.tif", aspose.pydrawing.RectangleF(0, 0, 258.24, 56.64),
15aspose.pydrawing.RectangleF(50, 20, 193.68, 42.48))
16# Save the resultant XPS document
17doc.save(data_dir + "AddImage_outXPS.xps")El resultado of running this code is next

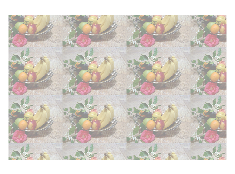
Agregar imágenes en mosaico
Aspose.Page para Python vía .NET proporciona la clase XpsPath, que le permite incorporar imágenes en documentos XPS. Para lograr esto, debe crear una Matriz y un ImageBrush, luego configurar el modo de mosaico en set_tile_mode(XpsTileMode.Tile) y, finalmente, guardar el XpsDocument. El siguiente fragmento de código demuestra la funcionalidad completa para agregar una imagen en mosaico a un documento XPS:
 1from aspose.page.xps import *
 2from aspose.page.xps.xpsmodel import *
 3import aspose.pydrawing
 4from util import Util
 5# The path to the documents directory.
 6data_dir = Util.get_data_dir_working_with_images()
 7# Create a new XPS Document
 8doc = XpsDocument()
 9# Tile an image
10# ImageBrush filled rectangle in the right top bellow
11path = doc.add_path(doc.create_path_geometry("M 10,160 L 228,160 228,305 10,305"))
12imageBrush: XpsImageBrush = doc.create_image_brush(data_dir + "R08LN_NN.jpg", aspose.pydrawing.RectangleF(0, 0, 128, 96),
13    aspose.pydrawing.RectangleF(0, 0, 64, 48))
14path.fill = imageBrush
15imageBrush.tile_mode = XpsTileMode.TILE
16path.fill.opacity = 0.5
17# Save the resultant XPS document
18doc.save(data_dir + "AddTiledImage_outXPS.xps")El resultado of running this code is next
Puede descargar ejemplos y archivos de datos desde GitHub.