Travailler avec des clips dans PostScript | C++
Ajouter un clip dans un document PS
Un clip dans un document PS est un chemin qui délimite le contenu de l’état graphique actuel qui sera affiché dans la visionneuse ou l’éditeur PS. Le contenu laissé au-delà des limites sera coupé.
Un chemin de détourage en C++ peut être attribué de trois manières :
- par System.Drawing.Drawing2D.GraphicsPath qui peut contenir n’importe quelle forme fermée ;
- par contour de texte ;
- par une image bicolore de 1 bpp (bits par pixel) comme masque de pochoir ;
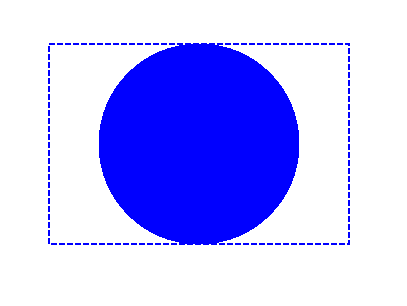
À l’heure actuelle, la bibliothèque Aspose.Page pour C++ propose la première et la deuxième manière de découper. Dans l’exemple ci-dessous, nous obtenons un cercle System.Drawing.Drawing2D.GraphicsPath à partir d’un rectangle comme chemin de détourage et découpons un rectangle rempli de bleu dans le même état graphique.
Afin d’ajouter un clip au nouveau PsDocument avec la bibliothèque Aspose.Page pour C++ dans cet exemple, nous procédons comme suit :
- Créez un flux de sortie pour le fichier PS résultant.
- Créez l’objet PsSaveOptions avec les options par défaut.
- Créez un PsDocument d’une page avec un flux de sortie déjà créé et enregistrez les options.
- Créez un nouvel état graphique.
- Créez un cercle System.Drawing.Drawing2D.GraphicsPath à partir du rectangle.
- Définissez un clip avec ce chemin.
- Définissez une peinture sur l’état graphique actuel de PsDocument.
- Remplissez le chemin du rectangle avec la peinture actuelle.
- Quittez l’état graphique actuel pour passer au niveau supérieur.
- Traduisez à la place du rectangle rempli.
- Tracez avec une ligne pointillée les limites du même rectangle au-dessus de celui rempli pour afficher les limites du rectangle rempli coupé.
- Fermez la page.
- Enregistrez le document.
 1    // The path to the documents directory.
 2    System::String dataDir = RunExamples::GetDataDir_WorkingWithCanvas();
 3
 4    //Create output stream for PostScript document
 5    {
 6        System::SharedPtr<System::IO::Stream> outPsStream = System::MakeObject<System::IO::FileStream>(dataDir + u"Clipping_outPS.ps", System::IO::FileMode::Create);
 7        // Clearing resources under 'using' statement
 8        System::Details::DisposeGuard<1> __dispose_guard_0({ outPsStream});
 9        // ------------------------------------------
10
11        try
12        {
13            //Create save options with default values
14            System::SharedPtr<PsSaveOptions> options = System::MakeObject<PsSaveOptions>();
15
16            // Create new 1-paged PS Document
17            System::SharedPtr<PsDocument> document = System::MakeObject<PsDocument>(outPsStream, options, false);
18
19            //Create graphics path from the rectangle
20            System::SharedPtr<System::Drawing::Drawing2D::GraphicsPath> rectanglePath = System::MakeObject<System::Drawing::Drawing2D::GraphicsPath>();
21            rectanglePath->AddRectangle(System::Drawing::RectangleF(0.0f, 0.0f, 300.0f, 200.0f));
22
23            ////////////////////////////////////// Clipping by shape //////////////////////////////////////////////////////////////////////
24
25            //Save graphics state in order to return back to this state after transformation
26            document->WriteGraphicsSave();
27
28            //Displace current graphics state on 100 points to the right and 100 points to the bottom.
29            document->Translate(100.0f, 100.0f);
30
31            //Create graphics path from the circle
32            System::SharedPtr<System::Drawing::Drawing2D::GraphicsPath> circlePath = System::MakeObject<System::Drawing::Drawing2D::GraphicsPath>();
33            circlePath->AddEllipse(System::Drawing::RectangleF(50.0f, 0.0f, 200.0f, 200.0f));
34
35            //Add clipping by circle to the current graphics state
36            document->Clip(circlePath);
37
38            //Set paint in the current graphics state
39            document->SetPaint(System::MakeObject<System::Drawing::SolidBrush>(System::Drawing::Color::get_Blue()));
40
41            //Fill the rectangle in the current graphics state (with clipping)
42            document->Fill(rectanglePath);
43
44            //Restore graphics state to the previus (upper) level
45            document->WriteGraphicsRestore();
46
47            //Displace upper level graphics state on 100 points to the right and 100 points to the bottom.
48            document->Translate(100.0f, 100.0f);
49
50            System::SharedPtr<System::Drawing::Pen> pen = System::MakeObject<System::Drawing::Pen>(System::MakeObject<System::Drawing::SolidBrush>(System::Drawing::Color::get_Blue()), 2.0f);
51            pen->set_DashStyle(System::Drawing::Drawing2D::DashStyle::Dash);
52
53            document->SetStroke(pen);
54
55            //Draw the rectangle in the current graphics state (has no clipping) above clipped rectangle
56            document->Draw(rectanglePath);
57
58            ////////////////////////////////////// Clipping by text //////////////////////////////////////////////////////////////////////
59
60            //Save graphics state in order to return back to this state after transformation
61            document->WriteGraphicsSave();
62
63            //Displace current graphics state on 100 points to the right and 100 points to the bottom.
64            document->Translate(0.0f, 350.0f);
65
66            int32_t fontSize = 120;
67            System::SharedPtr<System::Drawing::Font> font = System::MakeObject<System::Drawing::Font>(u"Arial", static_cast<float>(fontSize), System::Drawing::FontStyle::Bold);
68
69            //Clip rectangle by text's outline
70            document->ClipText(u"ABC", font, 20.0f, static_cast<float>(fontSize + 10));
71            document->Fill(rectanglePath);
72
73            document->WriteGraphicsRestore();
74
75            document->Translate(0.0f, 350.0f);
76
77            document->SetStroke(pen);
78            //Draw the rectangle in the current graphics state (has no clipping) above clipped rectangle
79            document->Draw(rectanglePath);
80
81            //////////////////////////////////////////////////////////////////////////////////////////////////////////////////////////////
82
83            //Close current page
84            document->ClosePage();
85
86            //Save the document
87            document->Save();
88        }
89        catch(...)
90        {
91            __dispose_guard_0.SetCurrentException(std::current_exception());
92        }
93    }
Voir Travailler avec des clips dans des documents PS dans Java.
Le résultat de l’exécution de ce code apparaît comme

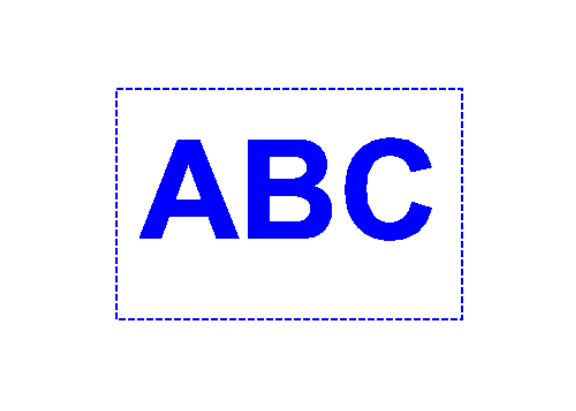
Dans l’exemple suivant, nous obtenons une police qui découpe un rectangle rempli de bleu avec le contour du texte.
Afin d’ajouter un extrait de texte au nouveau PsDocument avec la bibliothèque Aspose.Page pour C++ dans cet exemple, nous procédons comme suit :
- Créez un flux de sortie pour le fichier PS résultant.
- Créez un objet PsSaveOptions avec les options par défaut.
- Créez un PsDocument d’une page avec un flux de sortie déjà créé et enregistrez les options.
- Créez un nouvel état graphique.
- Créez une police.
- Définissez un clip avec le texte et la police.
- Définissez une peinture sur l’état graphique actuel de PsDocument.
- Remplissez le chemin du rectangle avec la peinture actuelle.
- Quittez l’état graphique actuel pour passer au niveau supérieur.
- Traduisez à la place du rectangle rempli.
- Tracez avec une ligne pointillée les limites du même rectangle au-dessus de celui rempli pour afficher les limites du rectangle rempli coupé.
- Fermez la page.
- Enregistrez le document.
 1//Create an output stream for the PostScript document
 2using (Stream outPsStream = new FileStream(dataDir + "Clipping_outPS.ps", FileMode.Create))
 3{
 4    //Create save options with default values
 5    PsSaveOptions options = new PsSaveOptions();
 6
 7    // Create a new 1-paged PS Document
 8    PsDocument document = new PsDocument(outPsStream, options, false);
 9
10    //Create a graphics path from the rectangle
11    GraphicsPath rectangePath = new GraphicsPath();
12    rectangePath.AddRectangle(new RectangleF(0, 0, 300, 200));
13
14    //Save the graphics state in order to return back to this state after transformation
15    document.WriteGraphicsSave();
16
17    //Displace the current graphics state on 100 points to the right and 100 points to the bottom.
18    document.Translate(100, 100);
19
20    //Set the paint in the current graphics state
21    document.SetPaint(new SolidBrush(Color.Blue));
22
23    //Create a font
24    int fontSize = 120;
25    Font font = new Font("Arial", fontSize, FontStyle.Bold);
26
27    //Clip the rectangle by text's outline
28    document.ClipText("ABC", font, 20, fontSize + 10);
29    document.Fill(rectanglePath);
30
31    //Restore the graphics state to the previus (upper) level
32    document.WriteGraphicsRestore();
33
34		//Displace the upper level graphics state on 100 points to the right and 100 points to the bottom.
35    document.Translate(100, 100);
36
37		Pen pen = new Pen(new SolidBrush(Color.Blue), 2);
38    pen.DashStyle = DashStyle.Dash;
39
40    document.SetStroke(pen);
41
42    //Draw the rectangle in the current graphics state (has no clipping) above the clipped rectangle
43    document.Draw(rectanglePath);
44
45    //Close the current page
46    document.ClosePage();
47
48    //Save the document
49    document.Save();
50}Le résultat de l’exécution de ce code apparaît comme

Vous pouvez télécharger des exemples et des fichiers de données à partir de GitHub.