Travailler avec transparence | C++
Définir le masque d’opacité
Définir l’objet de masque d’opacité
Il est possible de définir un masque d’opacité sur un document XPS. Aspose.Page pour C++ peut être utilisé pour créer/lire un document XPS et définir un masque d’opacité sur ces documents. L’API utilise l’image comme masque d’opacité où le composant Alpha de chaque pixel est utilisé pour s’appliquer sur le remplissage sous-jacent. Le document XPS résultant affichera des bandes de dégradé inclinées présentes sur le fichier image source. Pour définir le masque d’opacité sur un document XPS, les étapes suivantes peuvent être utilisées.
- Créez un nouvel objet de la classe XpsDocument
- Ajoutez un canevas à l’objet document à l’aide de la classe XpsCanvas
- Créez une classe d’objet XpsPath avec les paramètres requis
- Définissez le masque d’opacité sur le chemin
- Créez un objet de classe XpsImageBrush
- Enregistrez le document sur le disque en utilisant la méthode Save
 1For complete examples and data files, please go to https://github.com/aspose-page/Aspose.Page-for-C
 2// Create new XPS Document
 3System::SharedPtr<XpsDocument> doc = System::MakeObject<XpsDocument>();
 4//Add Canvas to XpsDocument instance
 5System::SharedPtr<XpsCanvas> canvas = doc->AddCanvas();
 6// Rectangle with opacity masked by ImageBrush
 7System::SharedPtr<XpsPath> path = canvas->AddPath(doc->CreatePathGeometry(u"M 10,180 L 228,180 228,285 10,285"));
 8path->set_Fill(doc->CreateSolidColorBrush(doc->CreateColor(1.0f, 0.0f, 0.0f)));
 9path->set_OpacityMask(doc->CreateImageBrush(dataDir() + u"R08SY_NN.tif", System::Drawing::RectangleF(0.f, 0.f, 128.f, 192.f), System::Drawing::RectangleF(0.f, 0.f, 64.f, 96.f)));
10(System::DynamicCast<Aspose::Page::Xps::XpsModel::XpsImageBrush>(path->get_OpacityMask()))->set_TileMode(Aspose::Page::Xps::XpsModel::XpsTileMode::Tile);
11// Save resultant XPS document
12doc->Save(outDir() + u"OpacityMask_out.xps");Ajouter un objet transparent dans le document XPS
Ajouter un objet transparent
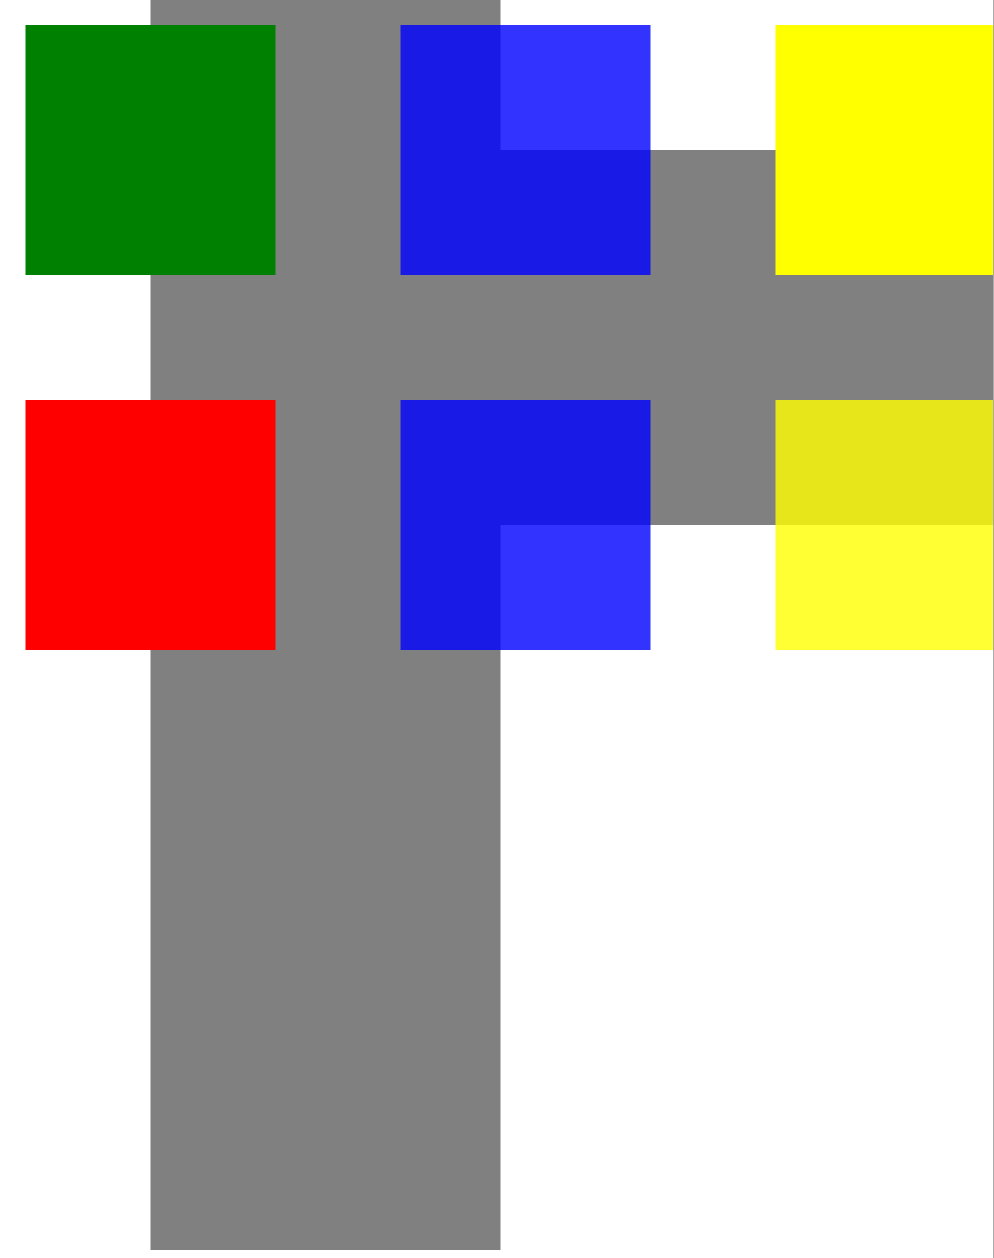
Aspose.Page pour C++ vous permet d’ajouter des objets transparents à un document XPS dans vos applications. La classe XpsPath est utilisée pour y parvenir à l’aide d’un code simple. Afin d’ajouter un objet transparent au document XPS, les étapes suivantes peuvent être utilisées.
- Créez un nouvel objet en utilisant la classe XpsDocument
- Créez un objet XpsPath avec les paramètres requis
- Définissez les informations de transformation de rendu pour le chemin
- Utilisez la méthode set_Opacity pour spécifier la valeur d’opacité
- Enregistrez le document XPS à l’aide de la méthode Save.
 1For complete examples and data files, please go to https://github.com/aspose-page/Aspose.Page-for-C
 2// Create new XPS Document
 3auto doc = System::MakeObject<XpsDocument>();
 4
 5// Just to demonstrate transparency
 6doc->AddPath(doc->CreatePathGeometry(u"M120,0 H400 v1000 H120"))->set_Fill(doc->CreateSolidColorBrush(System::Drawing::Color::get_Gray()));
 7doc->AddPath(doc->CreatePathGeometry(u"M300,120 h600 V420 h-600"))->set_Fill(doc->CreateSolidColorBrush(System::Drawing::Color::get_Gray()));
 8
 9// Create path with closed rectangle geometry
10System::SharedPtr<XpsPath> path1 = doc->CreatePath(doc->CreatePathGeometry(u"M20,20 h200 v200 h-200 z"));
11// Set blue solid brush to fill path1
12path1->set_Fill(doc->CreateSolidColorBrush(System::Drawing::Color::get_Blue()));
13// Add it to the current page
14System::SharedPtr<XpsPath> path2 = doc->Add(path1);
15
16// path1 and path2 are the same as soon as path1 hasn't been placed inside any other element
17// (which means that path1 had no parent element).
18// Because of that rectangle's color on the page effectively turns to green
19path2->set_Fill(doc->CreateSolidColorBrush(System::Drawing::Color::get_Green()));
20
21// Now add path2 once again. Now path2 has parent. So path3 won't be the same as path2.
22// Thus a new rectangle is painted on the page ...
23System::SharedPtr<XpsPath> path3 = doc->Add(path2);
24// ... and we shift it 300 units lower ...
25path3->set_RenderTransform(doc->CreateMatrix(1.0f, 0.0f, 0.0f, 1.0f, 0.0f, 300.0f));
26// ... and set red solid brush to fill it
27path3->set_Fill(doc->CreateSolidColorBrush(System::Drawing::Color::get_Red()));
28
29// Create new path4 with path2's geometry ...
30System::SharedPtr<XpsPath> path4 = doc->AddPath(path2->get_Data());
31// ... shift it 300 units to the right ...
32path4->set_RenderTransform(doc->CreateMatrix(1.0f, 0.0f, 0.0f, 1.0f, 300.0f, 0.0f));
33// ... and set blue solid fill
34path4->set_Fill(doc->CreateSolidColorBrush(System::Drawing::Color::get_Blue()));
35
36// Add path4 once again.
37System::SharedPtr<XpsPath> path5 = doc->Add(path4);
38// path4 and path5 are not the same again ...
39// (move path5 300 units lower)
40path5->set_RenderTransform(path5->get_RenderTransform()->Clone());
41// to disconnect RenderTransform value from path4 (see next comment about Fill property)
42path5->get_RenderTransform()->Translate(0.0f, 300.0f);
43// ... but if we set the opacity of Fill property, it will take effect on both path5 and path4
44// because brush is a complex property value which remains the same for path5 and path4
45path5->get_Fill()->set_Opacity(0.8f);
46
47// Create new path6 with path2's geometry ...
48System::SharedPtr<XpsPath> path6 = doc->AddPath(path2->get_Data());
49// ... shift it 600 units to the right ...
50path6->set_RenderTransform(doc->CreateMatrix(1.0f, 0.0f, 0.0f, 1.0f, 600.0f, 0.0f));
51// ... and set yellow solid fill
52path6->set_Fill(doc->CreateSolidColorBrush(System::Drawing::Color::get_Yellow()));
53
54// Now add path6's clone ...
55System::SharedPtr<XpsPath> path7 = doc->Add(path6->Clone());
56// (move path5 300 units lower)
57path7->set_RenderTransform(path7->get_RenderTransform()->Clone());
58path7->get_RenderTransform()->Translate(0.0f, 300.0f);
59// ... and set opacity for path7
60path7->get_Fill()->set_Opacity(0.8f);
61// Now opacity effects independantly as soon as property values are cloned along with the element
62
63// The following code block is equivalent to the previous one.
64// Add path6 itself. path6 and path7 are not the same. Although their Fill property values are the same
65//XpsPath path7 = doc.Add(path6);
66//path7.RenderTransform = path7.RenderTransform.Clone();
67//path7.RenderTransform.Translate(0, 300);
68// To "disconnect" path7's Fill property from path6's Fill property reassign it to its clone (or path6's Fill clone)
69//path7.Fill = ((XpsSolidColorBrush)path7.Fill).Clone();
70//path7.Fill.Opacity = 0.8f;
71
72// Save resultant XPS document
73doc->Save(outDir() + u"WorkingWithTransparency_out.xps");Le résultat comme ça
