Lavorare con le clip in PostScript | C++
Aggiungi clip in un documento PS
Una clip in un documento PS è un tracciato che delimita il contenuto dello stato grafico corrente che verrà visualizzato nel visualizzatore o nell’editor PS. Il contenuto che rimane oltre i limiti verrà tagliato.
Un tracciato di ritaglio in C++ può essere assegnato in tre modi:
tramite System.Drawing.Drawing2D.GraphicsPath che può contenere qualsiasi forma chiusa;
tramite contorno di testo;
tramite immagine a 2 colori a 1 bpp (bit per pixel) come maschera stencil;
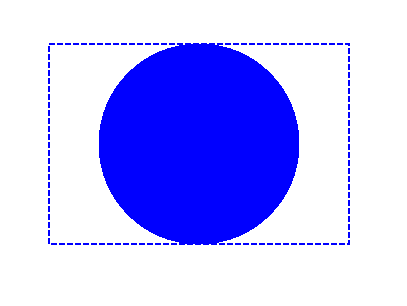
Al momento, la libreria Aspose.Page per C++ offre il primo e il secondo metodo di ritaglio. Nell’esempio seguente otteniamo un cerchio System.Drawing.Drawing2D.GraphicsPath da un rettangolo come tracciato di ritaglio e ritagliamo un rettangolo riempito di blu nello stesso stato grafico.
Per aggiungere una clip al nuovo PsDocument con la libreria Aspose.Page per C++, in questo esempio seguiamo i seguenti passaggi:
- Creiamo un flusso di output per il file PS risultante.
- Creiamo l’oggetto PsSaveOptions con le opzioni predefinite.
- Creiamo un PsDocument a pagina singola con un flusso di output già creato e opzioni di salvataggio.
- Creiamo un nuovo stato grafico.
- Creiamo un cerchio System.Drawing.Drawing2D.GraphicsPath dal rettangolo.
- Imposta una clip con questo percorso.
- Imposta un’immagine sullo stato grafico corrente del PsDocument. 8. Riempi il tracciato del rettangolo con il colore corrente.
- Esci dallo stato grafico corrente e torna al livello superiore.
- Trasla nella posizione del rettangolo riempito.
- Traccia con una linea tratteggiata i limiti dello stesso rettangolo sopra quello riempito per mostrare i limiti del rettangolo riempito ritagliato.
- Chiudi la pagina.
- Salva il documento.
 1    // The path to the documents directory.
 2    System::String dataDir = RunExamples::GetDataDir_WorkingWithCanvas();
 3
 4    //Create output stream for PostScript document
 5    {
 6        System::SharedPtr<System::IO::Stream> outPsStream = System::MakeObject<System::IO::FileStream>(dataDir + u"Clipping_outPS.ps", System::IO::FileMode::Create);
 7        // Clearing resources under 'using' statement
 8        System::Details::DisposeGuard<1> __dispose_guard_0({ outPsStream});
 9        // ------------------------------------------
10
11        try
12        {
13            //Create save options with default values
14            System::SharedPtr<PsSaveOptions> options = System::MakeObject<PsSaveOptions>();
15
16            // Create new 1-paged PS Document
17            System::SharedPtr<PsDocument> document = System::MakeObject<PsDocument>(outPsStream, options, false);
18
19            //Create graphics path from the rectangle
20            System::SharedPtr<System::Drawing::Drawing2D::GraphicsPath> rectanglePath = System::MakeObject<System::Drawing::Drawing2D::GraphicsPath>();
21            rectanglePath->AddRectangle(System::Drawing::RectangleF(0.0f, 0.0f, 300.0f, 200.0f));
22
23            ////////////////////////////////////// Clipping by shape //////////////////////////////////////////////////////////////////////
24
25            //Save graphics state in order to return back to this state after transformation
26            document->WriteGraphicsSave();
27
28            //Displace current graphics state on 100 points to the right and 100 points to the bottom.
29            document->Translate(100.0f, 100.0f);
30
31            //Create graphics path from the circle
32            System::SharedPtr<System::Drawing::Drawing2D::GraphicsPath> circlePath = System::MakeObject<System::Drawing::Drawing2D::GraphicsPath>();
33            circlePath->AddEllipse(System::Drawing::RectangleF(50.0f, 0.0f, 200.0f, 200.0f));
34
35            //Add clipping by circle to the current graphics state
36            document->Clip(circlePath);
37
38            //Set paint in the current graphics state
39            document->SetPaint(System::MakeObject<System::Drawing::SolidBrush>(System::Drawing::Color::get_Blue()));
40
41            //Fill the rectangle in the current graphics state (with clipping)
42            document->Fill(rectanglePath);
43
44            //Restore graphics state to the previus (upper) level
45            document->WriteGraphicsRestore();
46
47            //Displace upper level graphics state on 100 points to the right and 100 points to the bottom.
48            document->Translate(100.0f, 100.0f);
49
50            System::SharedPtr<System::Drawing::Pen> pen = System::MakeObject<System::Drawing::Pen>(System::MakeObject<System::Drawing::SolidBrush>(System::Drawing::Color::get_Blue()), 2.0f);
51            pen->set_DashStyle(System::Drawing::Drawing2D::DashStyle::Dash);
52
53            document->SetStroke(pen);
54
55            //Draw the rectangle in the current graphics state (has no clipping) above clipped rectangle
56            document->Draw(rectanglePath);
57
58            ////////////////////////////////////// Clipping by text //////////////////////////////////////////////////////////////////////
59
60            //Save graphics state in order to return back to this state after transformation
61            document->WriteGraphicsSave();
62
63            //Displace current graphics state on 100 points to the right and 100 points to the bottom.
64            document->Translate(0.0f, 350.0f);
65
66            int32_t fontSize = 120;
67            System::SharedPtr<System::Drawing::Font> font = System::MakeObject<System::Drawing::Font>(u"Arial", static_cast<float>(fontSize), System::Drawing::FontStyle::Bold);
68
69            //Clip rectangle by text's outline
70            document->ClipText(u"ABC", font, 20.0f, static_cast<float>(fontSize + 10));
71            document->Fill(rectanglePath);
72
73            document->WriteGraphicsRestore();
74
75            document->Translate(0.0f, 350.0f);
76
77            document->SetStroke(pen);
78            //Draw the rectangle in the current graphics state (has no clipping) above clipped rectangle
79            document->Draw(rectanglePath);
80
81            //////////////////////////////////////////////////////////////////////////////////////////////////////////////////////////////
82
83            //Close current page
84            document->ClosePage();
85
86            //Save the document
87            document->Save();
88        }
89        catch(...)
90        {
91            __dispose_guard_0.SetCurrentException(std::current_exception());
92        }
93    }
Vedi come lavorare con le clip nei documenti PS in Java.
Il risultato dell’esecuzione di questo codice viene visualizzato come
Nel prossimo esempio, otteniamo un font che ritaglia un rettangolo blu con il contorno del testo.
Per aggiungere un ritaglio di testo al nuovo PsDocument con la libreria Aspose.Page per C++, in questo esempio seguiamo i seguenti passaggi:
- Creare un flusso di output per il file PS risultante. 2. Crea un oggetto PsSaveOptions con opzioni predefinite.
- Crea un PsDocument a pagina singola con un flusso di output già creato e opzioni di salvataggio.
- Crea un nuovo stato grafico.
- Crea un font.
- Imposta un ritaglio con testo e font.
- Imposta un colore sullo stato grafico corrente del PsDocument.
- Riempi il percorso del rettangolo con il colore corrente.
- Esci dallo stato grafico corrente e passa a quello di livello superiore.
- Trasla nella posizione del rettangolo riempito.
- Traccia con una linea tratteggiata i limiti dello stesso rettangolo sopra quello riempito per mostrare i limiti del rettangolo riempito ritagliato.
- Chiudi la pagina.
- Salva il documento.
 1//Create an output stream for the PostScript document
 2using (Stream outPsStream = new FileStream(dataDir + "Clipping_outPS.ps", FileMode.Create))
 3{
 4    //Create save options with default values
 5    PsSaveOptions options = new PsSaveOptions();
 6
 7    // Create a new 1-paged PS Document
 8    PsDocument document = new PsDocument(outPsStream, options, false);
 9
10    //Create a graphics path from the rectangle
11    GraphicsPath rectangePath = new GraphicsPath();
12    rectangePath.AddRectangle(new RectangleF(0, 0, 300, 200));
13
14    //Save the graphics state in order to return back to this state after transformation
15    document.WriteGraphicsSave();
16
17    //Displace the current graphics state on 100 points to the right and 100 points to the bottom.
18    document.Translate(100, 100);
19
20    //Set the paint in the current graphics state
21    document.SetPaint(new SolidBrush(Color.Blue));
22
23    //Create a font
24    int fontSize = 120;
25    Font font = new Font("Arial", fontSize, FontStyle.Bold);
26
27    //Clip the rectangle by text's outline
28    document.ClipText("ABC", font, 20, fontSize + 10);
29    document.Fill(rectanglePath);
30
31    //Restore the graphics state to the previus (upper) level
32    document.WriteGraphicsRestore();
33
34		//Displace the upper level graphics state on 100 points to the right and 100 points to the bottom.
35    document.Translate(100, 100);
36
37		Pen pen = new Pen(new SolidBrush(Color.Blue), 2);
38    pen.DashStyle = DashStyle.Dash;
39
40    document.SetStroke(pen);
41
42    //Draw the rectangle in the current graphics state (has no clipping) above the clipped rectangle
43    document.Draw(rectanglePath);
44
45    //Close the current page
46    document.ClosePage();
47
48    //Save the document
49    document.Save();
50}Il risultato dell’esecuzione di questo codice viene visualizzato come

Puoi scaricare esempi e file di dati da GitHub.