Lavorare con le texture in PostScript | C++
Aggiungi un pattern di texture a mosaico in un documento PS
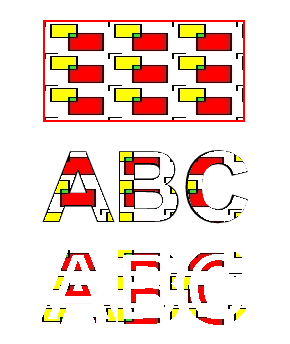
Un pattern di texture a mosaico è un’immagine utilizzata per riempire o disegnare oggetti: forme o testo. Se le dimensioni dell’immagine sono inferiori a quelle dell’oggetto, viene ripetuta nelle direzioni X e Y per coprire tutte le aree necessarie.
Il processo di ripetizione dell’immagine all’interno di oggetti grafici è chiamato mosaico. Per impostare il colore o il tratto in PsDocument, dobbiamo passare un oggetto della classe System.Drawing.Brush per un disegno e un oggetto della classe System.Drawing.Pen per il tratto ai rispettivi metodi.
La libreria Aspose.Page per C++ elabora tutte le sottoclassi di System.Drawing.Brush offerte dalla piattaforma C++. Questi sono System.Drawing.SolidBrush, System.Drawing.TextureBrush, System.Drawing.LinearGradientBrush, System.Drawing.PathGradientBrush e System.Drawing.HatchBrush. La classe System.Drawing.Pen non può essere estesa perché è sealed, ma contiene System.Drawing.Brush come proprietà e, pertanto, la libreria Aspose.Page per C++ può utilizzare anche un set completo di pennelli per disegnare linee e delineare forme e testo.
Per dipingere oggetti grafici con un pattern texturizzato nella libreria Aspose.Page per C++, è sufficiente passare System.Drawing.TextureBrush a SetPaint() o a uno dei metodi FillText() o FillAndStrokeText() che accetta System.Drawing.Brush come parametro.
Per delineare oggetti grafici con un pattern texture nella libreria Aspose.Page per C++, è necessario creare un nuovo System.Drawing.Pen con System.Drawing.TextureBrush e passarlo a SetStroke() o a uno dei metodi OutlineText() o FillAndStrokeText() che accetta System.Drawing.Pen come parametro.
Nell’esempio seguente mostriamo come riempire una forma e un testo e come delineare un testo con un pattern texture a mosaico.
Descrizione dei passaggi per lavorare con Texture Pattern e PsDocument nell’esempio:
- Crea un flusso di output per il file PS risultante.
- Crea un oggetto PsSaveOptions con le opzioni predefinite.
- Crea un PsDocument a pagina singola con un flusso di output già creato e le relative opzioni di salvataggio.
- Crea un nuovo stato grafico e traslalo nella posizione desiderata.
- Crea System.Drawing.Bitmap dal file immagine.
- Crea System.Drawing.TextureBrush dall’immagine.
- Imposta la trasformazione necessaria nel pennello texture.
- Imposta il pennello texture come pennello corrente nello stato grafico corrente del PsDocument.
- Crea un tracciato rettangolare.
- Riempi il rettangolo con il pennello texture.
- Salva il pennello corrente come variabile locale per un utilizzo futuro. 12. Imposta il tratto corrente con una penna rossa.
- Contorna il rettangolo con la penna corrente.
- Esci dallo stato grafico corrente e torna allo stato grafico di livello superiore.
- Crea un font system.
- Riempi e traccia (contorna) il testo. Per il riempimento si utilizza il pennello texture e per il contorno si utilizza una penna nera.
- Contorna il testo nell’altra posizione con il nuovo System.Drawing.Pen creato con il pennello texture come Brush.
- Chiudi la pagina.
- Salva il documento.
 1    // The path to the documents directory.
 2    System::String dataDir = RunExamples::GetDataDir_WorkingWithTextures();
 3
 4    //Create output stream for PostScript document
 5    {
 6        System::SharedPtr<System::IO::Stream> outPsStream = System::MakeObject<System::IO::FileStream>(dataDir + u"AddTextureTilingPattern_outPS.ps", System::IO::FileMode::Create);
 7        // Clearing resources under 'using' statement
 8        System::Details::DisposeGuard<1> __dispose_guard_1({ outPsStream});
 9        // ------------------------------------------
10
11        try
12        {
13            //Create save options with A4 size
14            System::SharedPtr<PsSaveOptions> options = System::MakeObject<PsSaveOptions>();
15
16            // Create new 1-paged PS Document
17            System::SharedPtr<PsDocument> document = System::MakeObject<PsDocument>(outPsStream, options, false);
18
19
20            document->WriteGraphicsSave();
21            document->Translate(200.0f, 100.0f);
22
23            //Create a Bitmap object from image file
24            {
25                System::SharedPtr<System::Drawing::Bitmap> image = System::MakeObject<System::Drawing::Bitmap>(dataDir + u"TestTexture.bmp");
26                // Clearing resources under 'using' statement
27                System::Details::DisposeGuard<1> __dispose_guard_0({ image});
28                // ------------------------------------------
29
30                try
31                {
32                    //Create texture brush from the image
33                    System::SharedPtr<System::Drawing::TextureBrush> brush = System::MakeObject<System::Drawing::TextureBrush>(image, System::Drawing::Drawing2D::WrapMode::Tile);
34
35                    //Add scaling in X direction to the mattern
36                    System::SharedPtr<System::Drawing::Drawing2D::Matrix> transform = System::MakeObject<System::Drawing::Drawing2D::Matrix>(2.0f, 0.0f, 0.0f, 1.0f, 0.0f, 0.0f);
37                    brush->set_Transform(transform);
38
39                    //Set this texture brush as current paint
40                    document->SetPaint(brush);
41                }
42                catch(...)
43                {
44                    __dispose_guard_0.SetCurrentException(std::current_exception());
45                }
46            }
47
48            //Create rectangle path
49            System::SharedPtr<System::Drawing::Drawing2D::GraphicsPath> path = System::MakeObject<System::Drawing::Drawing2D::GraphicsPath>();
50            path->AddRectangle(System::Drawing::RectangleF(0.0f, 0.0f, 200.0f, 100.0f));
51
52            //Fill rectangle
53            document->Fill(path);
54
55            //Get current paint
56            System::SharedPtr<System::Drawing::Brush> paint = document->GetPaint();
57
58            //Set red stroke
59            document->SetStroke(System::MakeObject<System::Drawing::Pen>(System::MakeObject<System::Drawing::SolidBrush>(System::Drawing::Color::get_Red()), 2.0f));
60            //Stroke the rectangle
61            document->Draw(path);
62
63            document->WriteGraphicsRestore();
64
65            //Fill text with texture pattern
66            System::SharedPtr<System::Drawing::Font> font = System::MakeObject<System::Drawing::Font>(u"Arial", 96.0f, System::Drawing::FontStyle::Bold);
67            document->FillAndStrokeText(u"ABC", font, 200.0f, 300.0f, paint, System::MakeObject<System::Drawing::Pen>(System::Drawing::Color::get_Black(), 2.0f));
68
69            //Outline text with texture pattern
70            document->OutlineText(u"ABC", font, 200.0f, 400.0f, System::MakeObject<System::Drawing::Pen>(paint, 5.0f));
71
72            //Close current page
73            document->ClosePage();
74
75            //Save the document
76            document->Save();
77        }
78        catch(...)
79        {
80            __dispose_guard_1.SetCurrentException(std::current_exception());
81        }
82 }Il risultato dell’esecuzione di questo codice viene visualizzato come
È possibile scaricare esempi e file di dati da GitHub.