Lavorare con le sfumature in PostScript | .NET
Aggiungere una sfumatura in un documento PS
In questo articolo, consideriamo i modi in cui una sfumatura può essere utilizzata nei documenti PS.
La sfumatura è una transizione graduale da un colore all’altro. Viene utilizzata per rendere le immagini disegnate più realistiche. Poiché la sfumatura è un tipo di pittura, è prevedibile che in .NET sia implementata come sottoclasse di System.Drawing.Brush. In realtà, la piattaforma .NET dispone di due pennelli di questo tipo:
- System.Drawing.LinearGradientBrush
- System.Drawing.PathGradientBrush
Per impostare una pittura o un tratto in PsDocument, dobbiamo passare un oggetto della classe System.Drawing.Brush per un dipinto e un oggetto di System.Drawing.Pen per il tratto ai rispettivi metodi. La libreria Aspose.Page per .NET elabora tutte le sottoclassi di System.Drawing.Brush offerte dalla piattaforma .NET. Queste sono System.Drawing.SolidBrush, System.Drawing.TextureBrush, System.Drawing.LinearGradientBrush, System.Drawing.PathGradientBrush e System.Drawing.HatchBrush. La classe System.Drawing.Pen non può essere estesa perché è sealed, ma contiene System.Drawing.Brush come proprietà e, pertanto, la libreria Aspose.Page per .NET può utilizzare un set completo di pennelli anche per disegnare linee e delineare forme e testo.
Per dipingere oggetti grafici con un gradiente nella libreria Aspose.Page per .NET, è necessario creare System.Drawing.LinearGradientBrush o System.Drawing.PathGradientBrush e passarlo a SetPaint() o a uno dei metodi FillText() o FillAndStrokeText() che accettano System.Drawing.Brush come parametro.
Per delineare oggetti grafici con un gradiente nella libreria Aspose.Page per .NET, è necessario creare System.Drawing.LinearGradientBrush o System.Drawing.PathGradientBrush, quindi creare System.Drawing.Pen con questo pennello e, infine, passarlo a SetStroke() o a uno dei metodi OutlineText() o FillAndStrokeText() che accetta System.Drawing.Pen come parametro.
Nell’esempio seguente mostriamo come riempire una forma e un testo e come delineare il testo con una sfumatura.
Un algoritmo per dipingere oggetti grafici con una sfumatura in un nuovo documento PS include i seguenti passaggi:
- Creare un flusso di output per il file PS risultante.
- Creare PsSaveOptions.
- Creare PsDocument con il flusso di output già creato e le opzioni di salvataggio.
- Creare il percorso grafico o il font necessari in base all’oggetto che si desidera riempire o delineare.
- Creare un oggetto di System.Drawing.LinearGradientBrush o System.Drawing.PathGradientBrush in base alla forma desiderata della sfumatura. 6. Impostare la trasformazione necessaria su questo pennello.
- Impostare il pennello sfumato come tratto corrente in PsDocument.
- Riempire il tracciato grafico con il tratto corrente o riempire un testo. Se utilizziamo uno dei metodi per riempire il testo che accetta System.Drawing.Brush come parametro, il punto precedente può essere ignorato.
- Chiudere la pagina.
- Salvare il documento.
Se desideriamo contornare (contornare) gli oggetti grafici con un gradiente invece degli ultimi 4 punti, ecco cosa fare:
Creare l’oggetto System.Drawing.Pen con il pennello sfumato.
Impostare questa penna come tratto corrente in PsDocument.
Delineare il tracciato grafico con il tratto corrente o delineare il testo. Se utilizziamo uno dei metodi per delineare il testo che accetta System.Drawing.Pen come parametro, il punto precedente può essere ignorato.
Chiudere la pagina.
Salva il documento.
Offriamo 5 frammenti di codice che illustrano l’utilizzo di diversi gradienti.
In questo frammento di codice creiamo un gradiente lineare orizzontale da due colori, riempiamo un rettangolo, riempiamo un testo e tracciamo un contorno di testo con questo gradiente.
 1// Paint rectangle and text and draw text with horizontal gradient fill in PS document.
 2
 3string outputFileName = "HorizontalGradient_outPS.ps";
 4
 5//Create save options with A4 size
 6PsSaveOptions options = new PsSaveOptions();
 7
 8// Create new 1-paged PS Document
 9PsDocument document = new PsDocument(OutputDir + outputFileName, options, false);
10
11float offsetX = 200;
12float offsetY = 100;
13float width = 200;
14float height = 100;
15
16//Create graphics path from the first rectangle
17GraphicsPath path = new GraphicsPath();
18path.AddRectangle(new RectangleF(offsetX, offsetY, width, height));
19
20//Create linear gradient brush with rectangle as a bounds, start and end colors
21LinearGradientBrush brush = new LinearGradientBrush(new RectangleF(0, 0, width, height), Color.FromArgb(150, 0, 0, 0),
22    Color.FromArgb(50, 40, 128, 70), 0f);
23//Create a transform for brush. X and Y scale component must be equal to width and height of the rectangle correspondingly.
24//Translation components are offsets of the rectangle
25Matrix brushTransform = new Matrix(width, 0, 0, height, offsetX, offsetY);
26//Set transform
27brush.Transform = brushTransform;
28
29//Set paint
30document.SetPaint(brush);
31
32//Fill the rectangle
33document.Fill(path);
34
35//Fill text with gradient
36System.Drawing.Font font = new System.Drawing.Font("Arial", 96, FontStyle.Bold);
37document.FillAndStrokeText("ABC", font, 200, 300, brush, new Pen(new SolidBrush(Color.Black), 2));
38
39//Set current stroke
40document.SetStroke(new Pen(brush, 5));
41//Outline text with gradient
42document.OutlineText("ABC", font, 200, 400);
43
44//Close current page
45document.ClosePage();
46
47//Save the document
48document.Save();Per Linux, macOS e altri sistemi operativi non Windows, offriamo l’utilizzo del nostro pacchetto Nuget Aspose.Page.Drawing. Utilizza il backend Aspose.Drawing invece della libreria di sistema System.Drawing.
Quindi, importate lo spazio dei nomi Aspose.Page.Drawing invece di quello System.Drawing. Nei frammenti di codice sopra e seguenti verrà utilizzato Aspose.Page.Drawing.RectangleF al posto di System.Drawing.RectangleF, Aspose.Page.Drawing.Drawing2D.GraphicsPath al posto di System.Drawing.Drawing2D.GraphicsPath e così via. I nostri esempi di codice su GitHub contengono tutte le sostituzioni necessarie.
Il risultato dell’esecuzione di questo codice appare come

In questo frammento di codice creiamo una sfumatura lineare verticale da 5 colori e riempiamo un rettangolo con questa sfumatura.
 1// Paint rectangle with vertical gradient fill in PS document.
 2
 3string outputFileName = "VerticalGradient_outPS.ps";
 4
 5//Create save options with A4 size
 6PsSaveOptions options = new PsSaveOptions();
 7
 8// Create new 1-paged PS Document
 9PsDocument document = new PsDocument(OutputDir + outputFileName, options, false);
10
11float offsetX = 200;
12float offsetY = 100;
13float width = 200;
14float height = 100;
15
16//Create graphics path from the first rectangle
17GraphicsPath path = new GraphicsPath();
18path.AddRectangle(new RectangleF(offsetX, offsetY, width, height));
19
20//Create an array of interpolation colors
21Color[] colors = { Color.Red, Color.Green, Color.Blue, Color.Orange, Color.DarkOliveGreen };
22float[] positions = { 0.0f, 0.1873f, 0.492f, 0.734f, 1.0f };
23ColorBlend colorBlend = new ColorBlend();
24colorBlend.Colors = colors;
25colorBlend.Positions = positions;
26
27//Create linear gradient brush with rectangle as a bounds, start and end colors
28LinearGradientBrush brush = new LinearGradientBrush(new RectangleF(0, 0, width, height), Color.Beige, Color.DodgerBlue, 0f);
29//Set interpolation colors
30brush.InterpolationColors = colorBlend;
31//Create a transform for brush. X and Y scale component must be equal to width and height of the rectangle correspondingly.
32//Translation components are offsets of the rectangle
33Matrix brushTransform = new Matrix(width, 0, 0, height, offsetX, offsetY);
34//Rotate transform to get colors change in vertical direction from up to down
35brushTransform.Rotate(90);
36//Set transform
37brush.Transform = brushTransform;
38
39//Set paint
40document.SetPaint(brush);
41
42//Fill the rectangle
43document.Fill(path);
44
45//Close current page
46document.ClosePage();
47
48//Save the document
49document.Save();Ecco il risultato!

In questo frammento di codice creiamo una sfumatura lineare diagonale da 2 colori e riempiamo un rettangolo con questa sfumatura.
 1// Paint a circle with 2-colors radial gradient fill in PS document.
 2
 3string outputFileName = "RadialGradient1_outPS.ps";
 4
 5//Create save options with A4 size
 6PsSaveOptions options = new PsSaveOptions();
 7
 8// Create new 1-paged PS Document
 9PsDocument document = new PsDocument(OutputDir + outputFileName, options, false);
10
11float offsetX = 200;
12float offsetY = 100;
13float width = 200;
14float height = 200;
15
16//Create graphics path from the rectangle bounds
17RectangleF bounds = new RectangleF(offsetX, offsetY, width, height);
18GraphicsPath path = new GraphicsPath();
19path.AddEllipse(bounds);
20
21//Create and fill color blend object
22Color[] colors = { Color.White, Color.White, Color.Blue };
23float[] positions = { 0.0f, 0.2f, 1.0f };
24ColorBlend colorBlend = new ColorBlend();
25colorBlend.Colors = colors;
26colorBlend.Positions = positions;
27
28GraphicsPath brushRect = new GraphicsPath();
29brushRect.AddRectangle(new RectangleF(0, 0, width, height));
30
31//Create path gradient brush with rectangle as a bounds
32PathGradientBrush brush = new PathGradientBrush(brushRect);
33//Set interpolation colors
34brush.InterpolationColors = colorBlend;
35//Create a transform for brush. X and Y scale component must be equal to width and height of the rectangle correspondingly.
36//Translation components are offsets of the rectangle
37Matrix brushTransform = new Matrix(width, 0, 0, height, offsetX, offsetY);
38//Set transform
39brush.Transform = brushTransform;
40
41//Set paint
42document.SetPaint(brush);
43
44//Fill the rectangle
45document.Fill(path);
46
47//Close current page
48document.ClosePage();
49
50//Save the document
51document.Save();
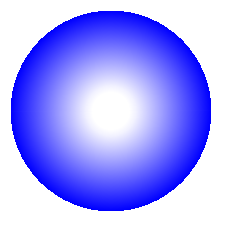
In questo frammento di codice creiamo una sfumatura radiale da 2 colori e riempiamo un cerchio con questa sfumatura.
 1// Paint a circle with 6-colors radial gradient fill in PS document.
 2
 3string outputFileName = "RadialGradient2_outPS.ps";
 4
 5//Create save options with A4 size
 6PsSaveOptions options = new PsSaveOptions();
 7
 8// Create new 1-paged PS Document
 9PsDocument document = new PsDocument(OutputDir + outputFileName, options, false);
10
11float offsetX = 200;
12float offsetY = 100;
13float width = 200;
14float height = 200;
15
16//Create graphics path from the rectangle bounds
17RectangleF bounds = new RectangleF(offsetX, offsetY, width, height);
18GraphicsPath path = new GraphicsPath();
19path.AddRectangle(bounds);
20
21//Create and fill color blend object
22Color[] colors = { Color.Green, Color.Blue, Color.Black, Color.Yellow, Color.Beige, Color.Red };
23float[] positions = { 0.0f, 0.2f, 0.3f, 0.4f, 0.9f, 1.0f };
24ColorBlend colorBlend = new ColorBlend();
25colorBlend.Colors = colors;
26colorBlend.Positions = positions;
27
28GraphicsPath brushRect = new GraphicsPath();
29brushRect.AddRectangle(new RectangleF(0, 0, width, height));
30
31//Create path gradient brush with rectangle as a bounds
32PathGradientBrush brush = new PathGradientBrush(brushRect);
33//Set interpolation colors
34brush.InterpolationColors = colorBlend;
35//Create a transform for brush. X and Y scale component must be equal to width and height of the rectangle correspondingly.
36//Translation components are offsets of the rectangle
37Matrix brushTransform = new Matrix(width, 0, 0, height, offsetX, offsetY);
38//Set transform
39brush.Transform = brushTransform;
40
41//Set paint
42document.SetPaint(brush);
43
44//Fill the rectangle
45document.Fill(path);
46
47//Close current page
48document.ClosePage();
49
50//Save the document
51document.Save();Il risultato
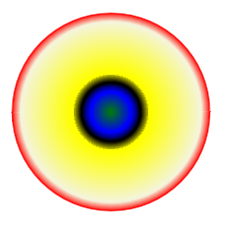
In questo frammento di codice creiamo una sfumatura radiale da 6 colori e riempiamo un rettangolo con questa sfumatura.
 1// Paint a circle with 2-colors radial gradient fill in PS document.
 2
 3string outputFileName = "RadialGradient1_outPS.ps";
 4
 5//Create save options with A4 size
 6PsSaveOptions options = new PsSaveOptions();
 7
 8// Create new 1-paged PS Document
 9PsDocument document = new PsDocument(OutputDir + outputFileName, options, false);
10
11float offsetX = 200;
12float offsetY = 100;
13float width = 200;
14float height = 200;
15
16//Create graphics path from the rectangle bounds
17RectangleF bounds = new RectangleF(offsetX, offsetY, width, height);
18GraphicsPath path = new GraphicsPath();
19path.AddEllipse(bounds);
20
21//Create and fill color blend object
22Color[] colors = { Color.White, Color.White, Color.Blue };
23float[] positions = { 0.0f, 0.2f, 1.0f };
24ColorBlend colorBlend = new ColorBlend();
25colorBlend.Colors = colors;
26colorBlend.Positions = positions;
27
28GraphicsPath brushRect = new GraphicsPath();
29brushRect.AddRectangle(new RectangleF(0, 0, width, height));
30
31//Create path gradient brush with rectangle as a bounds
32PathGradientBrush brush = new PathGradientBrush(brushRect);
33//Set interpolation colors
34brush.InterpolationColors = colorBlend;
35//Create a transform for brush. X and Y scale component must be equal to width and height of the rectangle correspondingly.
36//Translation components are offsets of the rectangle
37Matrix brushTransform = new Matrix(width, 0, 0, height, offsetX, offsetY);
38//Set transform
39brush.Transform = brushTransform;
40
41//Set paint
42document.SetPaint(brush);
43
44//Fill the rectangle
45document.Fill(path);
46
47//Close current page
48document.ClosePage();
49
50//Save the document
51document.Save();Il risultato
Vedi come lavorare con il gradiente nei documenti PS in Java.
È possibile scaricare esempi e file di dati da GitHub.