Lavorare con la trasparenza in un file XPS | .NET
Imposta maschera di opacità in XPS
Oggetto Imposta maschera di opacità
Aspose.Page per .NET offre la proprietà OpacityMask per impostare la maschera di opacità sul percorso XPS. È necessario specificare XpsPathGeometry e aggiungerla a XpsPath. Un’immagine può essere utilizzata come maschera di opacità e la componente alfa di ogni pixel viene applicata al riempimento sottostante. Il documento XPS generato mostrerà strisce di gradiente oblique presenti sul file immagine sorgente. Il seguente frammento di codice mostra la funzionalità completa per impostare la maschera di opacità:
 1// Apply opacity mask for texture pattern in XPS document.
 2
 3// Create new XPS Document
 4XpsDocument doc = new XpsDocument();
 5
 6string outputFileName = "OpacityMask_out.xps";
 7
 8//Add Canvas to XpsDocument instance
 9XpsCanvas canvas = doc.AddCanvas();
10// Rectangle with opacity masked by ImageBrush
11XpsPath path = canvas.AddPath(doc.CreatePathGeometry("M 10,180 L 228,180 228,285 10,285"));
12path.Fill = doc.CreateSolidColorBrush(doc.CreateColor(1.0f, 0.0f, 0.0f));
13path.OpacityMask = doc.CreateImageBrush(DataDir + "R08SY_NN.tif", new RectangleF(0f, 0f, 128f, 192f),
14    new RectangleF(0f, 0f, 64f, 96f));
15((XpsImageBrush)path.OpacityMask).TileMode = XpsTileMode.Tile;
16// Save resultant XPS document
17doc.Save(OutputDir + outputFileName);Per maggiori informazioni su come lavorare con la trasparenza nei documenti XPS, consulta Java e C++.
Il risultato

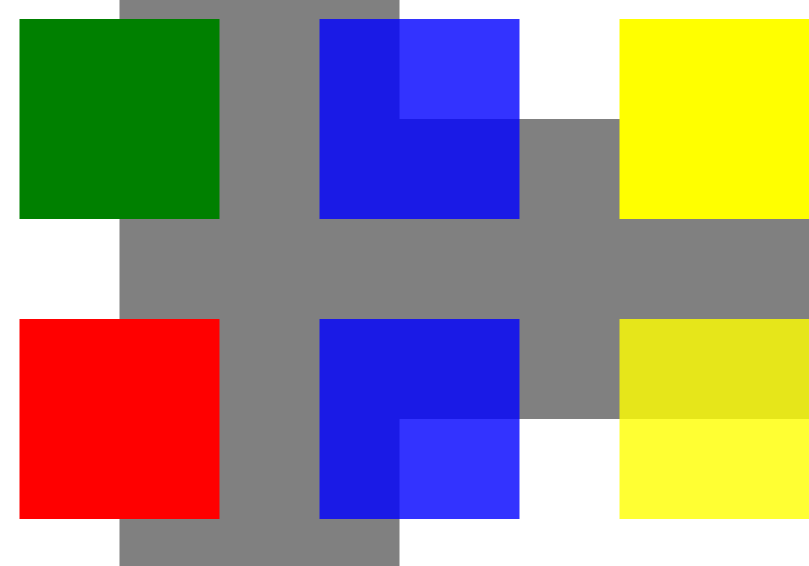
Aggiungi oggetto trasparente in un documento XPS
Aggiungi oggetto trasparente
La soluzione offre la classe XpsPath, con cui è possibile aggiungere oggetti trasparenti a un documento XPS. È necessario specificare XpsPathGeometry e aggiungerlo a XpsPath. Il seguente frammento di codice mostra la funzionalità completa per aggiungere oggetti trasparenti al documento XPS:
 1// Demonstrates transparency in shapes in XPS document.
 2
 3// Create new XPS Document
 4XpsDocument doc = new XpsDocument();
 5
 6string outputFileName = "AddTransparentObject_outXPS.xps";
 7
 8// Just to demonstrate transparency
 9doc.AddPath(doc.CreatePathGeometry("M120,0 H400 v1000 H120")).Fill = doc.CreateSolidColorBrush(Color.Gray);
10doc.AddPath(doc.CreatePathGeometry("M300,120 h600 V420 h-600")).Fill = doc.CreateSolidColorBrush(Color.Gray);
11
12// Create path with closed rectangle geometry
13XpsPath path1 = doc.CreatePath(doc.CreatePathGeometry("M20,20 h200 v200 h-200 z"));
14// Set blue solid brush to fill path1
15path1.Fill = doc.CreateSolidColorBrush(Color.Blue);
16// Add it to the current page
17XpsPath path2 = doc.Add(path1);
18
19// path1 and path2 are the same as soon as path1 hasn't been placed inside any other element
20// (which means that path1 had no parent element).
21// Because of that rectangle's color on the page effectively turns to green
22path2.Fill = doc.CreateSolidColorBrush(Color.Green);
23
24// Now add path2 once again. Now path2 has parent. So path3 won't be the same as path2.
25// Thus a new rectangle is painted on the page ...
26XpsPath path3 = doc.Add(path2);
27// ... and we shift it 300 units lower ...
28path3.RenderTransform = doc.CreateMatrix(1, 0, 0, 1, 0, 300);
29// ... and set red solid brush to fill it
30path3.Fill = doc.CreateSolidColorBrush(Color.Red);
31
32// Create new path4 with path2's geometry ...
33XpsPath path4 = doc.AddPath(path2.Data);
34// ... shift it 300 units to the right ...
35path4.RenderTransform = doc.CreateMatrix(1, 0, 0, 1, 300, 0);
36// ... and set blue solid fill
37path4.Fill = doc.CreateSolidColorBrush(Color.Blue);
38
39// Add path4 once again.
40XpsPath path5 = doc.Add(path4);
41// path4 and path5 are not the same again ...
42// (move path5 300 units lower)
43path5.RenderTransform = path5.RenderTransform.Clone(); // to disconnect RenderTransform value from path4 (see next comment about Fill property)
44path5.RenderTransform.Translate(0, 300);
45// ... but if we set the opacity of Fill property, it will take effect on both path5 and path4
46// because brush is a complex property value which remains the same for path5 and path4
47path5.Fill.Opacity = 0.8f;
48
49// Create new path6 with path2's geometry ...
50XpsPath path6 = doc.AddPath(path2.Data);
51// ... shift it 600 units to the right ...
52path6.RenderTransform = doc.CreateMatrix(1, 0, 0, 1, 600, 0);
53// ... and set yellow solid fill
54path6.Fill = doc.CreateSolidColorBrush(Color.Yellow);
55
56// Now add path6's clone ...
57XpsPath path7 = doc.Add(path6.Clone());
58// (move path5 300 units lower)
59path7.RenderTransform = path7.RenderTransform.Clone();
60path7.RenderTransform.Translate(0, 300);
61// ... and set opacity for path7
62path7.Fill.Opacity = 0.8f;
63// Now opacity effects independantly as soon as property values are cloned along with the element
64
65// Save resultant XPS document
66doc.Save(OutputDir + outputFileName);Il risultato
È possibile scaricare esempi e file di dati da GitHub.