Lavorare con le clip in un file PS | Python
Aggiungi ritaglio in un documento PS
In un documento PS, un ritaglio è un limite definito da un percorso che limita la visibilità del contenuto all’interno dello stato grafico corrente nei visualizzatori o negli editor PS. Qualsiasi contenuto che si estenda oltre questo limite verrà troncato.
In Python, i tracciati di ritaglio possono essere assegnati in tre modi:
Utilizzando qualsiasi classe implementata in aspose.pydrawing.GraphicsPath, in grado di contenere forme chiuse.
Utilizzando un contorno di testo;
Utilizzando un’immagine a 2 colori a 1 bpp (bit per pixel) come maschera stencil.
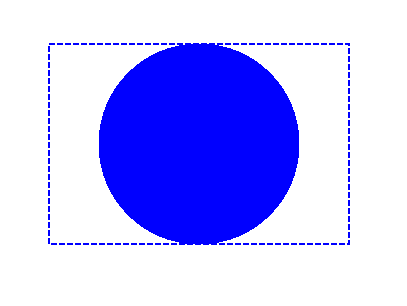
Attualmente, la libreria Aspose.Page per Python tramite .NET supporta il primo e il secondo metodo di ritaglio. Nell’esempio seguente, creiamo una forma circolare come tracciato di ritaglio e la utilizziamo per ritagliare un rettangolo con riempimento blu all’interno dello stesso stato grafico.
Nell’esempio seguente otteniamo una forma circolare come tracciato di ritaglio e ritagliamo un rettangolo con riempimento blu nello stesso stato grafico.
Per aggiungere una clip al nuovo PsDocument con Aspose.Page per Python tramite la libreria .NET, in questo esempio seguiamo i seguenti passaggi:
- Creiamo un flusso di output per il file PS risultante.
- Creiamo un oggetto PsSaveOptions con le opzioni predefinite.
- Creiamo un PsDocument a pagina singola con un flusso di output già creato e opzioni di salvataggio.
- Creiamo un nuovo stato grafico.
- Creiamo una forma circolare (oggetto aspose.pydrawing.GraphicsPath).
- Impostamo una clip con questo percorso.
- Impostamo un’immagine sullo stato grafico corrente del PsDocument. 8. Riempi il tracciato del rettangolo con il colore corrente.
- Esci dallo stato grafico corrente e torna a quello di livello superiore.
- Trasla nella posizione del rettangolo riempito.
- Traccia con una linea tratteggiata i limiti dello stesso rettangolo sopra quello riempito per mostrare i limiti del rettangolo riempito ritagliato.
- Chiudi la pagina.
- Salva il documento.
 1# Create an output stream for PostScript document
 2with open(data_dir + "Clipping_outPS.ps", "wb") as out_ps_stream:
 3    # Create the save options with default values
 4    options = PsSaveOptions()
 5
 6    # Create new 1-paged PS Document
 7    document = PsDocument(out_ps_stream, options, False)
 8
 9    # Create a graphics path from the rectangle
10    rectange_path = aspose.pydrawing.drawing2d.GraphicsPath()
11    rectange_path.add_rectangle(aspose.pydrawing.RectangleF(0, 0, 300, 200))
12
13    ##################################### Clipping by the shape //////////////////////////////////////////////////////////////////////
14
15    # Save the graphics state in order to return back to this state after the transformation
16    document.write_graphics_save()
17
18    # Displace the current graphics state on 100 points to the right and 100 points to the bottom.
19    document.translate(100, 100)
20
21    # Create a graphics path from the circle
22    circle_path = aspose.pydrawing.drawing2d.GraphicsPath()
23    circle_path.add_ellipse(aspose.pydrawing.RectangleF(50, 0, 200, 200))
24
25    # Add clipping by circle to the current graphics state
26    document.clip(circle_path)
27
28    # Set the paint in the current graphics state
29    document.set_paint(aspose.pydrawing.SolidBrush(aspose.pydrawing.Color.blue))
30
31    # Fill the rectangle in the current graphics state (with clipping)
32    document.fill(rectange_path)
33
34    # Restore the graphics state to the previus (upper) level
35    document.write_graphics_restore()
36
37    # Displace the upper level graphics state on 100 points to the right and 100 points to the bottom.
38    document.translate(100, 100)
39
40    pen = aspose.pydrawing.Pen(aspose.pydrawing.SolidBrush(aspose.pydrawing.Color.blue))
41    pen.width = float(2)
42    pen.dash_style = aspose.pydrawing.drawing2d.DashStyle.DASH
43
44    document.set_stroke(pen)
45
46    # Draw the rectangle in the current graphics state (has no clipping) above clipped rectangle
47    document.draw(rectange_path)
48
49    ########################################################################################################################
50
51    # Close the current page
52    document.close_page()
53
54    # Save the document
55 document.save()Il risultato dell’esecuzione di questo codice è
È possibile scaricare esempi e file di dati da GitHub.