Lavorare con le trasformazioni in un file PS | Python
Trasformare un contenuto in un documento PS
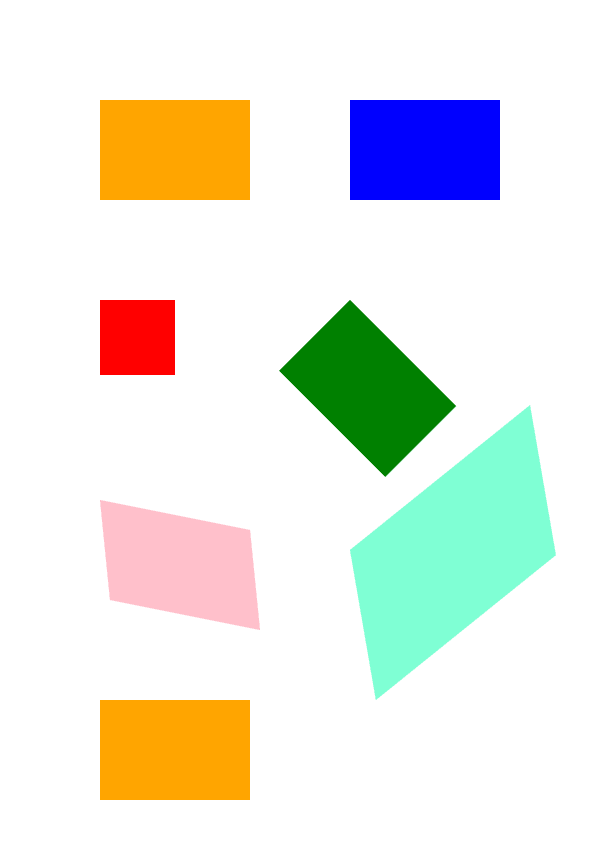
Questo articolo illustra come applicare diverse trasformazioni (traslazione, ridimensionamento, rotazione e inclinazione) a un tracciato rettangolare aggiunto a un PsDocument.
Abbiamo suddiviso un singolo frammento di codice in più sezioni: l’inizio, la fine e ciascuna trasformazione singolarmente. In PostScript, le trasformazioni vengono sempre eseguite all’interno di uno stato grafico delimitato dagli operatori “gsave” e “grestore”. Pertanto, il nostro PsDocument include metodi come “write_graphics_save()” e “write_graphics_restore()” per stabilire e ripristinare questi stati grafici. Tra questi metodi è possibile aggiungere qualsiasi contenuto, inclusi gli stati grafici nidificati, consentendo trasformazioni o ritagli. Queste trasformazioni interessano solo gli stati grafici nidificati e non quelli esterni. Tuttavia, se una trasformazione viene eseguita senza utilizzare i metodi “write_graphics_save()” e “write_graphics_restore()”, influisce sullo stato grafico del livello superiore e tutto il contenuto all’interno del PsDocument viene sottoposto a questa trasformazione.
L’algoritmo per applicare da zero qualsiasi trasformazione al contenuto di un documento prevede i seguenti passaggi:
- Creare un flusso di output per il file PS risultante.
- Creare PsSaveOptions.
- Creare PsDocument con il flusso di output e le opzioni di salvataggio già creati.
- Salvare uno stato grafico. Man mano che veniva creato un nuovo stato grafico, lo stato grafico precedente veniva inserito in uno stack di stati grafici. 5. Applicare le trasformazioni necessarie: traslazione, scala, rotazione, inclinazione o qualsiasi combinazione di esse. Nel nostro codice, mostriamo l’influenza di ogni componente di trasformazione separatamente e alla fine di 3 alla volta.
- Aggiungere il contenuto necessario per la trasformazione. Nel nostro caso, abbiamo creato un rettangolo aspose.pydrawing.GraphicsPath e poi lo riempiamo. Abbiamo creato un rettangolo prima di qualsiasi trasformazione e lo riempiamo dopo ogni trasformazione nello stato grafico corrente.
- Ripristinare lo stato grafico per tornare a quello precedente, dove le trasformazioni applicate non hanno effetto. Nel nostro caso, si tratta di uno stato grafico di livello superiore.
In questo frammento di codice, avviamo la creazione di un PsDocument utilizzando un flusso di output e PsSaveOptions. Quindi eseguiamo una traslazione dello stato grafico di livello superiore alle coordinate (100, 100) per compensare il primo rettangolo. Infine, generiamo il primo rettangolo.
  1data_dir = Util.get_data_dir_working_with_canvas()
  2
  3# Create an output stream for the PostScript document
  4with open(data_dir + "Transformations_outPS.ps", "wb") as out_ps_stream:
  5    # Create save options with default values
  6    options = PsSaveOptions()
  7
  8    # Create a new 1-paged PS Document
  9    document = PsDocument(out_ps_stream, options, False)
 10
 11    document.translate(100, 100)
 12
 13    # Create a graphics path from the rectangle
 14    path = aspose.pydrawing.drawing2d.GraphicsPath()
 15    path.add_rectangle(aspose.pydrawing.RectangleF(0, 0, 150, 100))
 16
 17    ##################################### No transformations ###############################################################
 18    # Set the paint in the graphics state on upper level
 19    document.set_paint(aspose.pydrawing.SolidBrush(aspose.pydrawing.Color.orange))
 20
 21    # Fill the first rectangle that is on the upper level graphics state and is without any transformations.
 22    document.fill(path)
 23    ########################################################################################################################
 24
 25
 26    ##################################### Translation ######################################################################
 27
 28    # Save the graphics state in order to return back to this state after the transformation
 29    document.write_graphics_save()
 30
 31    # Displace the current graphics state on 250 to the right. So we add a translation component to the current transformation.
 32    document.translate(250., 0.)
 33
 34    # Set the paint in the current graphics state
 35    document.set_paint(aspose.pydrawing.SolidBrush(aspose.pydrawing.Color.blue))
 36
 37    # Fill the second rectangle in the current graphics state (has translation transformation)
 38    document.fill(path)
 39
 40    # Restore the graphics state to the previus (upper) level
 41    document.write_graphics_restore()
 42    ########################################################################################################################
 43
 44
 45    # Displace on 200 to the bottom.
 46    document.translate(0., 200.)
 47
 48    ##################################### Scaling ##########################################################################
 49    # Save graphics state in order to return back to this state after transformation
 50    document.write_graphics_save()
 51
 52    # Scale the current graphics state on 0.5 in X axis and on 0.75f in Y axis. So we add a scale component to the current transformation.
 53    document.scale(0.5, 0.75)
 54
 55    # Set the paint in the current graphics state
 56    document.set_paint(aspose.pydrawing.SolidBrush(aspose.pydrawing.Color.red))
 57
 58    # Fill the third rectangle in the current graphics state (has scale transformation)
 59    document.fill(path)
 60
 61    # Restore the graphics state to the previus (upper) level
 62    document.write_graphics_restore()
 63    #####################################################################################################################
 64
 65
 66    # Displace the upper level graphics state on 250 to the right.
 67    document.translate(250., 0.)
 68
 69
 70    ##################################### Rotation ######################################################################
 71    #Save graphics state in order to return back to this state after transformation
 72    document.write_graphics_save()
 73
 74    # Rotate the current graphics state on 45 degrees around the origin of the current graphics state (350, 300). So we add a rotation component to the current transformation.
 75    document.rotate(float(45))
 76
 77    # Set the paint in the current graphics state
 78    document.set_paint(aspose.pydrawing.SolidBrush(aspose.pydrawing.Color.green))
 79
 80    # Fill the fourth rectangle in the current graphics state (has rotation transformation)
 81    document.fill(path)
 82
 83    # Restore the graphics state to the previus (upper) level
 84    document.write_graphics_restore()
 85    #####################################################################################################################
 86
 87
 88    # Returns the upper level graphics state back to the left and displace on 200 to the bottom.
 89    document.translate(-250., 200.)
 90
 91
 92    ##################################### Shearing ######################################################################
 93    # Save the graphics state in order to return back to this state after the transformation
 94    document.write_graphics_save()
 95
 96    # Shear the current graphics state. So we add shear component to the current transformation.
 97    document.shear(0.1, 0.2)
 98
 99    # Set the paint in the current graphics state
100    document.set_paint(aspose.pydrawing.SolidBrush(aspose.pydrawing.Color.pink))
101
102    # Fill the fifth rectangle in the current graphics state (has shear transformation)
103    document.fill(path)
104
105    # Restore the graphics state to the previus (upper) level
106    document.write_graphics_restore()
107    #####################################################################################################################
108
109
110    # Displace the upper level graphics state on 250 to the right.
111    document.translate(250., 0.)
112
113
114    ##################################### Complex transformation ########################################################
115    # Save the graphics state in order to return back to this state after the transformation
116    document.write_graphics_save()
117
118    # Transform the current graphics state with the complex transformation. So we add the translation, scale and rotation components to the current transformation.
119    document.transform(aspose.pydrawing.drawing2d.Matrix(1.2, -0.965925, 0.258819, 1.5, 0., 50.))
120
121    # Set the paint in the current graphics state
122    document.set_paint(aspose.pydrawing.SolidBrush(aspose.pydrawing.Color.aquamarine))
123
124    # Fill the sixth rectangle in the current graphics state (has complex transformation)
125    document.fill(path)
126
127    # Restore graphics state to the previus (upper) level
128    document.write_graphics_restore()
129    #####################################################################################################################
130
131
132    # Returns the upper level graphics state back to the left and displace on 200 to the bottom.
133    document.translate(-250., 200.)
134
135
136    ##################################### Again no transformation ########################################################
137    # Demonstrates that current graphics state's color is orange that was set up at the beginning of the code.
138    # Fill the seventh rectangle in the current graphics state (has no transformation)
139    document.fill(path)
140    #####################################################################################################################
141
142    # Close the current page
143    document.close_page()
144
145    # Save the document
146 document.save()Il risultato dell’esecuzione di questo codice è
È possibile scaricare esempi e file di dati da GitHub.