XPSグラフィックユーティリティの使用| C ++
簡単に**** XPSで単純な形状を生成する方法
XPS仕様は、複雑な形状を構成するために使用できるグラフィックプリミティブ要素を定義します。 C ++のAspose.Pageは、これらの要素をカプセル化するクラスを提供します。ただし、円形セクターやセグメントなど、比較的単純な形状を作成したり、円の周りに刻まれたり外接したりする通常のn-gonを作成する必要がある場合、それらを使用することは少し退屈かもしれません。円や楕円を描くことでさえ、可能な限り単純ではありません。そのため、Aspose.Pageは、そのようなタスクを実行するときに時間を節約する可能性が高い一連のユーティリティ方法を追加します。
次の例では、利用可能なすべての形状ユーティリティを使用します。それらのすべてが xpspatheometryのオブジェクトを返し、 xps pathsを構築するために使用できることに注意してください。また、これらのパスでは、ブラシ、ストロークパターン、不透明度など、外観の特性を指定できます。
 1    // ExStart:UsingShapeUtils
 2    // For complete examples and data files, please go to https://github.com/aspose-page/Aspose.Page-for-C
 3    // The path to the documents directory.
 4    System::String dataDir = RunExamples::GetDataDir_WorkingWithShapes();
 5    // Create new XPS Document
 6    {
 7        System::SharedPtr<XpsDocument> doc = System::MakeObject<XpsDocument>();
 8        // Clearing resources under 'using' statement
 9        System::Details::DisposeGuard<1> __dispose_guard_0({ doc});
10        // ------------------------------------------
11
12        try
13        {
14            // Set first page's size.
15            doc->get_Page()->set_Width(650.f);
16            doc->get_Page()->set_Height(240.f);
17
18            // Draw a circle with center (120, 120) and radius 100.
19            System::SharedPtr<XpsPath> path = doc->CreatePath(doc->get_Utils()->CreateCircle(System::Drawing::PointF(120.f, 120.f), 100.f));
20            path->set_Fill(doc->CreateSolidColorBrush(System::Drawing::Color::get_Green()));
21            doc->Add<System::SharedPtr<XpsPath>>(path);
22
23            // Inscribe a regular pentagon in the circle.
24            path = doc->CreatePath(doc->get_Utils()->CreateRegularInscribedNGon(5, System::Drawing::PointF(120.f, 120.f), 100.f));
25            path->set_Fill(doc->CreateSolidColorBrush(System::Drawing::Color::get_Red()));
26            doc->Add<System::SharedPtr<XpsPath>>(path);
27
28            // Circumscribe a regular hexagon around the circle.
29            path = doc->CreatePath(doc->get_Utils()->CreateRegularCircumscribedNGon(6, System::Drawing::PointF(120.f, 120.f), 100.f));
30            path->set_Stroke(doc->CreateSolidColorBrush(System::Drawing::Color::get_Magenta()));
31            path->set_StrokeThickness(3.f);
32            doc->Add<System::SharedPtr<XpsPath>>(path);
33
34            // Draw a sector of the circle centered at (340, 120), starting at -45 degrees and ending at +45 degrees.
35            path = doc->CreatePath(doc->get_Utils()->CreatePieSlice(System::Drawing::PointF(340.f, 120.f), 100.f, -45.f, 45.f));
36            path->set_Stroke(doc->CreateSolidColorBrush(System::Drawing::Color::get_Red()));
37            path->set_StrokeThickness(5.f);
38            doc->Add<System::SharedPtr<XpsPath>>(path);
39
40            // Draw a segment of the circle centered at (340, 120), starting at -45 degrees and ending at +45 degrees.
41            path = doc->CreatePath(doc->get_Utils()->CreateCircularSegment(System::Drawing::PointF(340.f, 120.f), 100.f, -45.f, 45.f));
42            path->set_Fill(doc->CreateSolidColorBrush(System::Drawing::Color::get_Black()));
43            doc->Add<System::SharedPtr<XpsPath>>(path);
44
45            // Draw a rectangle with the top left vertex (530, 20), width 100 units and height 200 units.
46            path = doc->CreatePath(doc->get_Utils()->CreateRectangle(System::Drawing::RectangleF(530.f, 20.f, 100.f, 200.f)));
47            path->set_Stroke(doc->CreateSolidColorBrush(System::Drawing::Color::get_Red()));
48            doc->Add<System::SharedPtr<XpsPath>>(path);
49
50            // Draw an ellipse with center (580, 120) and radii 50 and 100.
51            path = doc->CreatePath(doc->get_Utils()->CreateEllipse(System::Drawing::PointF(580.f, 120.f), 50.f, 100.f));
52            path->set_Fill(doc->CreateSolidColorBrush(System::Drawing::Color::get_Yellow()));
53            doc->Add<System::SharedPtr<XpsPath>>(path);
54
55            doc->Save(dataDir + u"UseShapeUtilsXPS_out.xps");
56        }
57        catch(...)
58        {
59            __dispose_guard_0.SetCurrentException(std::current_exception());
60        }
61    }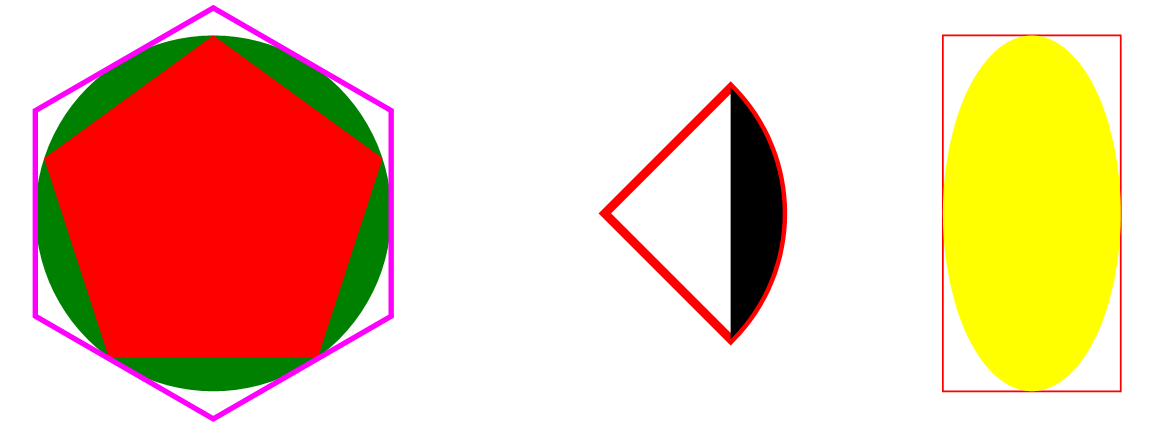
62 // ExEnd:UsingShapeUtils新しいXPSドキュメントから始めて、最初のページのサイズを調整します。ページに配置する最初の形状は、固体緑で満たされた円(中心と半径で指定)です。次に、私たちはその円に埋められていない赤いレギュラーペンタゴンを刻みます。その後、マゼンタでstrokedした囲まれた通常の六角形が来ます。
右側では、まず-45〜 +45度の間の赤い円形セクター(または「パイスライス」)を描き、次にセクターよりも同じパラメーターを持つ黒い円形セグメントを描きます。
図面の最後の部分は、赤い長方形(左上の頂点と寸法で指定)と、長方形に刻まれた黄色の楕円(中心と半径で指定)で構成されています。ここでは、「手で」碑文を制御します。
保存されているXPSファイルに表示されるはずです。
簡単に**** XPSページに画像を追加する方法
XPS仕様で定義されたプリミティブでは、ページに画像を追加することは2つのステップで構成されています。
- 画像で埋めたい長方形のパスを追加します。
- パスに画像ブラシを設定します。ここでは、ビューボックスとビューポートを指定する必要があります。一般に、前の2つのパラメーターを正確に提供するために、画像のピクセルの解像度とサイズを知る必要があります。
しかし、幸いなことに、XPSグラフィックユーティリティの間には、Aspose.Page APIの便利な方法があり、C ++のAPIページAPIがすべて(ほぼ)あなたのために仕事をすることができます。また、さまざまなフィットモードを提供します。以下の例を見てみましょう。
 1    // ExStart:UsingImageUtils
 2    // For complete examples and data files, please go to https://github.com/aspose-page/Aspose.Page-for-C
 3    // The path to the documents directory.
 4    System::String dataDir = RunExamples::GetDataDir_WorkingWithImages();
 5    // Create new XPS Document
 6    {
 7        System::SharedPtr<XpsDocument> doc = System::MakeObject<XpsDocument>();
 8        // Clearing resources under 'using' statement
 9        System::Details::DisposeGuard<1> __dispose_guard_0({ doc});
10        // ------------------------------------------
11
12        try
13        {
14            // Set first page's size.
15            doc->get_Page()->set_Width(540.f);
16            doc->get_Page()->set_Height(220.f);
17
18            // Draw the image box.
19            System::Drawing::RectangleF imageBox(10.f, 10.f, 200.f, 200.f);
20            System::SharedPtr<XpsPath> path = doc->AddPath(doc->get_Utils()->CreateRectangle(imageBox));
21            path->set_Stroke(doc->CreateSolidColorBrush(System::Drawing::Color::get_Black()));
22            // Add an image to fit width.
23            path = doc->get_Utils()->CreateImage(dataDir + u"R08LN_NN.jpg", imageBox, Aspose::Page::XPS::ImageMode::FitToWidth);
24            // Prevent tiling.
25            (System::ExplicitCast<Aspose::Page::XPS::XpsModel::XpsImageBrush>(path->get_Fill()))->set_TileMode(Aspose::Page::XPS::XpsModel::XpsTileMode::None);
26            doc->Add<System::SharedPtr<XpsPath>>(path);
27
28            // Add an image to fit width.
29            doc->Add<System::SharedPtr<XpsPath>>(doc->get_Utils()->CreateImage(dataDir + u"R08LN_NN.jpg", System::Drawing::RectangleF(220.f, 10.f, 200.f, 100.f), Aspose::Page::XPS::ImageMode::FitToHeight));
30
31            // Add an image to fit width.
32            doc->Add<System::SharedPtr<XpsPath>>(doc->get_Utils()->CreateImage(dataDir + u"R08LN_NN.jpg", System::Drawing::RectangleF(430.f, 10.f, 100.f, 200.f), Aspose::Page::XPS::ImageMode::FitToBox));
33
34            // Save resultant XPS document
35            doc->Save(dataDir + u"UseImageUtilsXPS_out.xps");
36        }
37        catch(...)
38        {
39            __dispose_guard_0.SetCurrentException(std::current_exception());
40        }
41    }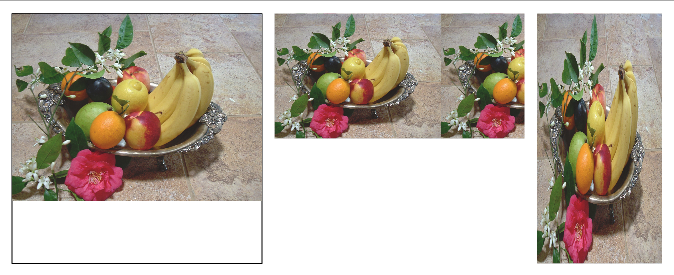
42 // ExEnd:UsingImageUtils繰り返しますが、新しいXPSドキュメントから始めて、最初のページのサイズを調整します。この時点で、デフォルトでは、ブラシとして使用される画像は、 xpstilemode.tileモードで使用された場合と同じように、長方形の領域を越えてタイルをタイル張ります。ただし、この例の最初の部分では、このタイルを防ぐ方法を示します。
そのため、最初に画像を(10、10)に表示し、幅200ユニット、200単位の長方形ボックスの幅をフィットさせたいと考えています。結果をより明確にするために、最初にボックス自体を描きます。 Next, we create the image (note that it is actually a filled path).最後に、パスの塗りつぶしを取得して
xpsimagebrushにキャストした後、 tilemodeプロパティを xpstilemode.noneに設定します。
右側には、同じ画像を配置し、画像ボックスの高さに合わせます。タイルに注意してください。
最後に、同じ画像を再び右に配置し、画像ボックスの高さと幅の両方に合わせて画像を歪めます。
そして、これが保存されたXPSファイルの結果です: