PostScript での図形の操作 | .NET
PSドキュメントに図形を追加する
PSに四角形を追加する
Aspose.Page for .NETライブラリを使用して PsDocumentに四角形を追加するには、次の手順に従います。
- 出力されたPSファイル用の出力ストリームを作成します。
- デフォルトのオプションで PsSaveOptionsオブジェクトを作成します。
- 既に作成済みの出力ストリームと保存オプションを使用して、1ページのPsDocumentを作成します。
- 四角形から四角形System.Drawing.Drawing2D.GraphicsPathを作成します。
- PsDocumentの現在のグラフィックス状態にペイントを設定します。
- 四角形のパスを塗りつぶします。
- ページを閉じます。
- ドキュメントを保存します。
四角形の輪郭線を描く場合、最初の4つの手順と最後の2つの手順は同じですが、5と6の手順は以下のようになります。
ストロークをPsDocumentの現在のグラフィック状態に設定します。
四角形のパスをストローク(アウトライン)します。
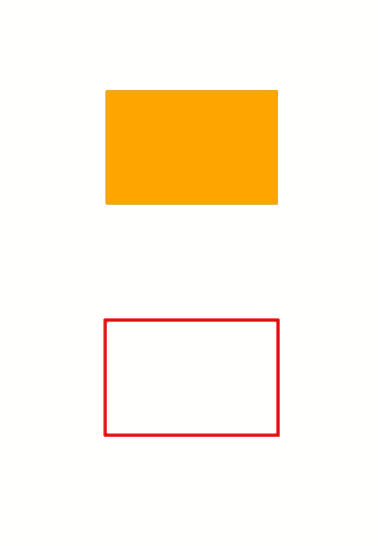
 1// Add Rectangle to PS document.
 2
 3string outputFileName = "AddRectangle_outPS.ps";
 4
 5//Create save options with A4 size
 6PsSaveOptions options = new PsSaveOptions();
 7
 8// Create new 1-paged PS Document
 9PsDocument document = new PsDocument(OutputDir + outputFileName, options, false);
10
11//Create graphics path from the first rectangle
12GraphicsPath path = new GraphicsPath();
13path.AddRectangle(new RectangleF(250, 100, 150, 100));
14//Set paint
15document.SetPaint(new SolidBrush(Color.Orange));
16//Fill the rectangle
17document.Fill(path);
18
19//Create graphics path from the second rectangle
20path = new GraphicsPath();
21path.AddRectangle(new RectangleF(250, 300, 150, 100));
22//Set stroke
23document.SetStroke(new Pen(new SolidBrush(Color.Red), 3));
24//Stroke (outline) the rectangle
25document.Draw(path);
26
27//Close current page
28document.ClosePage();
29
30//Save the document
31document.Save();Linux、macOS、その他のWindows以外のオペレーティングシステムでは、 Aspose.Page.Drawing NuGetパッケージをご利用いただけます。このパッケージは、System.Drawingシステムライブラリではなく、Aspose.Drawingバックエンドを使用します。
そのため、System.Drawing名前空間ではなく、Aspose.Page.Drawing名前空間をインポートしてください。上記および以下のコードスニペットでは、System.Drawing.Rectangleの代わりにAspose.Page.Drawing.Rectangleが、System.Drawing.Drawing2D.GraphicsPathの代わりにAspose.Page.Drawing.Drawing2D.GraphicsPathが使用されます。GitHubのコード例には、必要な置換がすべて含まれています。
Java の PS ドキュメント内のシェイプの操作を参照してください。
このコードを実行した結果は次のように表示されます。
PS に楕円を追加
PsDocument に楕円を追加するには、以下の 8 つの手順が必要です。
- 出力先の PS ファイルの出力ストリームを作成します。
- デフォルトのオプションで PsSaveOptions オブジェクトを作成します。
- 既に作成済みの出力ストリームと保存オプションを使用して、1 ページの PsDocument を作成します。
- 四角形から楕円の System.Drawing.Drawing2D.GraphicsPath を作成します。
- PsDocument の現在のグラフィックス状態をペイントに設定します。
- 楕円のパスを塗りつぶします。
- ページを閉じます。
- ドキュメントを保存します。
楕円の輪郭線を描く場合、最初の4つの手順と最後の2つの手順は同じですが、5と6の手順は以下のようになります。
ストロークをPsDocumentの現在のグラフィック状態に設定します。
楕円のパスを輪郭線で描きます。
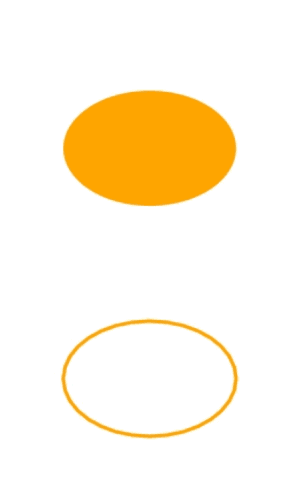
 1// Add ellipse to PS document.
 2
 3string outputFileName = "AddEllipse_outPS.ps";
 4
 5//Create save options with A4 size
 6PsSaveOptions options = new PsSaveOptions();
 7
 8// Create new 1-paged PS Document
 9PsDocument document = new PsDocument(OutputDir + outputFileName, options, false);
10
11//Create graphics path from the first ellipse
12GraphicsPath path = new GraphicsPath();
13path.AddEllipse(new RectangleF(250, 100, 150, 100));
14//Set paint
15document.SetPaint(new SolidBrush(Color.Orange));
16//Fill the ellipse
17document.Fill(path);
18
19//Create graphics path from the second ellipse
20path = new GraphicsPath();
21path.AddEllipse(new RectangleF(250, 300, 150, 100));
22//Set stroke
23document.SetStroke(new Pen(new SolidBrush(Color.Red), 3));
24//Stroke (outline) the ellipse
25document.Draw(path);
26
27//Close current page
28document.ClosePage();
29
30//Save the document
31document.Save();このコードを実行した結果は次のように表示されます。
ご覧のとおり、System.Drawing.Drawing2D.GraphicsPath に配置できる図形(閉じているものも閉じていないものも)は、 PsDocument で塗りつぶしたり描画したりできます。 切り取りも可能ですが、これについては別の記事で説明します。
サンプルとデータ ファイルは GitHub からダウンロードできます。