PostScript での変換の操作 | .NET
PS Document 内のコンテンツを変換する
この記事では、PsDocument に追加された長方形パスに対して、移動、拡大縮小、回転、傾斜といった様々な変換を行う方法について説明します。
1つのコードスニペットを複数のコードに分割し、開始、終了、そして各変換を個別に実行します。PostScript における変換は、常に “gsave” 演算子と “grestore” 演算子によってバインドされたグラフィック状態で実行されます。そのため、PsDocument には “WriteGraphicsSave()” と “WriteGraphicsRestore()” というメソッドが用意されています。これらのメソッドを使用することで、ネストされたグラフィック状態を含むあらゆるコンテンツを追加し、変換やクリッピングを行うことができます。これらの変換は、外側のグラフィック状態には影響しませんが、ネストされたグラフィック状態には影響します。
“WriteGraphicsSave()” メソッドと “WriteGraphicsRestore()” メソッドを使用せずに変換を行うと、上位レベルのグラフィックス状態で変換が行われ、PsDocument 内のすべてのコンテンツがこの変換の対象となります。
ドキュメントのコンテンツに対して最初から変換を設定するアルゴリズムは、以下の手順で構成されます。
- 結果のPSファイル用の出力ストリームを作成します。
- PsSaveOptions を作成します。
- 既に作成した出力ストリームと保存オプションを使用して、 PsDocument を作成します。
- グラフィックス状態を保存します。新しいグラフィックス状態を作成し、以前のグラフィックス状態をグラフィックス状態スタックに格納します。
- 必要な変換を追加します。移動、拡大縮小、回転、傾斜、またはこれらの組み合わせです。コードでは、各変換コンポーネントの影響を個別に表示し、最後に一度に3つずつ表示します。
- 変換に必要なコンテンツを追加します。今回のケースでは、四角形から四角形 GraphicsPath を作成し、それを塗りつぶしました。変換を行う前に1つの四角形を作成し、現在のグラフィックス状態における各変換後にその四角形を塗りつぶします。
- グラフィックス状態を復元して、適用された変換の影響を受けない前の状態に戻します。この例では、上位レベルのグラフィックス状態です。
このコードでは、出力ストリームとPsSaveOptionsからPsDocumentを作成し、上位レベルのグラフィックス状態をポイント100,100に変換して最初の四角形をオフセットし、最後にその四角形から最初の四角形GraphicsPathを作成します。
 1//Create an output stream for PostScript document
 2using (Stream outPsStream = new FileStream(dataDir + "Transformations_outPS.ps", FileMode.Create))
 3{
 4    //Create save options with default values
 5    PsSaveOptions options = new PsSaveOptions();
 6
 7    // Create new 1-paged PS Document
 8    PsDocument document = new PsDocument(outPsStream, options, false);
 9
10    document.Translate(100, 100);
11
12    //Create graphics path from the rectangle
13    GraphicsPath path = new GraphicsPath();
14    path.AddRectangle(new RectangleF(0, 0, 150, 100));
Linux、macOS、その他のWindows以外のオペレーティングシステムでは、 Aspose.Page.Drawing NuGetパッケージをご利用いただけます。このパッケージは、System.Drawingシステムライブラリではなく、Aspose.Drawingバックエンドを使用します。
そのため、System.Drawing名前空間ではなく、Aspose.Page.Drawing名前空間をインポートしてください。上記および以下のコードスニペットでは、System.Drawing.RectangleFではなくAspose.Page.Drawing.RectangleFが使用され、System.Drawing.Drawing2D.GraphicsPathではなくAspose.Page.Drawing.Drawing2D.GraphicsPathが使用されます。GitHubのコード例には、必要な置換がすべて含まれています。
ここでは、上位レベルのグラフィックス状態の現在のペイントとしてオレンジ色を設定し、この四角形を塗りつぶします。
結果として得られるPSファイルは、上位レベルのグラフィックス状態にあり、変換されていない最初の図形を示します。
1////////////////////////////////////// No transformations ///////////////////////////////////////////////////////////////
2    //Set a paint in graphics state on upper level
3    document.SetPaint(new SolidBrush(Color.Orange));
4
5    //Fill the first rectangle that is on on the upper-level graphics state and that is without any transformations.
6    document.Fill(path);
7/////////////////////////////////////////////////////////////////////////////////////////////////////////////////////////ここで、上位レベルのグラフィックス状態を基準にX軸で250ポイント移動する新しいグラフィックス状態を作成し、この新しいグラフィックス状態に青で塗りつぶされた同じ長方形パスを追加します。最後に、上位レベルのグラフィックス状態上で現在のグラフィックス状態から抜け出します。
 1////////////////////////////////////// Translation //////////////////////////////////////////////////////////////////////
 2
 3    //Save the graphics state in order to return back to this state after transformation
 4    document.WriteGraphicsSave();
 5
 6    //Displace current graphics state on 250 to the right. So we add translation component to the current transformation.
 7    document.Translate(250, 0);
 8
 9    //Set the paint in the current graphics state
10    document.SetPaint(new SolidBrush(Color.Blue));
11
12    //Fill the second rectangle in the current graphics state (has translation transformation)
13    document.Fill(path);
14
15    //Restore the graphics state to the previus (upper) level
16    document.WriteGraphicsRestore();
17/////////////////////////////////////////////////////////////////////////////////////////////////////////////////////////
次の四角形を配置するために、上位レベルのグラフィックス状態を変換します。
1    //Displace on 200 to the bottom.
2    document.Translate(0, 200);
ここでは、X 軸で 0.5、Y 軸で 0.75 にスケーリングされるグラフィックス状態を作成し、この新しいグラフィックス状態に、赤色 で塗りつぶされた同じ長方形パスを追加します。最後に、上位レベルのグラフィックス状態で現在のグラフィックス状態を終了します。
 1////////////////////////////////////// Scaling //////////////////////////////////////////////////////////////////////////
 2    //Save the graphics state in order to return back to this state after transformation
 3    document.WriteGraphicsSave();
 4
 5    //Scale current graphics state on 0.5 in X axis and on 0.75f in Y axis. So we add scale component to the current transformation.
 6    document.Scale(0.5f, 0.75f);
 7
 8    //Set the paint in the current graphics state
 9    document.SetPaint(new SolidBrush(Color.Red));
10
11    //Fill the third rectangle in the current graphics state (has scale transformation)
12    document.Fill(path);
13
14    //Restore the graphics state to the previus (upper) level
15    document.WriteGraphicsRestore();
16//////////////////////////////////////////////////////////////////////////////////////////////////////////////////////
次の四角形を配置するために、上位レベルのグラフィックス状態を変換します。
1    //Displace upper level graphics state on 250 to the right.
2 document.Translate(250, 0);次に、上位レベルのグラフィックス状態に対して時計回りに45度回転した新しいグラフィックス状態を作成し、この新しいグラフィックス状態に緑で塗りつぶされた同じ長方形パスを追加します。最後に、上位レベルのグラフィックス状態上で現在のグラフィックス状態を終了します。
 1////////////////////////////////////// Rotation //////////////////////////////////////////////////////////////////////
 2    //Save the graphics state in order to return back to this state after transformation
 3    document.WriteGraphicsSave();
 4
 5    //Rotate current graphics state on 45 degrees around origin of current graphics state (350, 300). So we add rotation component to the current transformation.
 6    document.Rotate(45));
 7
 8    //Set the paint in the current graphics state
 9    document.SetPaint(new SolidBrush(Color.Green));
10
11    //Fill the fourth rectangle in the current graphics state (has rotation transformation)
12    document.Fill(path);
13
14    //Restore the graphics state to the previus (upper) level
15    document.WriteGraphicsRestore();
16//////////////////////////////////////////////////////////////////////////////////////////////////////////////////////
次の四角形をページ上の空白スペースに配置するために、上位レベルのグラフィックス状態を変換します。
1    //Returns upper level graphics state back to the left and displace on 200 to the bottom.
2 document.Translate(-250, 200);次に、せん断される新しいグラフィック状態を作成し、この新しいグラフィック状態に、ピンク 色で塗りつぶされた同じ長方形パスを追加します。最後に、上位レベルのグラフィック状態で現在のグラフィック状態を終了します。
 1////////////////////////////////////// Shearing //////////////////////////////////////////////////////////////////////
 2    //Save the graphics state in order to return back to this state after transformation
 3    document.WriteGraphicsSave();
 4
 5    //Shear current graphics state. So we add shear component to the current transformation.
 6    document.Shear(0.1f, 0.2f);
 7
 8    //Set the paint in the current graphics state
 9    document.SetPaint(new SolidBrush(Color.Pink));
10
11    //Fill the fifth rectangle in the current graphics state (has shear transformation)
12    document.Fill(path);
13
14    //Restore the graphics state to the previus (upper) level
15    document.WriteGraphicsRestore();
16//////////////////////////////////////////////////////////////////////////////////////////////////////////////////////
次の四角形をページ上の空白スペースに配置するために、上位レベルのグラフィックス状態を変換します。
1    //Displace upper level graphics state on 250 to the right.
2 document.Translate(250, 0);ここで、移動、拡大縮小、回転などの複雑な変換が行われる最後のグラフィックス状態を作成し、この新しいグラフィックス状態に、アクアマリン 色で塗りつぶされた同じ長方形パスを追加します。 最後に、上位レベルのグラフィックス状態で現在のグラフィックス状態を終了します。
 1////////////////////////////////////// Complex transformation ////////////////////////////////////////////////////////
 2    //Save the graphics state in order to return back to this state after transformation
 3    document.WriteGraphicsSave();
 4
 5    //Transform current graphics state with complex transformation. So we add translation, scale and rotation components to the current transformation.
 6    document.Transform(new Matrix(1.2f, -0.965925f, 0.258819f, 1.5f, 0f, 50));
 7
 8    //Set the paint in the current graphics state
 9    document.SetPaint(new SolidBrush(Color.Aquamarine));
10
11    //Fill the sixth rectangle in the current graphics state (has complex transformation)
12    document.Fill(path);
13
14    //Restore the graphics state to the previus (upper) level
15    document.WriteGraphicsRestore();
16//////////////////////////////////////////////////////////////////////////////////////////////////////////////////////
最後の四角形をページ上の空白スペースに配置するために、上位レベルのグラフィックス状態を変換します。
1    //Returns upper level graphics state back to the left and displace on 200 to the bottom.
2    document.Translate(-250, 200);
最後に上位レベルのグラフィックス状態に再配置した塗りつぶされた四角形は、下位レベルのグラフィックス状態の変換や色の変更を受けていないことを示しています。 オレンジ色は現在のペイントのままです。
1////////////////////////////////////// Again no transformation ////////////////////////////////////////////////////////
2    // Demonstrates that current graphics state's color is orange that was set up at the beginning of the code.
3    //Fill the seventh rectangle in the current graphics state (has no transformation)
4    document.Fill(path);
5//////////////////////////////////////////////////////////////////////////////////////////////////////////////////////
最後に現在のページを閉じてドキュメントを保存します。
1    //Close current page
2    document.ClosePage();
3
4    //Save the document
5    document.Save();
6}
PSドキュメントでの変換の操作については、 Java を参照してください。
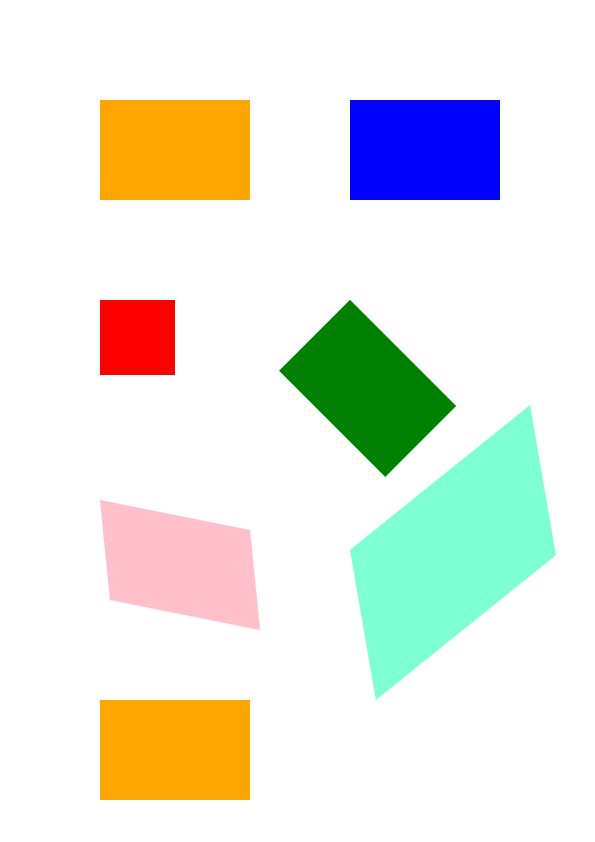
このコードを実行すると、次のようになります。
サンプルとデータ ファイルは GitHub からダウンロードできます。