Using XPS graphic utilities | .NET
XPS でシンプルな図形を 簡単に 作成する方法
XPS 仕様では、複雑な図形を作成するために使用できるグラフィック プリミティブ要素が定義されています。Aspose.Page for .NET は、これらの要素をカプセル化するクラスを提供しています。しかし、扇形や円弧、円に内接または外接する正 n 角形など、比較的シンプルな図形を作成する場合でも、これらのクラスを使用するのは少々面倒です。円や楕円を描画することさえ、実際にはそれほど簡単ではなく、むしろそうあるべきかもしれません。そのため、Aspose.Page は、こうしたタスクの実行時間を節約できるユーティリティ メソッドのセットも提供しています。
次の例では、利用可能なすべての図形ユーティリティを使用しています。これらすべてが XpsPathGeometry オブジェクトを返すことに注意してください。このオブジェクトは XPS パス の構築に使用できます。また、これらのパスには、ブラシ、ストロークパターン、不透明度などの外観プロパティを指定できます。
 1// Using shape utilities for adding shapes to XPS document.
 2
 3string outputFileName = "UseShapeUtilsXPS_out.xps";
 4
 5// Create new XPS Document
 6using (XpsDocument doc = new XpsDocument())
 7{
 8    // Set first page's size.
 9    doc.Page.Width = 650f;
10    doc.Page.Height = 240f;
11
12    // Draw a circle with center (120, 120) and radius 100.
13    XpsPath path = doc.CreatePath(doc.Utils.CreateCircle(new PointF(120f, 120f), 100f));
14    path.Fill = doc.CreateSolidColorBrush(Color.Green);
15    doc.Add(path);
16
17    // Inscribe a regular pentagon in the circle.
18    path = doc.CreatePath(doc.Utils.CreateRegularInscribedNGon(5, new PointF(120f, 120f), 100f));
19    path.Fill = doc.CreateSolidColorBrush(Color.Red);
20    doc.Add(path);
21
22    // Circumscribe a regular hexagon around the circle.
23    path = doc.CreatePath(doc.Utils.CreateRegularCircumscribedNGon(6, new PointF(120f, 120f), 100f));
24    path.Stroke = doc.CreateSolidColorBrush(Color.Magenta);
25    path.StrokeThickness = 3f;
26    doc.Add(path);
27
28    // Draw a sector of the circle centered at (340, 120), starting at -45 degrees and ending at +45 degrees.
29    path = doc.CreatePath(doc.Utils.CreatePieSlice(new PointF(340f, 120f), 100f, -45f, 45f));
30    path.Stroke = doc.CreateSolidColorBrush(Color.Red);
31    path.StrokeThickness = 5f;
32    doc.Add(path);
33
34    // Draw a segment of the circle centered at (340, 120), starting at -45 degrees and ending at +45 degrees.
35    path = doc.CreatePath(doc.Utils.CreateCircularSegment(new PointF(340f, 120f), 100f, -45f, 45f));
36    path.Fill = doc.CreateSolidColorBrush(Color.Black);
37    doc.Add(path);
38
39    // Draw a rectangle with the top left vertex (530, 20), width 100 units and height 200 units.
40    path = doc.CreatePath(doc.Utils.CreateRectangle(new RectangleF(530f, 20f, 100f, 200f)));
41    path.Stroke = doc.CreateSolidColorBrush(Color.Red);
42    doc.Add(path);
43
44    // Draw an ellipse with center (580, 120) and radii 50 and 100.
45    path = doc.CreatePath(doc.Utils.CreateEllipse(new PointF(580f, 120f), 50f, 100f));
46    path.Fill = doc.CreateSolidColorBrush(Color.Yellow);
47    doc.Add(path);
48
49    doc.Save(OutputDir + outputFileName);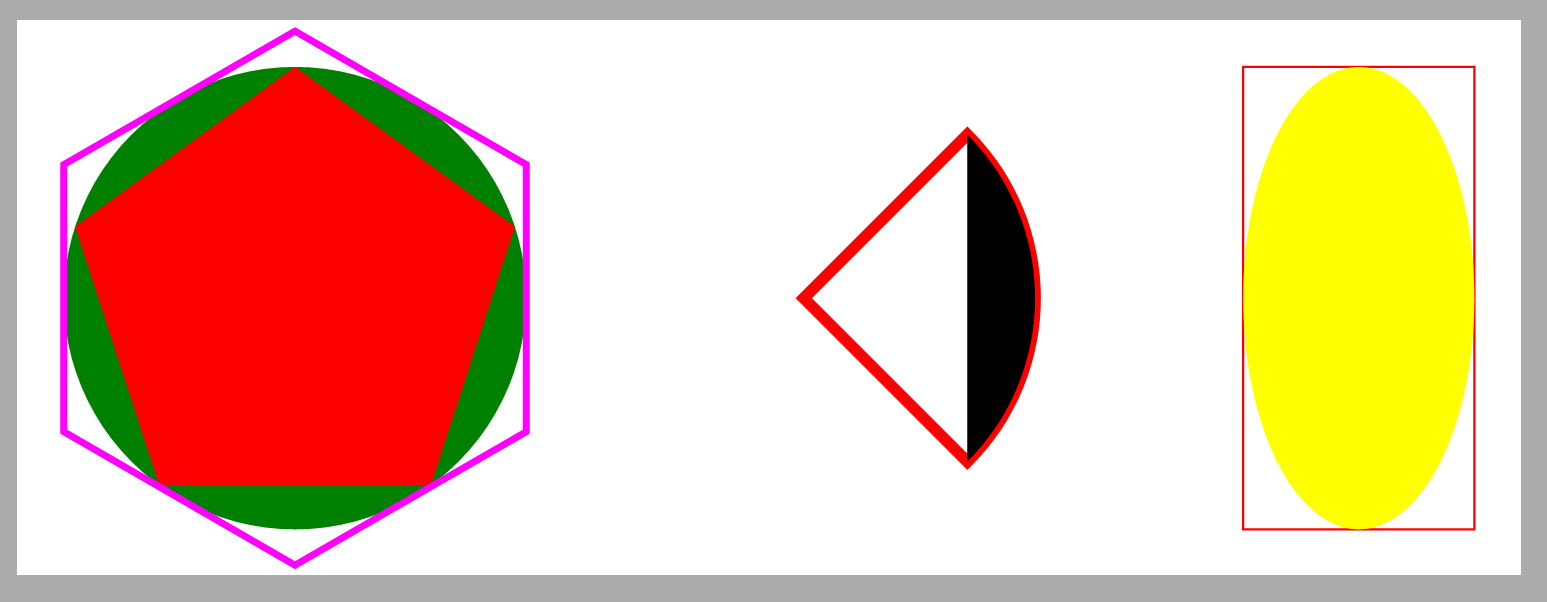
50}まず、新しい XPS ドキュメントを作成し、最初のページのサイズを調整します。ページに配置する最初の図形は、緑色で塗りつぶされた円(中心と半径で指定)です。次に、その円に塗りつぶされていない赤い正五角形を内接させます。次に、マゼンタで線を引いた外接正六角形を描きます。
右側では、まず-45度から+45度までの赤い扇形(または「パイスライス」)を描き、次に扇形の上に同じパラメータを持つ黒い円弧を描きます。
描画の最後の部分は、赤い長方形(左上の頂点と寸法で指定)と、長方形に内接する黄色い楕円(中心と半径で指定)で構成されます。ここでは、内接を「手作業」で制御します。
保存されたXPSファイルには、以下の内容が表示されるはずです。
XPSページに簡単に画像を追加する方法
XPS仕様で定義されたプリミティブを使用すると、ページに画像を追加するには、次の2つの手順が必要です。
- 画像で塗りつぶしたい長方形のパスを追加します。
- パスに画像ブラシを設定します。ここでは、ビューボックスとビューポートを指定する必要があります。通常、最初の2つのパラメータを正確に指定するには、画像の解像度とピクセル単位のサイズを知っておく必要があります。
しかし幸いなことに、Aspose.Page API for .NETのXPSグラフィックユーティリティの中に、(ほぼ)すべての作業を自動的に実行できる便利なメソッドがあります。また、さまざまなフィットモードも提供しています。以下の例をご覧ください。
 1// Using image utilities for adding images to XPS document.
 2
 3string outputFileName = "UseImageUtilsXPS_out.xps";
 4
 5// Create new XPS Document
 6using (XpsDocument doc = new XpsDocument())
 7{
 8    // Set first page's size.
 9    doc.Page.Width = 540f;
10    doc.Page.Height = 220f;
11
12    // Draw the image box.
13    RectangleF imageBox = new RectangleF(10f, 10f, 200f, 200f);
14    XpsPath path = doc.AddPath(doc.Utils.CreateRectangle(imageBox));
15    path.Stroke = doc.CreateSolidColorBrush(Color.Black);
16    // Add an image to fit width.
17    path = doc.Utils.CreateImage(DataDir + "R08LN_NN.jpg", imageBox, ImageMode.FitToWidth);
18    // Prevent tiling.
19    ((XpsImageBrush)path.Fill).TileMode = XpsTileMode.None;
20    doc.Add(path);
21
22    // Add an image to fit width.
23    doc.Add(doc.Utils.CreateImage(DataDir + "R08LN_NN.jpg", new RectangleF(220f, 10f, 200f, 100f), ImageMode.FitToHeight));
24
25    // Add an image to fit width.
26    doc.Add(doc.Utils.CreateImage(DataDir + "R08LN_NN.jpg", new RectangleF(430f, 10f, 100f, 200f), ImageMode.FitToBox));
27
28    // Save resultant XPS document
29    doc.Save(OutputDir + outputFileName);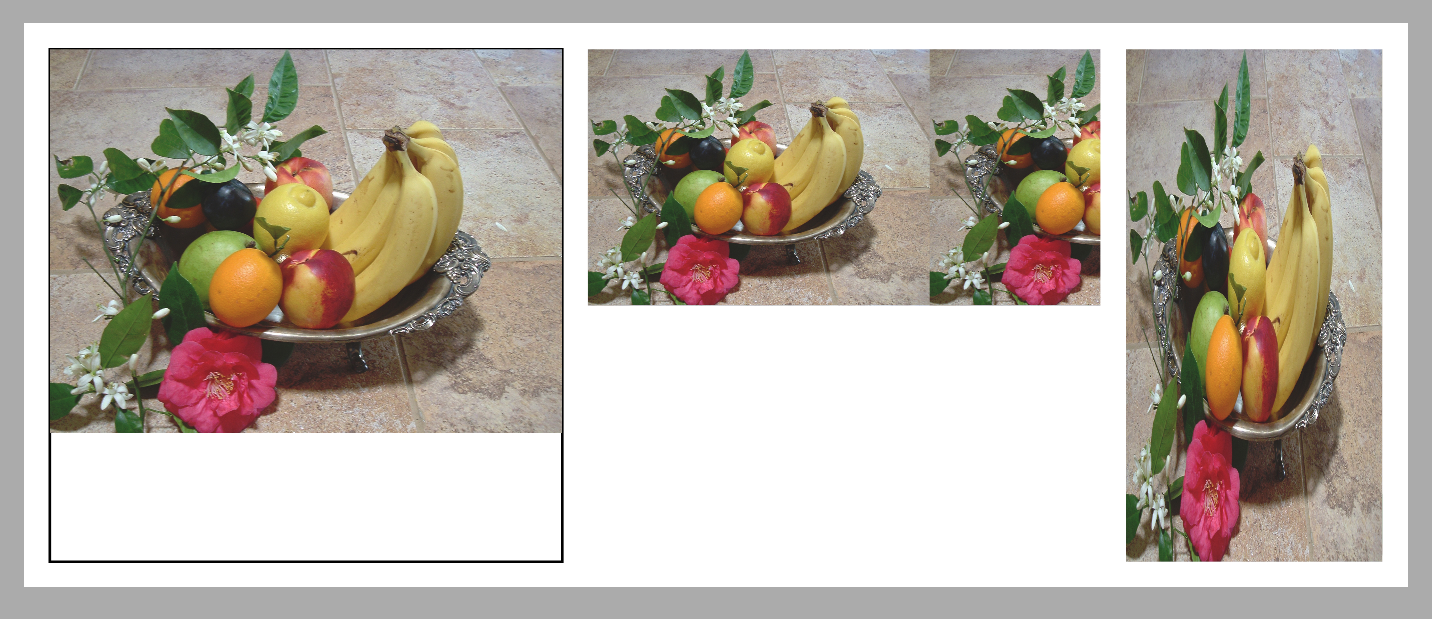
30}ここでも、新しい XPS ドキュメントを作成し、最初のページのサイズを調整します。ここで注目すべき点は、ブラシとして使用されている画像は、既定では XpsTileMode.Tile モードで使用された場合と同じように、長方形領域全体に並べて表示されることです。ただし、例の最初の部分では、この並べて表示されないようにする方法を示します。
まず、画像を (10, 10) に表示し、幅 200 単位、高さ 200 単位の長方形のボックスの幅に合わせる必要があります。結果をより明確にするために、まずボックス自体を描画します。次に、画像を作成します (実際には塗りつぶされたパスであることに注意してください)。最後に、パスの塗りつぶしを取得して
XpsImageBrush にキャストした後、TileMode プロパティを XpsTileMode.None に設定します。
右側には、同じ画像を画像ボックスの高さに合わせて配置します。タイリングされていることに注意してください。
最後に、同じ画像をもう一度右側に配置し、画像ボックスの高さと幅の両方に合わせて配置します。これにより、画像が歪んでしまいます。
保存された XPS ファイルの結果は次のとおりです。