ハッチパターンの操作 | Python
PSドキュメントにハッチパターンを追加する
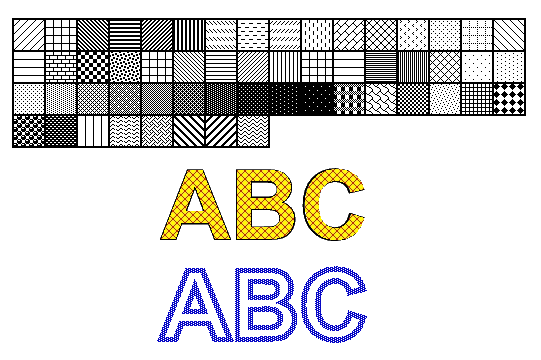
ハッチパターンは、多くの場合、シンプルな白黒画像に様々なハッチデザインを施したもので、テクスチャのタイリングパターンとして機能します。.NET経由のAspose.Page for Pythonでは、これらのパターンはaspose.pydrawing.Brushから派生したaspose.pydrawing.drawing2d.HatchBrushクラスで表現されます。aspose.pydrawing.TextureBrushとは異なり、HatchBrushはタイリングに使用する画像を定義する、名前付きの定義済みスタイルを提供します。Aspose.Page for Pythonは53種類のハッチスタイルを提供しており、これらはすべてPsDocumentでの塗りつぶしやストロークに利用できます。
グラフィックオブジェクトをハッチパターンで描画するには、目的のハッチスタイルを持つHatchBrushを作成し、set_paint()、またはaspose.pydrawing.Brushを受け入れる**fill_text()メソッドやfill_and_stroke_text()**メソッドのいずれかに渡します。
グラフィック オブジェクトをハッチ パターンでアウトラインするには、 PsDocument でハッチ パターンを現在のペイントとして設定し、新しい aspose.pydrawing.Pen を作成して、set_stroke() または aspose.pydrawing.Pen を受け入れる outline_text() メソッドや fill_and_stroke_text() メソッドのいずれかに渡します。
以下の例では、ハッチ パターンで図形を塗りつぶす方法、Python でのさまざまなハッチ スタイルの使用方法、ハッチ パターンでテキストを塗りつぶしてアウトラインする方法を示します。
新しいPSドキュメントでグラフィックオブジェクトをハッチパターンでペイントするアルゴリズムは次のとおりです。
- 生成されるPSファイル用の出力ストリームを作成します。
- PsSaveOptions を初期化します。
- 既に作成済みの出力ストリームと保存オプションを使用して、 PsDocument を作成します。
- 塗りつぶしまたはアウトライン化するオブジェクトに応じて、図形またはフォントを作成します。
- 目的のスタイルで aspose.pydrawing.drawing2d.HatchBrush オブジェクトを作成します。
- PsDocument で、ハッチペイントを現在のペイントとして設定します。
- 現在のペイントで図形を塗りつぶすか、テキストを塗りつぶします。 aspose.pydrawing.Brush をパラメーターとして受け入れるテキスト入力メソッドのいずれかを使用する場合は、前の手順をスキップできます。
- ページを閉じます。
- ドキュメントを保存します。
グラフィックオブジェクトにハッチパターンの*ストローク(アウトライン)*が必要な場合は、最後の4つの手順は次のように変更します。
- PsDocument でハッチペイントを現在のペイントとして設定します。
- aspose.pydrawing.Pen オブジェクトを作成します。
- このストロークを PsDocument で現在のストロークとして設定します。
- 現在のペイントとストロークで図形のアウトラインを作成するか、テキストのアウトラインを作成します。aspose.pydrawing.Pen をパラメーターとして受け入れるテキストのアウトライン化メソッドのいずれかを使用する場合は、前の手順は省略できます。
- ページを閉じます。
- ドキュメントを保存します。
 1# The path to the documents directory.
 2data_dir = Util.get_data_dir_working_with_hatches()
 3
 4# Create an output stream for the PostScript document
 5with open(data_dir + "AddHatchPattern_outPS.ps", "wb") as out_ps_stream:
 6    # Create the save options with A4 size
 7    options = PsSaveOptions()
 8
 9    # Create a new 1-paged PS Document
10    document = PsDocument(out_ps_stream, options, False)
11
12    x0 = 20.
13    y0 = 100.
14    square_side = 32.
15    width = 500.
16    sum_x = 0.
17
18    # Restore a graphics state
19    document.write_graphics_save()
20
21    # Translate to initial point
22    document.translate(x0, y0)
23
24    # Create a rectngle path for every pattern square
25    path = aspose.pydrawing.drawing2d.GraphicsPath()
26    path.add_rectangle(aspose.pydrawing.RectangleF(0, 0, square_side, square_side))
27
28    # Create a pen for outlining the pattern square
29    pen = GraphicsFactory.create_pen_by_color_and_width(aspose.pydrawing.Color.black, 2)
30
31    # For every hatch pattern style
32    hatch_style = 0
33    while hatch_style <= 52:
34        # Set the paint with the current hatch brush style
35        document.set_paint(aspose.pydrawing.drawing2d.HatchBrush(aspose.pydrawing.drawing2d.HatchStyle(hatch_style),
36            aspose.pydrawing.Color.black, aspose.pydrawing.Color.white))
37
38        # Calculate the displacement not to go beyond the page bounds
39        x = square_side
40        y = 0
41        if sum_x >= width:
42            x = -(sum_x - square_side)
43            y += square_side
44        # Translate the current graphics state
45        document.translate(x, y)
46        # Fill the pattern square
47        document.fill(path)
48        # Set the stroke
49        document.set_stroke(pen)
50        # Draw the square outline
51        document.draw(path)
52
53        # Calculate the distance from X0
54        if sum_x >= width:
55            sum_x = square_side
56        else:
57            sum_x += x
58        hatch_style += 1
59
60    # Restore the graphics state
61    document.write_graphics_restore()
62
63    # Fill the text with the hatch pattern
64    brush = aspose.pydrawing.drawing2d.HatchBrush(aspose.pydrawing.drawing2d.HatchStyle.DIAGONAL_CROSS,
65    aspose.pydrawing.Color.red, aspose.pydrawing.Color.yellow)
66    font = ExternalFontCache.fetch_dr_font("Arial", 96, aspose.pydrawing.FontStyle.BOLD)
67    document.fill_and_stroke_text("ABC", font, 200, 300, brush, pen)
68
69    # Outline text with the hatch pattern
70    brush = aspose.pydrawing.drawing2d.HatchBrush(aspose.pydrawing.drawing2d.HatchStyle.PERCENT50,
71    aspose.pydrawing.Color.blue, aspose.pydrawing.Color.white)
72    document.outline_text("ABC", font, 200, 400, GraphicsFactory.create_pen_by_brush_and_width(brush, 5))
73
74
75    # Close the current page
76    document.close_page()
77
78    # Save the document
79 document.save()このコードを実行した結果は
サンプルとデータ ファイルは GitHub からダウンロードできます。