Working with Textures in PS file | Python
PSドキュメントにテクスチャタイリングパターンを追加する
テクスチャタイリングパターンとは、図形やテキストなどのオブジェクトの塗りつぶしや描画に用いられる画像のことです。画像のサイズがオブジェクトのサイズよりも小さい場合、必要な領域を適切にカバーするために、X方向とY方向の両方に画像が繰り返されます。
グラフィックオブジェクト内でのこの画像の繰り返しは、タイリングと呼ばれます。 PsDocument でペイントやストロークを設定するには、それぞれのメソッドで、ペイントの場合はaspose.pydrawing.Brushクラスのオブジェクト、ストロークの場合はaspose.pydrawing.Penクラスのオブジェクトを提供する必要があります。
Aspose.Page for Python via .NETライブラリは、Pythonプラットフォームで提供されるaspose.pydrawing.Brushによって実装されたすべての重要なクラスを処理します。これらは、aspose.pydrawing.Color、aspose.pydrawing.TextureBrush、 aspose.pydrawing.drawing2d.LinearGradientBrush、および aspose.pydrawing.drawing2d.PathGradientBrush です。Python のストロークの色は、aspose.pydrawing.Pen オブジェクトのストロークのプロパティとは別に割り当てられ、aspose.pydrawing.Brush を再度使用します。 したがって、.NET ライブラリを介して Aspose.Page for Python は、線の描画、図形やテキストのアウトライン化にペイントの実装の完全なセットを使用できます。
Aspose.Page for Python で .NET ライブラリを使用してグラフィック オブジェクトにテクスチャ パターンを ペイント するには、set_paint() または、aspose.pydrawing.Brush をパラメーターとして受け取る fill_text() や fill_and_stroke_text() メソッドのいずれかに aspose.pydrawing.TextureBrush を渡すだけで十分です。
グラフィック オブジェクトにテクスチャ パターンを アウトライン するには、set_paint() または、ストローク ペイントをパラメーターとして受け取る outline_text() や fill_and_stroke_text() メソッドのいずれかに aspose.pydrawing.TextureBrush オブジェクトを渡す必要があります。
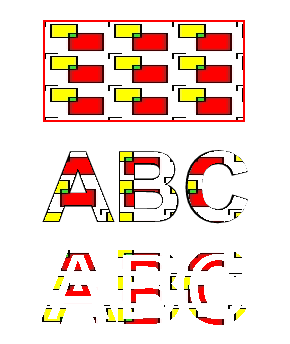
以下の例では、テクスチャタイリングパターンを使用して、図形とテキストを塗りつぶし、テキストのアウトラインを作成する方法を示します。
テクスチャパターンと PsDocument の操作手順を以下に説明します。
- 生成される PS ファイルの出力ストリームを作成します。
- デフォルトのオプションで PsSaveOptions オブジェクトを初期化します。
- 既に作成済みの出力ストリームと保存オプションを使用して、1 ページの PsDocument を作成します。
- 新しいグラフィックス状態を作成し、必要な位置に移動します。
- 画像ファイルから aspose.pydrawing.Bitmap を作成します。
- 画像から aspose.pydrawing.TextureBrush を作成します。
- テクスチャ ブラシに必要な変換を設定します。
- PsDocument の現在のグラフィック ステートで、テクスチャ ペイントを現在のペイントとして設定します。
- 四角形のパスを作成します。
- 四角形をテクスチャ ペイントで塗りつぶします。
- 現在のペイントを、後で使用できるようにローカル変数として保存します。
- 現在のペイントを赤色に設定します。
- 2 ポイント幅の aspose.pydrawing.Pen でストロークを設定します。
- 現在のストロークで四角形のアウトラインを描画します。
- 現在のグラフィック ステートから上位レベルのグラフィック ステートへ移動します。
- システム フォントを作成します。
- テキストを塗りつぶし、ストローク (アウトライン) します。塗りつぶしにはテクスチャ ペイントを使用し、ストロークには黒のペンを使用します。
- テクスチャ ペイントと新しい aspose.pydrawing.Pen を使用して、他の位置のテキストのアウトラインを描画します。
- ページを閉じます。
- ドキュメントを保存します。
 1# The path to the documents directory.
 2data_dir = Util.get_data_dir_working_with_textures()
 3
 4# Create an output stream for the PostScript document
 5with open(data_dir + "AddTextureTilingPattern_outPS.ps", "wb") as out_ps_stream:
 6    # Create the save options with the A4 size
 7    options = PsSaveOptions()
 8
 9    # Create a new 1-paged PS Document
10    document = PsDocument(out_ps_stream, options, False)
11
12
13    document.write_graphics_save()
14    document.translate(200, 100)
15
16    #Create a Bitmap object from an image file
17    with aspose.pydrawing.Bitmap(data_dir + "TestTexture.bmp") as image:
18        # Create a texture brush from the image
19        brush = aspose.pydrawing.TextureBrush(image, aspose.pydrawing.drawing2d.WrapMode.TILE)
20
21        # Add scaling in the X direction to the mattern
22        transform = aspose.pydrawing.drawing2d.Matrix(float(2), float(0), float(0), float(1), float(0), float(0))
23        brush.transform = transform
24
25        # Set this texture brush as a current paint
26        document.set_paint(brush)
27
28    # Create a rectangle path
29    path = aspose.pydrawing.drawing2d.GraphicsPath()
30    path.add_rectangle(aspose.pydrawing.RectangleF(0, 0, 200, 100))
31
32    # Fill the rectangle
33    document.fill(path)
34
35    # Get the current paint
36    paint = document.get_paint()
37
38    # Set a red stroke
39    pen1 = aspose.pydrawing.Pen(aspose.pydrawing.Color.red)
40    pen1.width = float(2)
41    document.set_stroke(pen1)
42
43    # Stroke the rectangle
44    document.draw(path)
45
46    document.write_graphics_restore()
47
48    # Fill the text with the texture pattern
49    font = aspose.page.ExternalFontCache.create_font_by_family_name("Arial", 96, aspose.pydrawing.FontStyle.BOLD)
50    pen2 = aspose.pydrawing.Pen(aspose.pydrawing.Color.black)
51    pen2.width = float(2)
52    document.fill_and_stroke_text("ABC", font, 200, 300, paint, pen2)
53
54    # Outline the text with the texture pattern
55    pen3 = aspose.pydrawing.Pen(aspose.pydrawing.Color.black)
56    pen3.brush = paint
57    pen3.width = float(5)
58    document.outline_text("ABC", font, 200, 400, pen3)
59
60    # Close the current page
61    document.close_page()
62
63    # Save the document
64 document.save()このコードを実行した結果は
サンプルとデータ ファイルは GitHub からダウンロードできます。