XPSファイル内の画像の操作 | Python
Contents
[
Hide
Show
]ここでは、Python を使用して XPS ファイル内の画像を操作する方法を説明するコードを紹介します。
XPS ドキュメント内に画像を追加する
Aspose.Page for Python via .NET は XpsPath クラスを提供しており、これを使用して XPS ドキュメントに画像を組み込むことができます。これを実現するには、Matrix と ImageBrush を作成し、XpsDocument を保存する必要があります。次のコード スニペットは、XPS ドキュメントに画像を追加するための完全な機能を示しています。
 1# The path to the documents directory.
 2data_dir = Util.get_data_dir_working_with_images()
 3# Create a new XPS Document
 4doc = XpsDocument()
 5# Add an Image
 6path = doc.add_path(doc.create_path_geometry("M 30,20 l 258.24,0 0,56.64 -258.24,0 Z"))
 7# Creating a matrix is optional, it can be used for the proper positioning
 8path.render_transform = doc.create_matrix(0.7, 0, 0, 0.7, 0, 20)
 9# Create an Image Brush
10path.fill = doc.create_image_brush(data_dir + "QL_logo_color.tif", aspose.pydrawing.RectangleF(0, 0, 258.24, 56.64),
11aspose.pydrawing.RectangleF(50, 20, 193.68, 42.48))
12# Save the resultant XPS document
13doc.save(data_dir + "AddImage_outXPS.xps")このコードを実行した結果は next

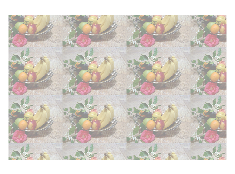
タイル画像の追加
Aspose.Page for Python via .NET は XpsPath クラスを提供しており、これを使用して XPS ドキュメントに画像を組み込むことができます。これを実現するには、Matrix と ImageBrush を作成し、タイルモードを set_tile_mode(XpsTileMode.Tile) に設定して、最後に XpsDocument を保存する必要があります。次のコードスニペットは、XPS ドキュメントにタイル画像を追加するための完全な機能を示しています。
 1# The path to the documents directory.
 2data_dir = Util.get_data_dir_working_with_images()
 3# Create a new XPS Document
 4doc = XpsDocument()
 5# Tile an image
 6# ImageBrush filled rectangle in the right top bellow
 7path = doc.add_path(doc.create_path_geometry("M 10,160 L 228,160 228,305 10,305"))
 8imageBrush: XpsImageBrush = doc.create_image_brush(data_dir + "R08LN_NN.jpg", aspose.pydrawing.RectangleF(0, 0, 128, 96),
 9    aspose.pydrawing.RectangleF(0, 0, 64, 48))
10path.fill = imageBrush
11imageBrush.tile_mode = XpsTileMode.TILE
12path.fill.opacity = 0.5
13# Save the resultant XPS document
14doc.save(data_dir + "AddTiledImage_outXPS.xps")このコードを実行した結果は next
サンプルとデータ ファイルは GitHub からダウンロードできます。