XPSファイルの透明度を操作する | Python
Contents
[
Hide
Show
]透明効果は、画像やグラフィック要素を別の画像やグラフィック要素にブレンド、フェード、オーバーレイするといった視覚効果を作成するためによく使用されます。オブジェクトの不透明度やアルファチャンネルの調整、ブレンドモードの使用、マスクやオーバーレイの適用など、さまざまな手法で実現できます。透明効果は、デザイン、イラストレーション、デジタルコンポジションにおいて、レイヤー構造や複雑な視覚効果の作成を可能にする貴重なツールです。
XPSドキュメントへの透明オブジェクトの追加
Aspose.Page for Python via .NET は、XpsPath クラスを提供しており、これを使用してXPSドキュメントに透明オブジェクトを追加できます。これを行うには、PathGeometry を指定して XpsPath に追加する必要があります。次のコードスニペットは、XPSドキュメントに透明オブジェクトを追加するための完全な機能を示しています。
 1from aspose.page.xps import *
 2from aspose.page.xps.xpsmodel import *
 3import aspose.pydrawing
 4from util import Util
 5# The path to the documents directory.
 6        data_dir = Util.get_data_dir_working_with_transparency()
 7        # Create new XPS Document
 8        doc = XpsDocument()
 9
10        # Just to demonstrate transparency
11        doc.add_path(doc.create_path_geometry("M120,0 H400 v1000 H120")).fill = doc.create_solid_color_brush(aspose.pydrawing.Color.gray)
12        doc.add_path(doc.create_path_geometry("M300,120 h600 V420 h-600")).fill = doc.create_solid_color_brush(aspose.pydrawing.Color.gray)
13
14        # Create the path with the closed rectangle geometry
15        path1: XpsPath = doc.create_path(doc.create_path_geometry("M20,20 h200 v200 h-200 z"))
16        # Set a blue solid brush to fill the path1
17        path1.fill = doc.create_solid_color_brush(aspose.pydrawing.Color.blue)
18        # Add it to the current page
19        path2: XpsPath = doc.add_path(path1)
20
21        # path1 and path2 are the same as soon as path1 hasn't been placed inside any other element
22        # (which means that path1 had no parent element).
23        # Because of that rectangle's color on the page effectively turns to green
24        path2.fill = doc.create_solid_color_brush(aspose.pydrawing.Color.green)
25
26        # Now add path2 once again. Now path2 has parent. So path3 won't be the same as path2.
27        # Thus a new rectangle is painted on the page ...
28        path3: XpsPath = doc.add_path(path2)
29        # ... and we shift it 300 units lower ...
30        path3.render_transform = doc.create_matrix(1, 0, 0, 1, 0, 300)
31        # ... and set red solid brush to fill it
32        path3.fill = doc.create_solid_color_brush(aspose.pydrawing.Color.red)
33
34        # Create a new path4 with path2's geometry ...
35        path4: XpsPath = doc.add_path(path2.data)
36        # ... shift it 300 units to the right ...
37        path4.render_transform = doc.create_matrix(1, 0, 0, 1, 300, 0)
38        # ... and set a blue solid fill
39        path4.fill = doc.create_solid_color_brush(aspose.pydrawing.Color.blue)
40
41        # Add path4 once again.
42        path5: XpsPath = doc.add_path(path4)
43        # path4 and path5 are not the same again ...
44        # (move path5 300 units lower)
45        path5.render_transform = path5.render_transform.clone() # to disconnect RenderTransform value from path4 (see next comment about Fill property)
46        path5.render_transform.translate(0, 300)
47        # ... but if we set the opacity of Fill property, it will take effect on both path5 and path4
48        # because brush is a complex property value which remains the same for path5 and path4
49        path5.fill.opacity = 0.8
50
51        # Create a new path6 with path2's geometry ...
52        path6: XpsPath = doc.add_path(path2.data)
53        # ... shift it 600 units to the right ...
54        path6.render_transform = doc.create_matrix(1, 0, 0, 1, 600, 0)
55        # ... and set a yellow solid fill
56        path6.fill = doc.create_solid_color_brush(aspose.pydrawing.Color.yellow)
57
58        # Now add path6's clone ...
59        path7: XpsPath = doc.add_path(path6.clone())
60        # (move path5 300 units lower)
61        path7.render_transform = path7.render_transform.clone()
62        path7.render_transform.translate(0, 300)
63        # ... and set the opacity for path7
64        path7.fill.opacity = 0.8
65        # Now opacity effects independantly as soon as property values are cloned along with the element
66
67        # The following code block is equivalent to the previous one.
68        # Add path6 itself. path6 and path7 are not the same. Although their Fill property values are the same
69        #XpsPath path7 = doc.add_path(path6);
70        #path7.RenderTransform = path7.RenderTransform.Clone();
71        #path7.RenderTransform.Translate(0, 300);
72        # To "disconnect" path7's Fill property from path6's Fill property reassign it to its clone (or path6's Fill clone)
73        #path7.Fill = ((XpsSolidColorBrush)path7.Fill).Clone();
74        #path7.Fill.Opacity = 0.8f;
75
76        # Save the resultant XPS document
77 doc.save(data_dir + "WorkingWithTransparency_out.xps")結果
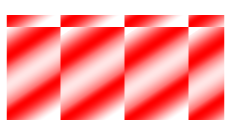
不透明マスクの設定
このソリューションでは、XPSドキュメントに不透明マスクを適用するための**set_opacity_mask()**プロパティを提供しています。これを実現するには、PathGeometryを作成し、XpsPathに追加する必要があります。画像は不透明マスクとして利用できます。この場合、各ピクセルのアルファ成分によって、下層の塗りつぶしに適用される透明度レベルが決まります。結果として得られるXPSドキュメントには、ソース画像ファイルに斜めのグラデーションストライプが重ねて表示されます。次のコードスニペットは、不透明マスクを設定するための完全な機能を示しています。
 1from aspose.page.xps import *
 2from aspose.page.xps.xpsmodel import *
 3import aspose.pydrawing
 4from util import Util
 5# The path to the documents directory.
 6data_dir = Util.get_data_dir_working_with_transparency()
 7# Create a new XPS Document
 8doc = XpsDocument()
 9#Add Canvas to the XpsDocument instance
10canvas = doc.add_canvas()
11# A rectangle with opacity masked by ImageBrush
12path = canvas.add_path(doc.create_path_geometry("M 10,180 L 228,180 228,285 10,285"))
13path.fill = doc.create_solid_color_brush(doc.create_color(1.0, 0.0, 0.0))
14imageBrush: XpsImageBrush = doc.create_image_brush(data_dir + "R08SY_NN.tif", aspose.pydrawing.RectangleF(0, 0, 128, 192),
15        aspose.pydrawing.RectangleF(0, 0, 64, 96))
16path.opacity_mask = imageBrush
17imageBrush.tile_mode = XpsTileMode.TILE
18# Save the resultant XPS document
19doc.save(data_dir + "OpacityMask_out.xps")
結果

サンプルとデータ ファイルは GitHub からダウンロードできます。