Working with Transparency in XPS file | Java
Add Transparent Object inside XPS Document
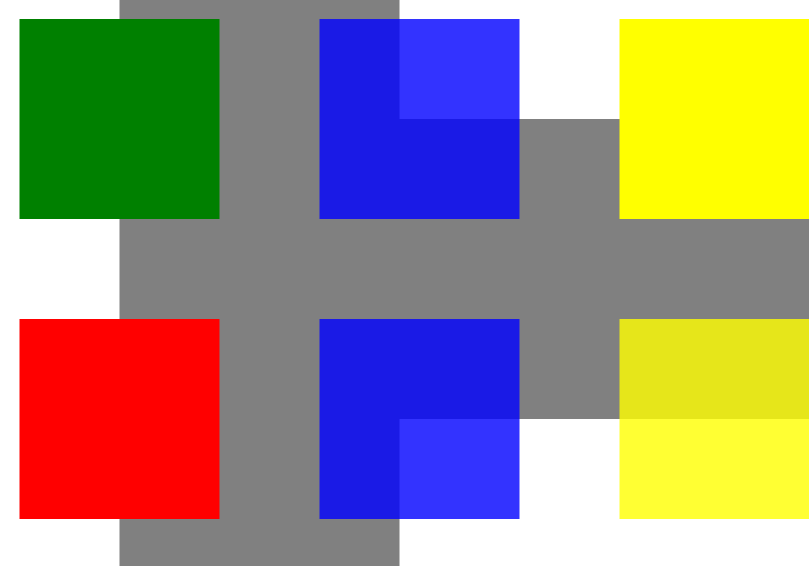
Aspose.Page for Java offers XpsPath Class, with which you can add transparent object on XPS document. You need to specify PathGeometry and add it to XpsPath. The following code snippet shows complete functionality to add transparent object on an XPS document:
 1// Demonstrates transparency in shapes in XPS document.
 2
 3// Create new XPS Document
 4XpsDocument doc = new XpsDocument();
 5
 6String outputFileName = "AddTransparentObject_outXPS.xps";
 7
 8// Just to demonstrate transparency - draw background rectangles
 9doc.addPath(doc.createPathGeometry("M120,0 H400 v1000 H120")).setFill(doc.createSolidColorBrush(doc.createColor(128,128,128)));
10doc.addPath(doc.createPathGeometry("M300,120 h600 V420 h-600")).setFill(doc.createSolidColorBrush(doc.createColor(128,128,128)));
11
12// Create path with closed rectangle geometry
13XpsPath path1 = doc.createPath(doc.createPathGeometry("M20,20 h200 v200 h-200 z"));
14// Set blue solid brush to fill path1
15path1.setFill(doc.createSolidColorBrush(doc.createColor(0, 0, 255)));
16// Add it to the current page
17XpsPath path2 = doc.add(path1);
18
19// path1 and path2 are the same as long as path1 has no parent. Setting fill on path2 affects shared brush
20path2.setFill(doc.createSolidColorBrush(doc.createColor(0, 128, 0)));
21
22// Now add path2 once again. Now path2 has parent. So path3 won't be the same as path2.
23XpsPath path3 = doc.add(path2);
24// shift it 300 units lower
25path3.setRenderTransform(doc.createMatrix(1f, 0f, 0f, 1f, 0f, 300f));
26// set red solid brush to fill it
27path3.setFill(doc.createSolidColorBrush(doc.createColor(255, 0, 0)));
28
29// Create new path4 with path2's geometry ...
30XpsPath path4 = doc.addPath(path2.getData());
31// shift it 300 units to the right ...
32path4.setRenderTransform(doc.createMatrix(1f, 0f, 0f, 1f, 300f, 0f));
33// and set blue solid fill
34path4.setFill(doc.createSolidColorBrush(doc.createColor(0, 0, 255)));
35
36// Add path4 once again.
37XpsPath path5 = doc.add(path4);
38// move path5 300 units lower and disconnect render transform from path4
39path5.setRenderTransform(path5.getRenderTransform().deepClone());
40path5.getRenderTransform().translate(0f, 300f);
41// set the opacity of Fill property - this will affect both path5 and path4 if brush instance is shared
42path5.getFill().setOpacity(0.8f);
43
44// Create new path6 with path2's geometry ...
45XpsPath path6 = doc.addPath(path2.getData());
46// shift it 600 units to the right ...
47path6.setRenderTransform(doc.createMatrix(1f, 0f, 0f, 1f, 600f, 0f));
48// and set yellow solid fill
49path6.setFill(doc.createSolidColorBrush(doc.createColor(255, 255, 0)));
50
51// Now add path6's clone ...
52XpsPath path7 = doc.add(path6.deepClone());
53// move it 300 units lower
54path7.setRenderTransform(path7.getRenderTransform().deepClone());
55path7.getRenderTransform().translate(0f, 300f);
56// set opacity for path7
57path7.getFill().setOpacity(0.8f);
58
59// Save resultant XPS document
60doc.save(getOutputDir() + outputFileName);The result

Set Opacity Mask
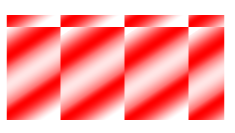
The solution offers setOpacityMask() property, with which you can set opacity mask on XPS document. You need to create PathGeometry and add it to XpsPath. An image can be used as an opacity mask and Alpha component of each pixel is used to apply over underlying fill. Generated XPS document will show slanting gradient stripes as a present over source image file. The following code snippet shows complete functionality to set opacity mask:
 1// Apply opacity mask for texture pattern in XPS document.
 2
 3// Create new XPS Document
 4XpsDocument doc = new XpsDocument();
 5
 6String outputFileName = "OpacityMask_out.xps";
 7
 8//Add Canvas to XpsDocument instance
 9XpsCanvas canvas = doc.addCanvas();
10// Rectangle with opacity masked by ImageBrush
11XpsPath path = canvas.addPath(doc.createPathGeometry("M 10,180 L 228,180 228,285 10,285"));
12path.setFill(doc.createSolidColorBrush(doc.createColor(255, 0, 0)));
13path.setOpacityMask((XpsImageBrush)doc.createImageBrush(getDataDir() + "R08SY_NN.tif", new Rectangle2D.Float(0f, 0f, 128f, 192f),
14        new Rectangle2D.Float(0f, 0f, 64f, 96f)));
15((XpsImageBrush)path.getOpacityMask()).setTileMode(XpsTileMode.Tile);
16// Save resultant XPS document
17doc.save(getOutputDir() + outputFileName);The result

You can download examples and data files from GitHub.