Working with Clips in PostScript | .NET
Add Clip in PS Document
A clip in a PS document is a path that bounds the content of the current graphics state that will be shown in the PS viewer or editor. The content that is left beyond the bounds will be cut off.
A clipping path in .NET can be assigned in three ways:
- by System.Drawing.Drawing2D.GraphicsPath that can contain any closed shapes;
- by text outline;
- by 1 bpp (bits per pixel) 2-color image as a stencil mask;
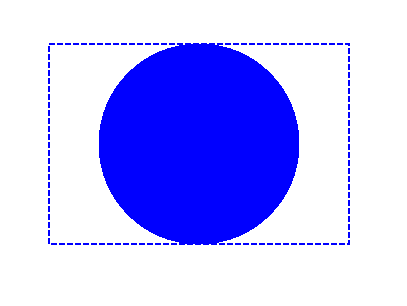
At this moment Aspose.Page for .NET library offers the first and the second ways of clipping. In the example below we obtain a circle System.Drawing.Drawing2D.GraphicsPath from a rectangle as a clipping path and cut off a blue-filled rectangle in the same graphics state.
In order to add a clip to the new PsDocument with Aspose.Page for .NET library in this example we do the following steps:
- Create an output stream for the resulting PS file.
- Create the PsSaveOptions object with default options.
- Create a 1-paged PsDocument with an already created output stream and save options.
- Create a new graphics state.
- Create a circle System.Drawing.Drawing2D.GraphicsPath from the rectangle.
- Set a clip with this path.
- Set a paint to the current graphics state of PsDocument.
- Fill the rectangle path with the current paint.
- Exit from the current graphics state to upper level one.
- Translate to the place of the filled rectangle.
- Stroke with a dashed line the bounds of the same rectangle above the filled one to show the bounds of the clipped filled rectangle.
- Close the page.
- Save the document.
 1// Demonstrates clipping by shape and clipping by text in PS document.
 2
 3string outputFileName = "ApplyClipByShape_outPS.ps";
 4
 5//Create save options with A4 size
 6PsSaveOptions options = new PsSaveOptions();
 7
 8// Create new 1-paged PS Document
 9PsDocument document = new PsDocument(OutputDir + outputFileName, options, false);
10
11//Create graphics path from the rectangle
12GraphicsPath rectanglePath = new GraphicsPath();
13rectanglePath.AddRectangle(new RectangleF(0, 0, 300, 200));
14
15////////////////////////////////////// Clipping by shape //////////////////////////////////////////////////////////////////////
16
17//Save graphics state in order to return back to this state after transformation
18document.WriteGraphicsSave();
19
20//Displace current graphics state on 100 points to the right and 100 points to the bottom.
21document.Translate(100, 100);
22
23//Create graphics path from the circle
24GraphicsPath circlePath = new GraphicsPath();
25circlePath.AddEllipse(new RectangleF(50, 0, 200, 200));
26
27//Add clipping by circle to the current graphics state
28document.Clip(circlePath);
29
30//Set paint in the current graphics state
31document.SetPaint(new SolidBrush(Color.Blue));
32
33//Fill the rectangle in the current graphics state (with clipping)
34document.Fill(rectanglePath);
35
36//Restore graphics state to the previus (upper) level
37document.WriteGraphicsRestore();
38
39//Displace upper level graphics state on 100 points to the right and 100 points to the bottom.
40document.Translate(100, 100);
41
42Pen pen = new Pen(new SolidBrush(Color.Blue), 2);
43pen.DashStyle = DashStyle.Dash;
44
45document.SetStroke(pen);
46
47//Draw the rectangle in the current graphics state (has no clipping) above clipped rectangle
48document.Draw(rectanglePath);
49
50//Close current page
51document.ClosePage();
52
53//Save the document
54document.Save();For Linux, MacOS, and other non-Windows operation systems we offer to use our Aspose.Page.Drawing Nuget package. It uses Aspose.Drawing backend instead of System.Drawing system library.
So import Aspose.Page.Drawing namespace instead of System.Drawing one. In the above code snippet Aspose.Page.Drawing.Rectangle will be used instead of System.Drawing.Rectangle, Aspose.Page.Drawing.Drawing2D.GraphicsPath will be used instead of System.Drawing.Drawing2D.GraphicsPath and so on. Our code examples on GitHub contain all the necessary substitutions.
See working with clips in PS documents in Java.
The result of running this code is appeared as
In the next example, we obtain a font that to clip a blue-filled rectangle with the text’s outline.
In order to add a clipping by text to the new PsDocument with Aspose.Page for .NET library in this example we do the following steps:
- Create an output stream for the resulting PS file.
- Create a PsSaveOptions object with default options.
- Create a 1-paged PsDocument with an already created output stream and save options.
- Create a new graphics state.
- Create a font.
- Set a clip with text and the font.
- Set a paint to the current graphics state of PsDocument.
- Fill the rectangle path with the current paint.
- Exit from the current graphics state to upper level one.
- Translate to the place of the filled rectangle.
- Stroke with a dashed line the bounds of the same rectangle above the filled one to show the bounds of the clipped filled rectangle.
- Close the page.
- Save the document.
 1// Demonstrates clipping by text in PS document.
 2
 3string outputFileName = "ApplyClipByText_outPS.ps";
 4
 5//Create save options with A4 size
 6PsSaveOptions options = new PsSaveOptions();
 7
 8// Create new 1-paged PS Document
 9PsDocument document = new PsDocument(OutputDir + outputFileName, options, false);
10
11//Create graphics path from the rectangle
12GraphicsPath rectanglePath = new GraphicsPath();
13rectanglePath.AddRectangle(new RectangleF(0, 0, 300, 200));
14
15//Save graphics state in order to return back to this state after transformation
16document.WriteGraphicsSave();
17
18//Displace current graphics state on 100 points to the right and 100 points to the bottom.
19document.Translate(100, 100);
20
21Pen pen = new Pen(new SolidBrush(Color.Blue), 2);
22pen.DashStyle = DashStyle.Dash;
23int fontSize = 120;
24System.Drawing.Font font = new System.Drawing.Font("Arial", fontSize, FontStyle.Bold);
25
26//Clip rectangle by text's outline
27document.ClipText("ABC", font, 20, fontSize + 10);
28
29//Set paint in the current graphics state
30document.SetPaint(new SolidBrush(Color.Blue));
31
32document.Fill(rectanglePath);
33
34document.WriteGraphicsRestore();
35
36document.Translate(100, 100);
37
38document.SetStroke(pen);
39//Draw the rectangle in the current graphics state (has no clipping) above clipped rectangle
40document.Draw(rectanglePath);
41
42//Close current page
43document.ClosePage();
44
45//Save the document
46document.Save();For Linux, MacOS, and other non-Windows operation systems we offer to use our Aspose.Page.Drawing Nuget package. It uses Aspose.Drawing backend instead of System.Drawing system library.
So import Aspose.Page.Drawing namespace instead of System.Drawing one. In the above code snippet Aspose.Page.Drawing.Rectangle will be used instead of System.Drawing.Rectangle, Aspose.Page.Drawing.Drawing2D.GraphicsPath will be used instead of System.Drawing.Drawing2D.GraphicsPath and so on. Our code examples on GitHub contain all the necessary substitutions.
See working with clips in PS documents in Java.
The result of running this code is appeared as

You can download examples and data files from GitHub.