Working with Hatch Patterns in PostScript | .NET
Add Hatch Pattern in PS Document
Hatch pattern is a texture tiling pattern usually represented by small 2-colors (usually black&white) simple image. The main content of these small images is various hatches.
For painting by hatches, the .NET platform has a separate class, derived from System.Drawing.Brush, System.Drawing.HatchBrush. Its difference from System.Drawing.TextureBrush is that it has named predefined styles defining what image to use for tiling. .NET platform offers 53 hatch styles and all 52 styles can be used for filling or stroking (outlining) in PsDocument.
In order to paint graphics objects with a hatch pattern in Aspose.Page for .NET library it is enough simply to pass System.Drawing.HatchBrush to SetPaint() or one of the FillText() or FillAndStrokeText() methods that accept System.Drawing.Brush as a parameter.
In order to outline graphics objects with a hatch pattern in Aspose.Page for .NET library someone should create new System.Drawing.Pen with System.Drawing.HacthBrush and pass it to SetStroke() or one of the OutlineText() or FillAndStrokeText() methods that accept System.Drawing.Pen as a parameter.
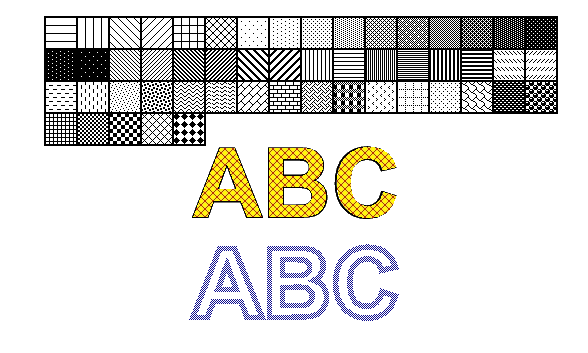
In the example below we demonstrate, firstly, how to fill a shape with a hatch pattern, then all variety of hatch styles in .NET, and, finally, how to fill and outline a text with a hatch pattern.
An algorithm for painting graphics objects with a hatch pattern in a new PS document includes the following steps:
- Create an output stream for the resulting PS file.
- Create PsSaveOptions.
- Create PsDocument with the already created output stream and save options.
- Create the necessary graphics path or font in dependence on what object we are going to fill or outline.
- Create an object of System.Drawing.HatchBrush with wishful style.
- Set the hatch brush as current paint in PsDocument
- Fill the graphics path with current paint or fill a text. If we use one of the methods for filling a text that accepts System.Drawing.Brush as a parameter, the previous point can be ignored.
- Close the page.
- Save the document.
If we need stroking (outlining) graphics objects with a hatch pattern instead of the last 4 points following will be:
Create System.Drawing.Pen object with the hatch brush.
Set this pen as current stroke in PsDocument.
Outline the graphics path with current stroke or outline the text. If we use one of the methods for outlining the text that accepts System.Drawing.Pen as a parameter, previous point can be ignored.
Close the page.
Save the document.
 1// Demonstrates all embedded hatch patterns that can be used to paint or outline shapes or text in PS document.
 2
 3string outputFileName = "AddHatchPattern_outPS.ps";
 4
 5//Create save options with A4 size
 6PsSaveOptions options = new PsSaveOptions();
 7
 8// Create new 1-paged PS Document
 9PsDocument document = new PsDocument(OutputDir + outputFileName, options, false);
10
11int x0 = 20;
12int y0 = 100;
13int squareSide = 32;
14int width = 500;
15int sumX = 0;
16
17//Restore graphics state
18document.WriteGraphicsSave();
19
20//Translate to initial point
21document.Translate(x0, y0);
22
23//Create rectngle path for every pattern square
24GraphicsPath path = new GraphicsPath();
25path.AddRectangle(new RectangleF(0, 0, squareSide, squareSide));
26
27//Create pen for outlining pattern square
28Pen pen = new Pen(Color.Black, 2);
29
30//For every hatch pattern style
31for (HatchStyle hatchStyle = 0; hatchStyle <= (HatchStyle)52; hatchStyle++)
32{
33    //Set paint with current hatch brush style
34    document.SetPaint(new HatchBrush(hatchStyle, Color.Black, Color.White));
35
36    //Calculate displacement in order to don't go beyond the page bounds
37    int x = squareSide;
38    int y = 0;
39    if (sumX >= width)
40    {
41        x = -(sumX - squareSide);
42        y += squareSide;
43    }
44    //Translate current graphics state
45    document.Translate(x, y);
46    //Fill pattern square
47    document.Fill(path);
48    //Set stroke
49    document.SetStroke(pen);
50    //Draw square outline
51    document.Draw(path);
52
53    //Calculate distance from X0
54    if (sumX >= width)
55    {
56        sumX = squareSide;
57    }
58    else
59        sumX += x;
60}
61
62//Restore graphics state
63document.WriteGraphicsRestore();
64
65//Fill text with hatch pattern
66HatchBrush brush = new HatchBrush(HatchStyle.DiagonalCross, Color.Red, Color.Yellow);
67System.Drawing.Font font = new System.Drawing.Font("Arial", 96, FontStyle.Bold);
68document.FillAndStrokeText("ABC", font, 200, 300, brush, pen);
69
70//Outline text with hatch pattern
71brush = new HatchBrush(HatchStyle.Percent50, Color.Blue, Color.White);
72document.OutlineText("ABC", font, 200, 400, new Pen(brush, 5));
73
74//Close current page
75document.ClosePage();
76
77//Save the document
78document.Save();For Linux, MacOS and other non-Windows operation systems we offer to use our Aspose.Page.Drawing Nuget package. It uses Aspose.Drawing backend instead of System.Drawing system library.
So import Aspose.Page.Drawing namespace instead of System.Drawing one. In the above code snippet Aspose.Page.Drawing.Rectangle will be used instead of System.Drawing.Rectangle, Aspose.Page.Drawing.Drawing2D.GraphicsPath will be used instead of System.Drawing.Drawing2D.GraphicsPath and so on. Our code examples on GitHub contain all the necessary substitutions.
See working with a hatch pattern in PS document in Java.
The result of running this code is appeared as

You can download examples and data files from GitHub.