Working with Transformations in PostScript | .NET
Transform a content in PS Document
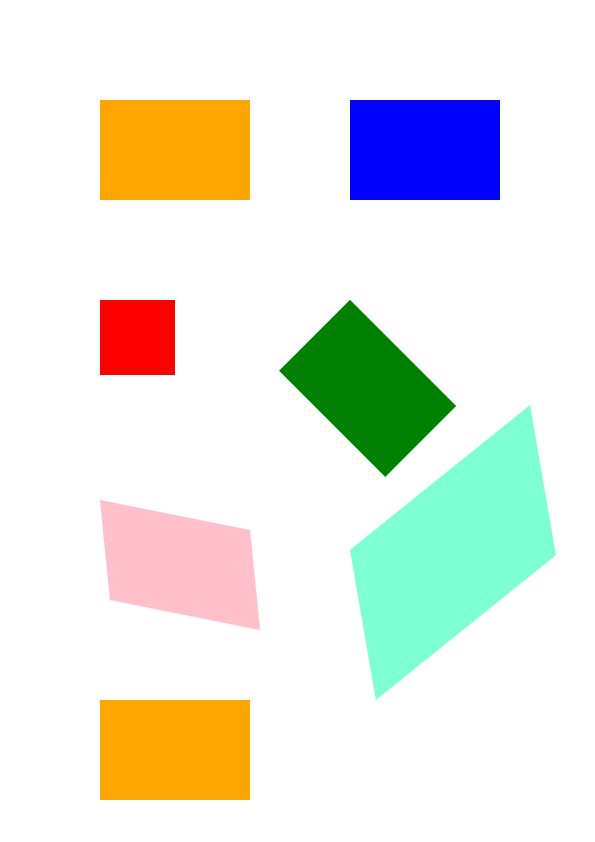
In this article, we consider how to make different transformations: translation, scaling, rotation, and shearing onto a rectangle path added to PsDocument.
We split one code snippet into several pieces of code: the beginning, the end, and each transformation separately. A transformation in PostScript is made always in a graphics state that is bound by “gsave” and “grestore” operators. Therefore in our PsDocument, there are methods “WriteGraphicsSave()” and “WriteGraphicsRestore()”. Between these methods, we can add any content, including nested graphics state, and make any transformations or clipping. These transformations will not affect outer graphics states but will do on nested ones.
If we make a transformation without “WriteGraphicsSave()” and “WriteGraphicsRestore()” methods we make it in the graphics state of the upper level and all content that is in PsDocument will be undergone by this transformation.
An algorithm for setting any transformation on a document’s content from scratch includes the following steps:
- Create an output stream for the resulting PS file.
- Create PsSaveOptions.
- Create PsDocument with the already created output stream and save options.
- Save a graphics state. So we created a new graphics state, the previous graphics state was put in a graphics states stack.
- Add necessary transformation: translation, scale, rotation, shear, or any combination of it. In our code, we show the influence of every transformation component separately and 3 ones at a time in the end.
- Add necessary content that is required to transform. In our case, we created a rectangle GraphicsPath from the rectangle and then fill it. We created one rectangle before any transformations and just fill it after every transformation in the current graphics state.
- Restore the graphics state to return back to the previous one where applied transformation(s) doesn’t affect. In our case, it is an upper-level graphics state.
In this piece of code, we create PsDocument from an output stream and PsSaveOptions, translate upper-level graphics state to points 100,100 in order to offset the first rectangle, and finally create the first rectangle GraphicsPath from the rectangle.
 1//Create save options with default values
 2PsSaveOptions options = new PsSaveOptions();
 3
 4// Create new 1-paged PS Document
 5PsDocument document = new PsDocument(dataDir + "Transformations_outPS.ps", options, false);
 6
 7document.Translate(100, 100);
 8
 9//Create graphics path from the rectangle
10GraphicsPath path = new GraphicsPath();
11path.AddRectangle(new RectangleF(0, 0, 150, 100));
For Linux, MacOS and other non-Windows operation systems we offer to use our Aspose.Page.Drawing Nuget package. It uses Aspose.Drawing backend instead of System.Drawing system library.
So import Aspose.Page.Drawing namespace instead of System.Drawing one. In the above and the following code snippets Aspose.Page.Drawing.RectangleF will be used instead of System.Drawing.RectangleF, Aspose.Page.Drawing.Drawing2D.GraphicsPath will be used instead of System.Drawing.Drawing2D.GraphicsPath and so on. Our code examples on GitHub contain all the necessary substitutions.
Here we set Orange color as the current paint for the upper-level graphics state and fill this rectangle.
The resulting PS file will demonstrate the first shape that is located in the upper-level graphics state and is not undergone any transformation.
1////////////////////////////////////// No transformations ///////////////////////////////////////////////////////////////
2//Set a paint in graphics state on upper level
3document.SetPaint(new SolidBrush(Color.Orange));
4
5//Fill the first rectangle that is on on the upper-level graphics state and that is without any transformations.
6document.Fill(path);
7/////////////////////////////////////////////////////////////////////////////////////////////////////////////////////////
Now we create a new graphics state that will be translated on 250 points by X-axis relatively to the upper-level graphics state and add to these new graphics state the same rectangle path painted with Blue color. In the end, we exit from the current graphics state on the upper-level graphics state.
 1////////////////////////////////////// Translation //////////////////////////////////////////////////////////////////////
 2
 3//Save the graphics state in order to return back to this state after transformation
 4document.WriteGraphicsSave();
 5
 6//Displace current graphics state on 250 to the right. So we add translation component to the current transformation.
 7document.Translate(250, 0);
 8
 9//Set the paint in the current graphics state
10document.SetPaint(new SolidBrush(Color.Blue));
11
12//Fill the second rectangle in the current graphics state (has translation transformation)
13document.Fill(path);
14
15//Restore the graphics state to the previus (upper) level
16document.WriteGraphicsRestore();
17/////////////////////////////////////////////////////////////////////////////////////////////////////////////////////////
Translate upper level graphics state in order to put the next rectangles.
1//Displace on 200 to the bottom.
2document.Translate(0, 200);
Here we create a graphics state that will be scaled on 0.5 by X-axis and 0.75 by Y-axis and add to these new graphics state the same rectangle path painted with Red color. In the end, we exit from the current graphics state on the upper-level graphics state.
 1////////////////////////////////////// Scaling //////////////////////////////////////////////////////////////////////////
 2//Save the graphics state in order to return back to this state after transformation
 3document.WriteGraphicsSave();
 4
 5//Scale current graphics state on 0.5 in X axis and on 0.75f in Y axis. So we add scale component to the current transformation.
 6document.Scale(0.5f, 0.75f);
 7
 8//Set the paint in the current graphics state
 9document.SetPaint(new SolidBrush(Color.Red));
10
11//Fill the third rectangle in the current graphics state (has scale transformation)
12document.Fill(path);
13
14//Restore the graphics state to the previus (upper) level
15document.WriteGraphicsRestore();
16//////////////////////////////////////////////////////////////////////////////////////////////////////////////////////
Translate the upper-level graphics state in order to put the next rectangles.
1//Displace upper level graphics state on 250 to the right.
2document.Translate(250, 0);
Then we create a new graphics state that will be rotated 45 degrees clockwise relative to the upper-level graphics state and add to these new graphics state the same rectangle path painted with Green color. In the end, we exit from the current graphics state on the upper-level graphics state.
 1////////////////////////////////////// Rotation //////////////////////////////////////////////////////////////////////
 2//Save the graphics state in order to return back to this state after transformation
 3document.WriteGraphicsSave();
 4
 5//Rotate current graphics state on 45 degrees around origin of current graphics state (350, 300). So we add rotation component to the current transformation.
 6document.Rotate(45));
 7
 8//Set the paint in the current graphics state
 9document.SetPaint(new SolidBrush(Color.Green));
10
11//Fill the fourth rectangle in the current graphics state (has rotation transformation)
12document.Fill(path);
13
14//Restore the graphics state to the previus (upper) level
15document.WriteGraphicsRestore();
16//////////////////////////////////////////////////////////////////////////////////////////////////////////////////////
Translate the upper-level graphics state in order to put the next rectangles in the blank space on the page.
1//Returns upper level graphics state back to the left and displace on 200 to the bottom.
2document.Translate(-250, 200);
Then we create a new graphics state that will be sheared and add to this new graphics state the same rectangle path painted with Pink color. In the end, we exit from the current graphics state on the upper-level graphics state.
 1////////////////////////////////////// Shearing //////////////////////////////////////////////////////////////////////
 2//Save the graphics state in order to return back to this state after transformation
 3document.WriteGraphicsSave();
 4
 5//Shear current graphics state. So we add shear component to the current transformation.
 6document.Shear(0.1f, 0.2f);
 7
 8//Set the paint in the current graphics state
 9document.SetPaint(new SolidBrush(Color.Pink));
10
11//Fill the fifth rectangle in the current graphics state (has shear transformation)
12document.Fill(path);
13
14//Restore the graphics state to the previus (upper) level
15document.WriteGraphicsRestore();
16//////////////////////////////////////////////////////////////////////////////////////////////////////////////////////
Translate the upper-level graphics state in order to put the next rectangles in the blank space on the page.
1//Displace upper level graphics state on 250 to the right.
2document.Translate(250, 0);
Now we create the last graphics state that will be undergone by complex transformation containing translation, scaling, and rotation components and add to this new graphics state the same rectangle path painted with Aquamarine color. In the end, we exit from the current graphics state on the upper-level graphics state.
 1////////////////////////////////////// Complex transformation ////////////////////////////////////////////////////////
 2//Save the graphics state in order to return back to this state after transformation
 3document.WriteGraphicsSave();
 4
 5//Transform current graphics state with complex transformation. So we add translation, scale and rotation components to the current transformation.
 6document.Transform(new Matrix(1.2f, -0.965925f, 0.258819f, 1.5f, 0f, 50));
 7
 8//Set the paint in the current graphics state
 9document.SetPaint(new SolidBrush(Color.Aquamarine));
10
11//Fill the sixth rectangle in the current graphics state (has complex transformation)
12document.Fill(path);
13
14//Restore the graphics state to the previus (upper) level
15document.WriteGraphicsRestore();
16//////////////////////////////////////////////////////////////////////////////////////////////////////////////////////
Translate the upper-level graphics state in order to put the last rectangle in the blank space on the page.
1//Returns upper level graphics state back to the left and displace on 200 to the bottom.
2document.Translate(-250, 200);
The last filled rectangle that we put again in the upper-level graphics state shows that it was not undergone by transformations of graphics states of the lower level and changing of colors in it. Orange color is left current paint.
1////////////////////////////////////// Again no transformation ////////////////////////////////////////////////////////
2// Demonstrates that current graphics state's color is orange that was set up at the beginning of the code.
3//Fill the seventh rectangle in the current graphics state (has no transformation)
4document.Fill(path);
5//////////////////////////////////////////////////////////////////////////////////////////////////////////////////////
Finally we close the current page and save the document.
1//Close current page
2document.ClosePage();
3
4//Save the document
5document.Save();
See working with transformations in PS document in Java.
The result of running this code is the next
You can download examples and data files from GitHub.