Trabalhar com Clips em PostScript | C++
Adicionar Clip em Documento PS
Um clipe num documento PS é um caminho que delimita o conteúdo do estado gráfico atual que será apresentado no visualizador ou editor PS. O conteúdo que ficar para além dos limites será recortado.
Um caminho de recorte em C++ pode ser atribuído de três formas:
- por System.Drawing.Drawing2D.GraphicsPath, que pode conter quaisquer formas fechadas;
- por contorno de texto;
- por imagem bicolor de 1 bpp (bits por pixel) como máscara de stencil;
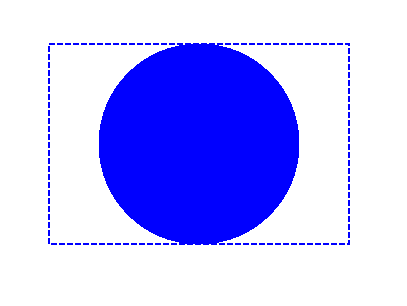
Neste momento, a biblioteca Aspose.Page para C++ oferece a primeira e a segunda formas de recorte. No exemplo abaixo, obtemos um círculo System.Drawing.Drawing2D.GraphicsPath de um retângulo como caminho de recorte e recortamos um retângulo preenchido a azul no mesmo estado gráfico.
Para adicionar um clip ao novo PsDocument com a biblioteca Aspose.Page para C++, neste exemplo, seguimos os seguintes passos:
- Crie um fluxo de saída para o ficheiro PS resultante.
- Crie o objeto PsSaveOptions com as opções padrão.
- Crie um PsDocument de 1 página com um fluxo de saída já criado e opções de guardar.
- Crie um novo estado gráfico.
- Crie um círculo System.Drawing.Drawing2D.GraphicsPath a partir do retângulo.
- Defina um clipe com este percurso.
- Defina uma pintura para o estado gráfico atual do PsDocument.
- Preencha o percurso do retângulo com a tinta atual.
- Saia do estado gráfico atual para o nível superior.
- Transfira para o local do retângulo preenchido.
- Trace com uma linha tracejada os limites do mesmo retângulo acima do preenchido para mostrar os limites do retângulo preenchido recortado.
- Feche a página.
- Guarde o documento.
 1    // The path to the documents directory.
 2    System::String dataDir = RunExamples::GetDataDir_WorkingWithCanvas();
 3
 4    //Create output stream for PostScript document
 5    {
 6        System::SharedPtr<System::IO::Stream> outPsStream = System::MakeObject<System::IO::FileStream>(dataDir + u"Clipping_outPS.ps", System::IO::FileMode::Create);
 7        // Clearing resources under 'using' statement
 8        System::Details::DisposeGuard<1> __dispose_guard_0({ outPsStream});
 9        // ------------------------------------------
10
11        try
12        {
13            //Create save options with default values
14            System::SharedPtr<PsSaveOptions> options = System::MakeObject<PsSaveOptions>();
15
16            // Create new 1-paged PS Document
17            System::SharedPtr<PsDocument> document = System::MakeObject<PsDocument>(outPsStream, options, false);
18
19            //Create graphics path from the rectangle
20            System::SharedPtr<System::Drawing::Drawing2D::GraphicsPath> rectanglePath = System::MakeObject<System::Drawing::Drawing2D::GraphicsPath>();
21            rectanglePath->AddRectangle(System::Drawing::RectangleF(0.0f, 0.0f, 300.0f, 200.0f));
22
23            ////////////////////////////////////// Clipping by shape //////////////////////////////////////////////////////////////////////
24
25            //Save graphics state in order to return back to this state after transformation
26            document->WriteGraphicsSave();
27
28            //Displace current graphics state on 100 points to the right and 100 points to the bottom.
29            document->Translate(100.0f, 100.0f);
30
31            //Create graphics path from the circle
32            System::SharedPtr<System::Drawing::Drawing2D::GraphicsPath> circlePath = System::MakeObject<System::Drawing::Drawing2D::GraphicsPath>();
33            circlePath->AddEllipse(System::Drawing::RectangleF(50.0f, 0.0f, 200.0f, 200.0f));
34
35            //Add clipping by circle to the current graphics state
36            document->Clip(circlePath);
37
38            //Set paint in the current graphics state
39            document->SetPaint(System::MakeObject<System::Drawing::SolidBrush>(System::Drawing::Color::get_Blue()));
40
41            //Fill the rectangle in the current graphics state (with clipping)
42            document->Fill(rectanglePath);
43
44            //Restore graphics state to the previus (upper) level
45            document->WriteGraphicsRestore();
46
47            //Displace upper level graphics state on 100 points to the right and 100 points to the bottom.
48            document->Translate(100.0f, 100.0f);
49
50            System::SharedPtr<System::Drawing::Pen> pen = System::MakeObject<System::Drawing::Pen>(System::MakeObject<System::Drawing::SolidBrush>(System::Drawing::Color::get_Blue()), 2.0f);
51            pen->set_DashStyle(System::Drawing::Drawing2D::DashStyle::Dash);
52
53            document->SetStroke(pen);
54
55            //Draw the rectangle in the current graphics state (has no clipping) above clipped rectangle
56            document->Draw(rectanglePath);
57
58            ////////////////////////////////////// Clipping by text //////////////////////////////////////////////////////////////////////
59
60            //Save graphics state in order to return back to this state after transformation
61            document->WriteGraphicsSave();
62
63            //Displace current graphics state on 100 points to the right and 100 points to the bottom.
64            document->Translate(0.0f, 350.0f);
65
66            int32_t fontSize = 120;
67            System::SharedPtr<System::Drawing::Font> font = System::MakeObject<System::Drawing::Font>(u"Arial", static_cast<float>(fontSize), System::Drawing::FontStyle::Bold);
68
69            //Clip rectangle by text's outline
70            document->ClipText(u"ABC", font, 20.0f, static_cast<float>(fontSize + 10));
71            document->Fill(rectanglePath);
72
73            document->WriteGraphicsRestore();
74
75            document->Translate(0.0f, 350.0f);
76
77            document->SetStroke(pen);
78            //Draw the rectangle in the current graphics state (has no clipping) above clipped rectangle
79            document->Draw(rectanglePath);
80
81            //////////////////////////////////////////////////////////////////////////////////////////////////////////////////////////////
82
83            //Close current page
84            document->ClosePage();
85
86            //Save the document
87            document->Save();
88        }
89        catch(...)
90        {
91            __dispose_guard_0.SetCurrentException(std::current_exception());
92        }
93    }
Veja como trabalhar com recortes em documentos PS em Java.
O resultado da execução deste código é apresentado como
No próximo exemplo, obtemos um tipo de letra que recorta um retângulo preenchido a azul com o contorno do texto.
Para adicionar um recorte por texto ao novo PsDocument com a biblioteca Aspose.Page para C++, neste exemplo, seguimos os seguintes passos:
- Criar um fluxo de saída para o ficheiro PS resultante.
- Crie um objeto PsSaveOptions com as opções padrão.
- Crie um PsDocument de 1 página com um fluxo de saída já criado e opções de guardar.
- Crie um novo estado gráfico.
- Crie uma fonte.
- Defina um recorte com texto e a fonte.
- Defina uma pintura para o estado gráfico atual do PsDocument.
- Preencha o percurso do retângulo com a pintura atual.
- Saia do estado gráfico atual para o nível superior.
- Translação para o local do retângulo preenchido.
- Trace com uma linha tracejada os limites do mesmo retângulo acima do preenchido para mostrar os limites do retângulo preenchido recortado.
- Feche a página.
- Guarde o documento.
 1//Create an output stream for the PostScript document
 2using (Stream outPsStream = new FileStream(dataDir + "Clipping_outPS.ps", FileMode.Create))
 3{
 4    //Create save options with default values
 5    PsSaveOptions options = new PsSaveOptions();
 6
 7    // Create a new 1-paged PS Document
 8    PsDocument document = new PsDocument(outPsStream, options, false);
 9
10    //Create a graphics path from the rectangle
11    GraphicsPath rectangePath = new GraphicsPath();
12    rectangePath.AddRectangle(new RectangleF(0, 0, 300, 200));
13
14    //Save the graphics state in order to return back to this state after transformation
15    document.WriteGraphicsSave();
16
17    //Displace the current graphics state on 100 points to the right and 100 points to the bottom.
18    document.Translate(100, 100);
19
20    //Set the paint in the current graphics state
21    document.SetPaint(new SolidBrush(Color.Blue));
22
23    //Create a font
24    int fontSize = 120;
25    Font font = new Font("Arial", fontSize, FontStyle.Bold);
26
27    //Clip the rectangle by text's outline
28    document.ClipText("ABC", font, 20, fontSize + 10);
29    document.Fill(rectanglePath);
30
31    //Restore the graphics state to the previus (upper) level
32    document.WriteGraphicsRestore();
33
34		//Displace the upper level graphics state on 100 points to the right and 100 points to the bottom.
35    document.Translate(100, 100);
36
37		Pen pen = new Pen(new SolidBrush(Color.Blue), 2);
38    pen.DashStyle = DashStyle.Dash;
39
40    document.SetStroke(pen);
41
42    //Draw the rectangle in the current graphics state (has no clipping) above the clipped rectangle
43    document.Draw(rectanglePath);
44
45    //Close the current page
46    document.ClosePage();
47
48    //Save the document
49    document.Save();
50}O resultado da execução deste código é apresentado como

Pode descarregar exemplos e ficheiros de dados do GitHub.