Working with Transformations in PS file | Python
Transform a content in PS Document
This article explores how to apply various transformations-translation, scaling, rotation, and shearing to a rectangle path added to a PsDocument.
We’ve broken down a single code snippet into multiple sections: the beginning, the end, and each transformation individually. In PostScript, transformations are always performed within a graphics state delimited by the “gsave” and “grestore” operators. Therefore, our PsDocument includes methods such as “write_graphics_save()” and “write_graphics_restore()” to establish and reset these graphics states. Between these methods, any content, including nested graphics states, can be added, allowing for transformations or clipping. These transformations affect only the nested graphics states and do not impact the outer ones. However, if a transformation is performed without using “write_graphics_save()” and “write_graphics_restore()” methods, it affects the graphics state of the upper level, and all content within the PsDocument is subjected to this transformation.
The algorithm for applying any transformation to a document’s content from scratch involves the following steps:
- Create an output stream for the resulting PS file.
- Create PsSaveOptions.
- Create PsDocument with the already created output stream and save options.
- Save a graphics state. As we created a new graphics state, the previous graphics state was put in a graphics states stack.
- Apply necessary transformations: translation, scale, rotation, shear, or any combination of it. In our code, we show the influence of every transformation component separately and 3 ones at a time in the end.
- Add necessary content that is required to transform. In our case, we created a reactangle aspose.pydrawing.GraphicsPath and then fill it. We created one rectangle before any transformations and just fill it after every transformation in the current graphics state.
- Restore the graphics state to return back to the previous one where applied transformation(s) doesn’t affect. In our case, it is an upper-level graphics state.
In this code snippet, we initiate the creation of a PsDocument using an output stream and PsSaveOptions. We then perform a translation of the upper-level graphics state to the coordinates (100, 100) to offset the first rectangle. Finally, we generate the first rectangle.
  1from aspose.page.eps import *
  2from aspose.page.eps.device import *
  3import aspose.pydrawing
  4from util import Util
  5###############################################
  6###### Class and Method declaration here ######
  7###############################################
  8
  9data_dir = Util.get_data_dir_working_with_canvas()
 10
 11# Create an output stream for the PostScript document
 12with open(data_dir + "Transformations_outPS.ps", "wb") as out_ps_stream:
 13    # Create save options with default values
 14    options = PsSaveOptions()
 15
 16    # Create a new 1-paged PS Document
 17    document = PsDocument(out_ps_stream, options, False)
 18
 19    document.translate(100, 100)
 20
 21    # Create a graphics path from the rectangle
 22    path = aspose.pydrawing.drawing2d.GraphicsPath()
 23    path.add_rectangle(aspose.pydrawing.RectangleF(0, 0, 150, 100))
 24
 25    ##################################### No transformations ###############################################################
 26    # Set the paint in the graphics state on upper level
 27    document.set_paint(aspose.pydrawing.SolidBrush(aspose.pydrawing.Color.orange))
 28
 29    # Fill the first rectangle that is on the upper level graphics state and is without any transformations.
 30    document.fill(path)
 31    ########################################################################################################################
 32
 33
 34    ##################################### Translation ######################################################################
 35
 36    # Save the graphics state in order to return back to this state after the transformation
 37    document.write_graphics_save()
 38
 39    # Displace the current graphics state on 250 to the right. So we add a translation component to the current transformation.
 40    document.translate(250., 0.)
 41
 42    # Set the paint in the current graphics state
 43    document.set_paint(aspose.pydrawing.SolidBrush(aspose.pydrawing.Color.blue))
 44
 45    # Fill the second rectangle in the current graphics state (has translation transformation)
 46    document.fill(path)
 47
 48    # Restore the graphics state to the previus (upper) level
 49    document.write_graphics_restore()
 50    ########################################################################################################################
 51
 52
 53    # Displace on 200 to the bottom.
 54    document.translate(0., 200.)
 55
 56    ##################################### Scaling ##########################################################################
 57    # Save graphics state in order to return back to this state after transformation
 58    document.write_graphics_save()
 59
 60    # Scale the current graphics state on 0.5 in X axis and on 0.75f in Y axis. So we add a scale component to the current transformation.
 61    document.scale(0.5, 0.75)
 62
 63    # Set the paint in the current graphics state
 64    document.set_paint(aspose.pydrawing.SolidBrush(aspose.pydrawing.Color.red))
 65
 66    # Fill the third rectangle in the current graphics state (has scale transformation)
 67    document.fill(path)
 68
 69    # Restore the graphics state to the previus (upper) level
 70    document.write_graphics_restore()
 71    #####################################################################################################################
 72
 73
 74    # Displace the upper level graphics state on 250 to the right.
 75    document.translate(250., 0.)
 76
 77
 78    ##################################### Rotation ######################################################################
 79    #Save graphics state in order to return back to this state after transformation
 80    document.write_graphics_save()
 81
 82    # Rotate the current graphics state on 45 degrees around the origin of the current graphics state (350, 300). So we add a rotation component to the current transformation.
 83    document.rotate(float(45))
 84
 85    # Set the paint in the current graphics state
 86    document.set_paint(aspose.pydrawing.SolidBrush(aspose.pydrawing.Color.green))
 87
 88    # Fill the fourth rectangle in the current graphics state (has rotation transformation)
 89    document.fill(path)
 90
 91    # Restore the graphics state to the previus (upper) level
 92    document.write_graphics_restore()
 93    #####################################################################################################################
 94
 95
 96    # Returns the upper level graphics state back to the left and displace on 200 to the bottom.
 97    document.translate(-250., 200.)
 98
 99
100    ##################################### Shearing ######################################################################
101    # Save the graphics state in order to return back to this state after the transformation
102    document.write_graphics_save()
103
104    # Shear the current graphics state. So we add shear component to the current transformation.
105    document.shear(0.1, 0.2)
106
107    # Set the paint in the current graphics state
108    document.set_paint(aspose.pydrawing.SolidBrush(aspose.pydrawing.Color.pink))
109
110    # Fill the fifth rectangle in the current graphics state (has shear transformation)
111    document.fill(path)
112
113    # Restore the graphics state to the previus (upper) level
114    document.write_graphics_restore()
115    #####################################################################################################################
116
117
118    # Displace the upper level graphics state on 250 to the right.
119    document.translate(250., 0.)
120
121
122    ##################################### Complex transformation ########################################################
123    # Save the graphics state in order to return back to this state after the transformation
124    document.write_graphics_save()
125
126    # Transform the current graphics state with the complex transformation. So we add the translation, scale and rotation components to the current transformation.
127    document.transform(aspose.pydrawing.drawing2d.Matrix(1.2, -0.965925, 0.258819, 1.5, 0., 50.))
128
129    # Set the paint in the current graphics state
130    document.set_paint(aspose.pydrawing.SolidBrush(aspose.pydrawing.Color.aquamarine))
131
132    # Fill the sixth rectangle in the current graphics state (has complex transformation)
133    document.fill(path)
134
135    # Restore graphics state to the previus (upper) level
136    document.write_graphics_restore()
137    #####################################################################################################################
138
139
140    # Returns the upper level graphics state back to the left and displace on 200 to the bottom.
141    document.translate(-250., 200.)
142
143
144    ##################################### Again no transformation ########################################################
145    # Demonstrates that current graphics state's color is orange that was set up at the beginning of the code.
146    # Fill the seventh rectangle in the current graphics state (has no transformation)
147    document.fill(path)
148    #####################################################################################################################
149
150    # Close the current page
151    document.close_page()
152
153    # Save the document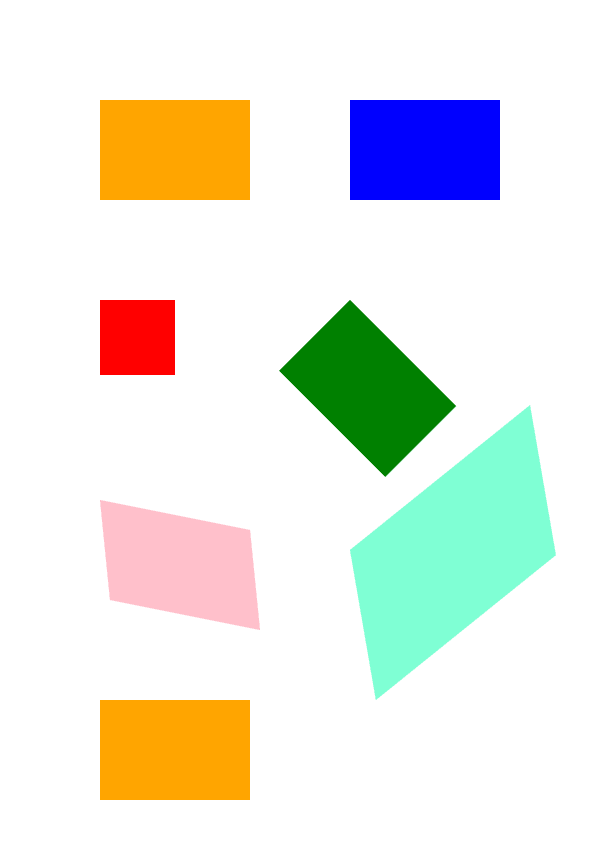
154 document.save()The result of running this code is
You can download examples and data files from GitHub.