Working with Transparency in XPS file | Python
Transparency is commonly used to create visual effects such as blending, fading, or overlaying one image or graphic element onto another. It can be achieved through various techniques, including adjusting the opacity or alpha channel of an object, using blending modes, or applying masks or overlays. It is a valuable tool in design, illustration, and digital composition, enabling the creation of layered and complex visual compositions.
Add Transparent Object to XPS Document
Aspose.Page for Python via .NET provides the XpsPath Class, enabling you to add transparent objects to an XPS document. To accomplish this, you must specify a PathGeometry and add it to the XpsPath. The following code snippet demonstrates the complete functionality for adding a transparent object to an XPS document:
 1from aspose.page.xps import *
 2from aspose.page.xps.xpsmodel import *
 3import aspose.pydrawing
 4from util import Util
 5###############################################
 6###### Class and Method declaration here ######
 7###############################################
 8
 9# The path to the documents directory.
10        data_dir = Util.get_data_dir_working_with_transparency()
11        # Create new XPS Document
12        doc = XpsDocument()
13
14        # Just to demonstrate transparency
15        doc.add_path(doc.create_path_geometry("M120,0 H400 v1000 H120")).fill = doc.create_solid_color_brush(aspose.pydrawing.Color.gray)
16        doc.add_path(doc.create_path_geometry("M300,120 h600 V420 h-600")).fill = doc.create_solid_color_brush(aspose.pydrawing.Color.gray)
17
18        # Create the path with the closed rectangle geometry
19        path1: XpsPath = doc.create_path(doc.create_path_geometry("M20,20 h200 v200 h-200 z"))
20        # Set a blue solid brush to fill the path1
21        path1.fill = doc.create_solid_color_brush(aspose.pydrawing.Color.blue)
22        # Add it to the current page
23        path2: XpsPath = doc.add_path(path1)
24
25        # path1 and path2 are the same as soon as path1 hasn't been placed inside any other element
26        # (which means that path1 had no parent element).
27        # Because of that rectangle's color on the page effectively turns to green
28        path2.fill = doc.create_solid_color_brush(aspose.pydrawing.Color.green)
29
30        # Now add path2 once again. Now path2 has parent. So path3 won't be the same as path2.
31        # Thus a new rectangle is painted on the page ...
32        path3: XpsPath = doc.add_path(path2)
33        # ... and we shift it 300 units lower ...
34        path3.render_transform = doc.create_matrix(1, 0, 0, 1, 0, 300)
35        # ... and set red solid brush to fill it
36        path3.fill = doc.create_solid_color_brush(aspose.pydrawing.Color.red)
37
38        # Create a new path4 with path2's geometry ...
39        path4: XpsPath = doc.add_path(path2.data)
40        # ... shift it 300 units to the right ...
41        path4.render_transform = doc.create_matrix(1, 0, 0, 1, 300, 0)
42        # ... and set a blue solid fill
43        path4.fill = doc.create_solid_color_brush(aspose.pydrawing.Color.blue)
44
45        # Add path4 once again.
46        path5: XpsPath = doc.add_path(path4)
47        # path4 and path5 are not the same again ...
48        # (move path5 300 units lower)
49        path5.render_transform = path5.render_transform.clone() # to disconnect RenderTransform value from path4 (see next comment about Fill property)
50        path5.render_transform.translate(0, 300)
51        # ... but if we set the opacity of Fill property, it will take effect on both path5 and path4
52        # because brush is a complex property value which remains the same for path5 and path4
53        path5.fill.opacity = 0.8
54
55        # Create a new path6 with path2's geometry ...
56        path6: XpsPath = doc.add_path(path2.data)
57        # ... shift it 600 units to the right ...
58        path6.render_transform = doc.create_matrix(1, 0, 0, 1, 600, 0)
59        # ... and set a yellow solid fill
60        path6.fill = doc.create_solid_color_brush(aspose.pydrawing.Color.yellow)
61
62        # Now add path6's clone ...
63        path7: XpsPath = doc.add_path(path6.clone())
64        # (move path5 300 units lower)
65        path7.render_transform = path7.render_transform.clone()
66        path7.render_transform.translate(0, 300)
67        # ... and set the opacity for path7
68        path7.fill.opacity = 0.8
69        # Now opacity effects independantly as soon as property values are cloned along with the element
70
71        # The following code block is equivalent to the previous one.
72        # Add path6 itself. path6 and path7 are not the same. Although their Fill property values are the same
73        #XpsPath path7 = doc.add_path(path6);
74        #path7.RenderTransform = path7.RenderTransform.Clone();
75        #path7.RenderTransform.Translate(0, 300);
76        # To "disconnect" path7's Fill property from path6's Fill property reassign it to its clone (or path6's Fill clone)
77        #path7.Fill = ((XpsSolidColorBrush)path7.Fill).Clone();
78        #path7.Fill.Opacity = 0.8f;
79
80        # Save the resultant XPS document
81 doc.save(data_dir + "WorkingWithTransparency_out.xps")The result
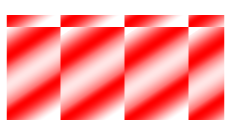
Set Opacity Mask
The solution provides the set_opacity_mask() property used to apply an opacity mask to an XPS document. To achieve this, you must create a PathGeometry and add it to the XpsPath. An image can be utilized as an opacity mask, where the Alpha component of each pixel determines the level of transparency applied to the underlying fill. The resulting XPS document will display slanting gradient stripes overlaying the source image file. The following code snippet demonstrates the complete functionality for setting an opacity mask:
 1from aspose.page.xps import *
 2from aspose.page.xps.xpsmodel import *
 3import aspose.pydrawing
 4from util import Util
 5###############################################
 6###### Class and Method declaration here ######
 7###############################################
 8
 9# The path to the documents directory.
10data_dir = Util.get_data_dir_working_with_transparency()
11# Create a new XPS Document
12doc = XpsDocument()
13#Add Canvas to the XpsDocument instance
14canvas = doc.add_canvas()
15# A rectangle with opacity masked by ImageBrush
16path = canvas.add_path(doc.create_path_geometry("M 10,180 L 228,180 228,285 10,285"))
17path.fill = doc.create_solid_color_brush(doc.create_color(1.0, 0.0, 0.0))
18imageBrush: XpsImageBrush = doc.create_image_brush(data_dir + "R08SY_NN.tif", aspose.pydrawing.RectangleF(0, 0, 128, 192),
19        aspose.pydrawing.RectangleF(0, 0, 64, 96))
20path.opacity_mask = imageBrush
21imageBrush.tile_mode = XpsTileMode.TILE
22# Save the resultant XPS document
23doc.save(data_dir + "OpacityMask_out.xps")The result

You can download examples and data files from GitHub.