Работа с клипами в PS-файле | Java
Добавить обрезку в документ PS
Клип в документе PS — это путь, ограничивающий содержимое текущего состояния графики, которое будет отображаться в средстве просмотра или редакторе PS. Контент, выходящий за пределы, будет обрезан.
Путь обрезки в Java можно назначить тремя способами:
- любым реализованным классом java.awt.Shape, который может содержать любые замкнутые фигуры;
- по контуру текста;
- по 1 bpp (бит на пиксель) 2-цветное изображение в виде трафаретной маски;
На данный момент библиотека Aspose.Page для Java предлагает первый и второй способы отсечения.
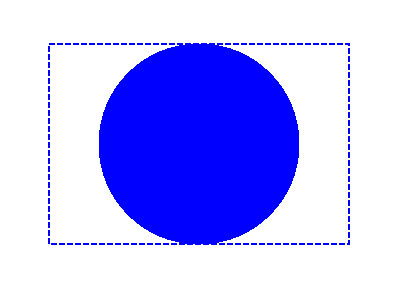
В приведенном ниже примере мы получаем форму круга в качестве обтравочного контура и отсекаем прямоугольник с синей заливкой в том же графическом состоянии.
Чтобы добавить клип в новый PsDocument с помощью библиотеки Aspose.Page для Java, в этом примере мы выполняем следующие шаги:
- Создайте выходной поток для полученного PS-файла.
- Создайте объект PsSaveOptions с параметрами по умолчанию.
- Создайте одностраничный PsDocument с уже созданным потоком вывода и сохраните параметры.
- Создайте новое графическое состояние.
- Создайте фигуру круга (объект java.awt.geom.Ellipse2D).
- Установите клип по этому пути.
- Установите отрисовку текущего графического состояния PsDocument.
- Заполните прямоугольник текущей краской.
- Выход из текущего состояния графики на верхний уровень.
- Перевести на место закрашенный прямоугольник.
- Обведите пунктирной линией границы того же прямоугольника над закрашенным, чтобы показать границы обрезанного залитого прямоугольника.
- Закройте страницу.
- Сохраните документ.
 1// Demonstrates clipping by shape and clipping by text in PS document.
 2String outputFileName = "ApplyClipByShape_outPS.ps";
 3
 4//Create save options with A4 size
 5PsSaveOptions options = new PsSaveOptions();
 6
 7// Create new 1-paged PS Document
 8PsDocument document = new PsDocument(getOutputDir() + outputFileName, options, false);
 9
10//Create graphics path from the rectangle
11GeneralPath rectanglePath = new GeneralPath();
12rectanglePath.append(new Rectangle2D.Float(0, 0, 300, 200), false);
13
14////////////////////////////////////// Clipping by shape ///////////////////////////////
15
16//Save graphics state in order to return back to this state after transformation
17document.writeGraphicsSave();
18
19//Displace current graphics state on 100 points to the right and 100 points to the bottom.
20document.translate(100, 100);
21
22//Create graphics path from the circle
23GeneralPath circlePath = new GeneralPath();
24circlePath.append(new Ellipse2D.Float(50, 0, 200, 200), false);
25
26//Add clipping by circle to the current graphics state
27document.clip(circlePath);
28
29//Set paint in the current graphics state
30document.setPaint(Color.BLUE);
31
32//Fill the rectangle in the current graphics state (with clipping)
33document.fill(rectanglePath);
34
35//Restore graphics state to the previous (upper) level
36document.writeGraphicsRestore();
37
38//Displace upper level graphics state on 100 points to the right and 100 points to the bottom.
39document.translate(100, 100);
40
41//Create dashed stroke similar to Pen with DashStyle.Dash
42float[] dash = new float[] { 5.0f };
43BasicStroke stroke = new BasicStroke(2.0f, BasicStroke.CAP_BUTT, BasicStroke.JOIN_MITER, 10.0f, dash, 0.0f);
44
45document.setStroke(stroke);
46
47//Draw the rectangle in the current graphics state (has no clipping) above clipped rectangle
48document.draw(rectanglePath);
49
50//Close current page
51document.closePage();
52
53//Save the document
54document.save();См. работу с клипами в документах PS в .NET.
Результат выполнения этого кода выглядит так
В следующем примере мы получаем шрифт, используемый для обрезки прямоугольника с синей заливкой и контуром текста.
Чтобы добавить вырезку по тексту в новый PsDocument с помощью библиотеки Aspose.Page для Java в этом примере, мы выполняем следующие шаги:
- Создайте выходной поток для полученного PS-файла.
- Создайте объект PsSaveOptions с параметрами по умолчанию.
- Создайте одностраничный PsDocument с уже созданным потоком вывода и сохраните параметры.
- Создайте новое графическое состояние.
- Создайте шрифт.
- Установите клип с текстом и шрифтом.
- Установите отрисовку текущего графического состояния PsDocument.
- Заполните прямоугольник текущей краской.
- Выход из текущего состояния графики на верхний уровень.
- Перевести на место закрашенный прямоугольник.
- Обведите пунктирной линией границы того же прямоугольника над закрашенным, чтобы показать границы обрезанного залитого прямоугольника.
- Закройте страницу.
- Сохраните документ.
 1// Demonstrates clipping by text in PS document.
 2String outputFileName = "ApplyClipByText_outPS.ps";
 3
 4//Create save options with A4 size
 5PsSaveOptions options = new PsSaveOptions();
 6
 7// Create new 1-paged PS Document
 8PsDocument document = new PsDocument(getOutputDir() + outputFileName, options, false);
 9
10//Create graphics path from the rectangle
11GeneralPath rectanglePath = new GeneralPath();
12rectanglePath.append(new Rectangle2D.Float(0, 0, 300, 200), false);
13
14//Save graphics state in order to return back to this state after transformation
15document.writeGraphicsSave();
16
17//Displace current graphics state on 100 points to the right and 100 points to the bottom.
18document.translate(100, 100);
19
20float[] dash = new float[] { 5.0f };
21BasicStroke stroke = new BasicStroke(2.0f, BasicStroke.CAP_BUTT, BasicStroke.JOIN_MITER, 10.0f, dash, 0.0f);
22
23int fontSize = 120;
24Font font = new Font("Arial", Font.BOLD, fontSize);
25
26//Clip rectangle by text's outline
27document.clipText("ABC", font, 20, fontSize + 10);
28
29//Set paint in the current graphics state
30document.setPaint(Color.BLUE);
31
32document.fill(rectanglePath);
33
34document.writeGraphicsRestore();
35
36document.translate(100, 100);
37
38//Set paint in the current graphics state
39document.setPaint(Color.BLUE);
40
41document.setStroke(stroke);
42//Draw the rectangle in the current graphics state (has no clipping) above clipped rectangle
43document.draw(rectanglePath);
44
45//Close current page
46document.closePage();
47
48//Save the document
49document.save();См. работу с клипами в документах PS в .NET.
Результат запуска этого кода выглядит как

Вы можете загрузить примеры и файлы данных с GitHub.