Робота з прозорістю у файлі XPS | .NET
Установіть маску непрозорості в XPS
Встановити об’єкт маски непрозорості
Aspose.Page для .NET пропонує властивість OpacityMask для встановлення маски непрозорості на шляху XPS. Потрібно вказати XpsPathGeometry і додати його до XpsPath. Зображення можна використовувати як маску непрозорості, а альфа-компонент кожного пікселя використовується для застосування поверх базової заливки. У створеному документі XPS над вихідним файлом зображення відображатимуться похилі градієнтні смуги. Наступний фрагмент коду демонструє повну функціональність для встановлення маски непрозорості:
 1// Apply opacity mask for texture pattern in XPS document.
 2
 3// Create new XPS Document
 4XpsDocument doc = new XpsDocument();
 5
 6string outputFileName = "OpacityMask_out.xps";
 7
 8//Add Canvas to XpsDocument instance
 9XpsCanvas canvas = doc.AddCanvas();
10// Rectangle with opacity masked by ImageBrush
11XpsPath path = canvas.AddPath(doc.CreatePathGeometry("M 10,180 L 228,180 228,285 10,285"));
12path.Fill = doc.CreateSolidColorBrush(doc.CreateColor(1.0f, 0.0f, 0.0f));
13path.OpacityMask = doc.CreateImageBrush(DataDir + "R08SY_NN.tif", new RectangleF(0f, 0f, 128f, 192f),
14    new RectangleF(0f, 0f, 64f, 96f));
15((XpsImageBrush)path.OpacityMask).TileMode = XpsTileMode.Tile;
16// Save resultant XPS document
17doc.Save(OutputDir + outputFileName);Результат

Додайте прозорий об’єкт у документ XPS
Додати прозорий об’єкт
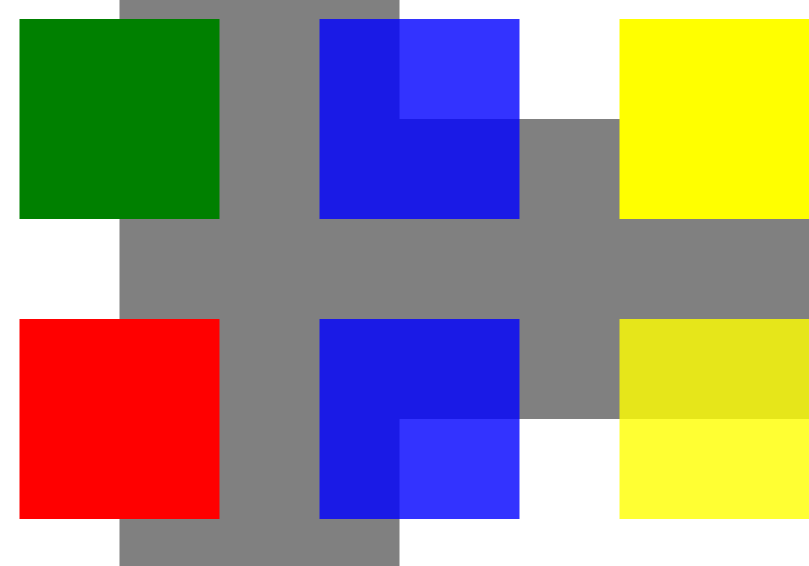
Рішення пропонує клас XpsPath, за допомогою якого можна додавати прозорі об’єкти до документа XPS. Потрібно вказати XpsPathGeometry і додати його до XpsPath. Наступний фрагмент коду демонструє повну функціональність для додавання прозорих об’єктів до документа XPS:
 1// Demonstrates transparency in shapes in XPS document.
 2
 3// Create new XPS Document
 4XpsDocument doc = new XpsDocument();
 5
 6string outputFileName = "AddTransparentObject_outXPS.xps";
 7
 8// Just to demonstrate transparency
 9doc.AddPath(doc.CreatePathGeometry("M120,0 H400 v1000 H120")).Fill = doc.CreateSolidColorBrush(Color.Gray);
10doc.AddPath(doc.CreatePathGeometry("M300,120 h600 V420 h-600")).Fill = doc.CreateSolidColorBrush(Color.Gray);
11
12// Create path with closed rectangle geometry
13XpsPath path1 = doc.CreatePath(doc.CreatePathGeometry("M20,20 h200 v200 h-200 z"));
14// Set blue solid brush to fill path1
15path1.Fill = doc.CreateSolidColorBrush(Color.Blue);
16// Add it to the current page
17XpsPath path2 = doc.Add(path1);
18
19// path1 and path2 are the same as soon as path1 hasn't been placed inside any other element
20// (which means that path1 had no parent element).
21// Because of that rectangle's color on the page effectively turns to green
22path2.Fill = doc.CreateSolidColorBrush(Color.Green);
23
24// Now add path2 once again. Now path2 has parent. So path3 won't be the same as path2.
25// Thus a new rectangle is painted on the page ...
26XpsPath path3 = doc.Add(path2);
27// ... and we shift it 300 units lower ...
28path3.RenderTransform = doc.CreateMatrix(1, 0, 0, 1, 0, 300);
29// ... and set red solid brush to fill it
30path3.Fill = doc.CreateSolidColorBrush(Color.Red);
31
32// Create new path4 with path2's geometry ...
33XpsPath path4 = doc.AddPath(path2.Data);
34// ... shift it 300 units to the right ...
35path4.RenderTransform = doc.CreateMatrix(1, 0, 0, 1, 300, 0);
36// ... and set blue solid fill
37path4.Fill = doc.CreateSolidColorBrush(Color.Blue);
38
39// Add path4 once again.
40XpsPath path5 = doc.Add(path4);
41// path4 and path5 are not the same again ...
42// (move path5 300 units lower)
43path5.RenderTransform = path5.RenderTransform.Clone(); // to disconnect RenderTransform value from path4 (see next comment about Fill property)
44path5.RenderTransform.Translate(0, 300);
45// ... but if we set the opacity of Fill property, it will take effect on both path5 and path4
46// because brush is a complex property value which remains the same for path5 and path4
47path5.Fill.Opacity = 0.8f;
48
49// Create new path6 with path2's geometry ...
50XpsPath path6 = doc.AddPath(path2.Data);
51// ... shift it 600 units to the right ...
52path6.RenderTransform = doc.CreateMatrix(1, 0, 0, 1, 600, 0);
53// ... and set yellow solid fill
54path6.Fill = doc.CreateSolidColorBrush(Color.Yellow);
55
56// Now add path6's clone ...
57XpsPath path7 = doc.Add(path6.Clone());
58// (move path5 300 units lower)
59path7.RenderTransform = path7.RenderTransform.Clone();
60path7.RenderTransform.Translate(0, 300);
61// ... and set opacity for path7
62path7.Fill.Opacity = 0.8f;
63// Now opacity effects independantly as soon as property values are cloned along with the element
64
65// Save resultant XPS document
66doc.Save(OutputDir + outputFileName);Результат
Ви можете завантажити приклади і файли даних з GitHub.