使用 XPS 图形实用程序 | C++
如何在 XPS 中轻松绘制简单形状
XPS 规范定义了可用于构成任何复杂形状的图形基元元素。Aspose.Page for C++ 提供了封装这些元素的类。然而,当您需要绘制即使是相对简单的形状(例如扇形或线段,或内接或外接于圆的正 N 边形)时,使用它们可能会有些繁琐。即使是绘制圆形或椭圆形,也远没有想象中那么简单。因此,Aspose.Page 还提供了一组实用方法,这些方法很可能会在执行此类任务时节省您的时间。
在下面的示例中,我们将使用所有可用的形状实用工具。请注意,它们都返回一个 XpsPathGeometry 对象,该对象可用于构建 XPS 路径。并且,您可以为这些路径指定外观属性,例如画笔、描边图案、不透明度等。
 1    // ExStart:UsingShapeUtils
 2    // For complete examples and data files, please go to https://github.com/aspose-page/Aspose.Page-for-C
 3    // The path to the documents directory.
 4    System::String dataDir = RunExamples::GetDataDir_WorkingWithShapes();
 5    // Create new XPS Document
 6    {
 7        System::SharedPtr<XpsDocument> doc = System::MakeObject<XpsDocument>();
 8        // Clearing resources under 'using' statement
 9        System::Details::DisposeGuard<1> __dispose_guard_0({ doc});
10        // ------------------------------------------
11
12        try
13        {
14            // Set first page's size.
15            doc->get_Page()->set_Width(650.f);
16            doc->get_Page()->set_Height(240.f);
17
18            // Draw a circle with center (120, 120) and radius 100.
19            System::SharedPtr<XpsPath> path = doc->CreatePath(doc->get_Utils()->CreateCircle(System::Drawing::PointF(120.f, 120.f), 100.f));
20            path->set_Fill(doc->CreateSolidColorBrush(System::Drawing::Color::get_Green()));
21            doc->Add<System::SharedPtr<XpsPath>>(path);
22
23            // Inscribe a regular pentagon in the circle.
24            path = doc->CreatePath(doc->get_Utils()->CreateRegularInscribedNGon(5, System::Drawing::PointF(120.f, 120.f), 100.f));
25            path->set_Fill(doc->CreateSolidColorBrush(System::Drawing::Color::get_Red()));
26            doc->Add<System::SharedPtr<XpsPath>>(path);
27
28            // Circumscribe a regular hexagon around the circle.
29            path = doc->CreatePath(doc->get_Utils()->CreateRegularCircumscribedNGon(6, System::Drawing::PointF(120.f, 120.f), 100.f));
30            path->set_Stroke(doc->CreateSolidColorBrush(System::Drawing::Color::get_Magenta()));
31            path->set_StrokeThickness(3.f);
32            doc->Add<System::SharedPtr<XpsPath>>(path);
33
34            // Draw a sector of the circle centered at (340, 120), starting at -45 degrees and ending at +45 degrees.
35            path = doc->CreatePath(doc->get_Utils()->CreatePieSlice(System::Drawing::PointF(340.f, 120.f), 100.f, -45.f, 45.f));
36            path->set_Stroke(doc->CreateSolidColorBrush(System::Drawing::Color::get_Red()));
37            path->set_StrokeThickness(5.f);
38            doc->Add<System::SharedPtr<XpsPath>>(path);
39
40            // Draw a segment of the circle centered at (340, 120), starting at -45 degrees and ending at +45 degrees.
41            path = doc->CreatePath(doc->get_Utils()->CreateCircularSegment(System::Drawing::PointF(340.f, 120.f), 100.f, -45.f, 45.f));
42            path->set_Fill(doc->CreateSolidColorBrush(System::Drawing::Color::get_Black()));
43            doc->Add<System::SharedPtr<XpsPath>>(path);
44
45            // Draw a rectangle with the top left vertex (530, 20), width 100 units and height 200 units.
46            path = doc->CreatePath(doc->get_Utils()->CreateRectangle(System::Drawing::RectangleF(530.f, 20.f, 100.f, 200.f)));
47            path->set_Stroke(doc->CreateSolidColorBrush(System::Drawing::Color::get_Red()));
48            doc->Add<System::SharedPtr<XpsPath>>(path);
49
50            // Draw an ellipse with center (580, 120) and radii 50 and 100.
51            path = doc->CreatePath(doc->get_Utils()->CreateEllipse(System::Drawing::PointF(580.f, 120.f), 50.f, 100.f));
52            path->set_Fill(doc->CreateSolidColorBrush(System::Drawing::Color::get_Yellow()));
53            doc->Add<System::SharedPtr<XpsPath>>(path);
54
55            doc->Save(dataDir + u"UseShapeUtilsXPS_out.xps");
56        }
57        catch(...)
58        {
59            __dispose_guard_0.SetCurrentException(std::current_exception());
60        }
61    }
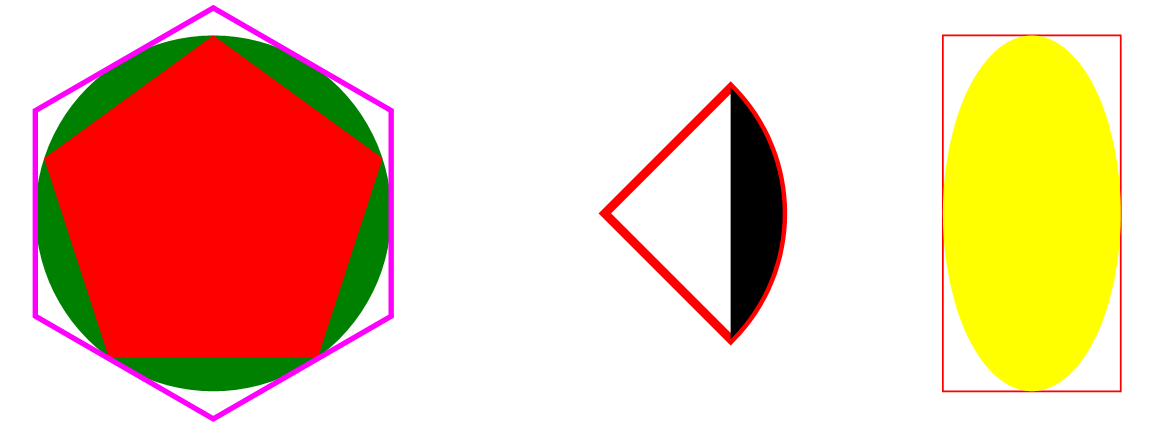
62 // ExEnd:UsingShapeUtils我们首先创建一个新的 XPS 文档,然后调整第一页的大小。我们在页面上放置的第一个形状是一个圆形(由其圆心和半径指定),并用纯绿色填充。接下来,我们在该圆形内内接一个未填充的红色正五边形。然后是一个外接正六边形,并用洋红色描边。
在右侧,我们首先在 -45 度到 +45 度之间绘制一个红色扇形(或“饼形切片”),然后在扇形上方使用相同的参数绘制一个黑色圆段。
绘图的最后一部分由一个红色矩形(由左上角顶点和尺寸指定)和一个黄色椭圆(由圆心和半径指定)组成,它们内接于矩形内。在这里,我们“手动”控制刻画。
保存的 XPS 文件中应该显示的内容如下:

如何轻松在 XPS 页面上添加图片
使用 XPS 规范定义的图元,在页面上添加图像包含两个步骤:
- 添加要用图像填充的矩形路径;
- 为路径设置图像画笔,其中需要指定视图框和视口。通常,您需要知道图像的分辨率和像素大小才能准确提供前两个参数。
不过,幸运的是,Aspose.Page API for C++ 的 XPS 图形实用程序中有一个便捷的方法可以为您完成(几乎)所有工作。它还提供各种适配模式。让我们看下面的示例:
 1    // ExStart:UsingImageUtils
 2    // For complete examples and data files, please go to https://github.com/aspose-page/Aspose.Page-for-C
 3    // The path to the documents directory.
 4    System::String dataDir = RunExamples::GetDataDir_WorkingWithImages();
 5    // Create new XPS Document
 6    {
 7        System::SharedPtr<XpsDocument> doc = System::MakeObject<XpsDocument>();
 8        // Clearing resources under 'using' statement
 9        System::Details::DisposeGuard<1> __dispose_guard_0({ doc});
10        // ------------------------------------------
11
12        try
13        {
14            // Set first page's size.
15            doc->get_Page()->set_Width(540.f);
16            doc->get_Page()->set_Height(220.f);
17
18            // Draw the image box.
19            System::Drawing::RectangleF imageBox(10.f, 10.f, 200.f, 200.f);
20            System::SharedPtr<XpsPath> path = doc->AddPath(doc->get_Utils()->CreateRectangle(imageBox));
21            path->set_Stroke(doc->CreateSolidColorBrush(System::Drawing::Color::get_Black()));
22            // Add an image to fit width.
23            path = doc->get_Utils()->CreateImage(dataDir + u"R08LN_NN.jpg", imageBox, Aspose::Page::XPS::ImageMode::FitToWidth);
24            // Prevent tiling.
25            (System::ExplicitCast<Aspose::Page::XPS::XpsModel::XpsImageBrush>(path->get_Fill()))->set_TileMode(Aspose::Page::XPS::XpsModel::XpsTileMode::None);
26            doc->Add<System::SharedPtr<XpsPath>>(path);
27
28            // Add an image to fit width.
29            doc->Add<System::SharedPtr<XpsPath>>(doc->get_Utils()->CreateImage(dataDir + u"R08LN_NN.jpg", System::Drawing::RectangleF(220.f, 10.f, 200.f, 100.f), Aspose::Page::XPS::ImageMode::FitToHeight));
30
31            // Add an image to fit width.
32            doc->Add<System::SharedPtr<XpsPath>>(doc->get_Utils()->CreateImage(dataDir + u"R08LN_NN.jpg", System::Drawing::RectangleF(430.f, 10.f, 100.f, 200.f), Aspose::Page::XPS::ImageMode::FitToBox));
33
34            // Save resultant XPS document
35            doc->Save(dataDir + u"UseImageUtilsXPS_out.xps");
36        }
37        catch(...)
38        {
39            __dispose_guard_0.SetCurrentException(std::current_exception());
40        }
41    }
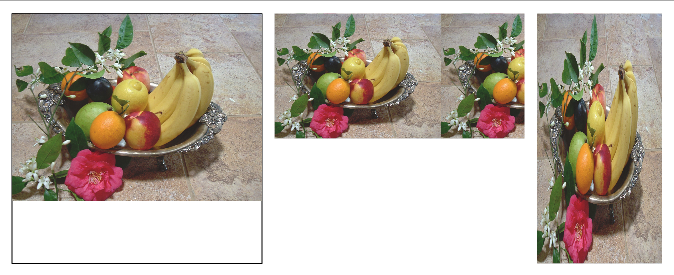
42 // ExEnd:UsingImageUtils再次,我们新建一个 XPS 文档并调整第一页的大小。此时值得注意的是,默认情况下,用作画笔的图像将以与 XpsTileMode.Tile 模式相同的方式平铺在矩形区域上。但是,在示例的第一部分,我们演示了如何避免这种平铺。
因此,我们首先希望图像出现在 (10, 10) 位置,并适应宽 200 个单位、高 200 个单位的矩形框的宽度。为了更清楚地看到结果,我们首先绘制矩形框本身。接下来,我们创建图像(请注意,它实际上是一个填充路径)。最后,获取路径的填充并将其转换为
XpsImageBrush 后,我们将 TileMode 属性设置为 XpsTileMode.None。
在右侧,我们放置相同的图像,并使其与图像框的高度相适应。注意平铺。
最后,我们再次将相同的图像放置在右侧,并使其与图像框的高度和宽度相适应,这会使图像变形。
保存的 XPS 文件中的结果如下:
