在 PS 文件中使用填充图案 | Java
在 PS 文档中添加阴影图案
阴影图案是一种纹理平铺图案,通常用简单的双色(通常为黑白)小图像表示。这些小图像的主要内容是各种阴影。
Java 平台没有单独的类用于使用阴影绘制形状和文本。但是,Aspose.Page for Java 库提供了 com.aspose.eps.HatchPaintLibrary 类,该类可以创建 java.awt.TexturePaint,并使用 com.aspose.eps.HatchStyle 提供的 55 种样式之一定义的阴影填充。
为了在 Aspose.Page for Java 库中使用填充图案绘制图形对象,需要创建填充图案 java.awt.TexturePaint 并指定填充样式,然后将其传递给 setPaint() 或接受 java.awt.Paint 作为参数的 fillText() 或 fillAndStrokeText() 方法之一。
为了在 Aspose.Page for Java 库中使用填充图案勾勒图形对象的轮廓,需要在 PsDocument 中将填充图案设置为当前绘制,创建新的 java.awt.BasicStroke 并将其传递给 setStroke() 或接受 java.awt.Stroke 作为参数的 outlineText() 或 fillAndStrokeText() 方法之一。
在下面的示例中,我们首先演示如何使用填充图案填充形状,然后演示 Java 中各种填充样式,最后演示如何使用填充图案填充和勾勒文本轮廓。
在新的 PS 文档中使用填充图案绘制图形对象的算法包括以下步骤:
- 为生成的 PS 文件创建输出流。
- 创建 PsSaveOptions。
- 使用已创建的输出流和保存选项创建 PsDocument。
- 根据要填充或勾勒轮廓的对象创建形状或字体。
- 使用 com.aspose.eps.HatchPaintLibrary 创建一个具有所需样式的 java.awt.TexturePaint 对象。
- 将阴影线绘制设置为 PsDocument 中的当前绘制
- 使用当前绘制填充形状或填充文本。如果我们使用接受 java.awt.Paint 作为参数的文本填充方法,则可以忽略前一个点。
- 关闭页面。
- 保存文档。
如果我们需要使用阴影图案而不是最后四个点来描边(勾勒轮廓)图形对象,则需要执行以下操作:
将阴影线绘制设置为 PsDocument 中的当前绘制。
创建 java.awt.BasicStroke 对象。
将此描边设置为 PsDocument 中的当前描边。
使用当前绘制勾勒形状的轮廓,并对文本进行描边或勾勒轮廓。如果我们使用接受 java.awt.Stroke 作为参数的文本勾勒轮廓方法,则可以忽略前一个点。
关闭页面。
保存文档。
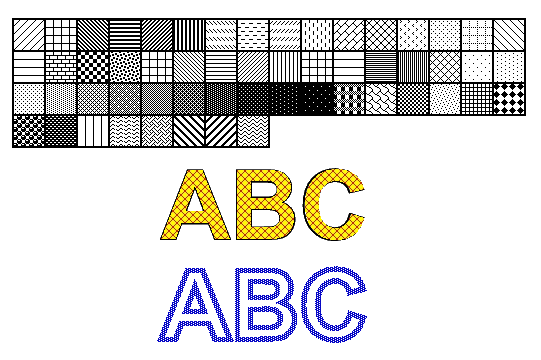
 1  // Demonstrates all embedded hatch patterns that can be used to paint or outline shapes or text in PS document.
 2
 3  String outputFileName = "AddHatchPattern_outPS.ps";
 4
 5  //Create save options with A4 size
 6  PsSaveOptions options = new PsSaveOptions();
 7
 8  // Create new 1-paged PS Document
 9  PsDocument document = new PsDocument(getOutputDir() + outputFileName, options, false);
10
11  int x0 = 20;
12  int y0 = 100;
13  int squareSide = 32;
14  int width = 500;
15  int sumX = 0;
16
17//Restore graphics state
18  document.writeGraphicsSave();
19
20  //Translate to initial point
21  document.translate(x0, y0);
22
23  //Create a square for every pattern
24  Rectangle2D.Float square = new Rectangle2D.Float(0, 0, squareSide, squareSide);
25
26  //Create pen for outlining pattern square
27  BasicStroke stroke = new BasicStroke(2);
28
29  HatchStyle [] hatchStyles = HatchStyle.values();
30
31  //For every hatch pattern style
32  for (int i = 0; i < hatchStyles.length; i++) {
33  	//Create a hatch texture pattern by hatch style, foreground and background colors
34  	TexturePaint paint = HatchPaintLibrary.getHatchTexturePaint(hatchStyles[i], Color.BLACK, Color.WHITE);
35  	//Set paint with the current hatch pattern
36      document.setPaint(paint);
37
38      //Calculate a displacement in order to don't go beyond the page bounds
39      int x = squareSide;
40      int y = 0;
41      if (sumX >= width) {
42          x = -(sumX - squareSide);
43          y += squareSide;
44      }
45
46      //Translate current graphics state
47      document.translate(x, y);
48      //Fill pattern square
49      document.fill(square);
50
51      //Set current paint
52      document.setPaint(Color.BLACK);
53      //Set current stroke
54      document.setStroke(stroke);
55      //Draw square outline
56      document.draw(square);
57
58      //Calculate distance from X0
59      if (sumX >= width)
60          sumX = squareSide;
61      else
62          sumX += x;
63  }
64
65  //Restore graphics state
66  document.writeGraphicsRestore();
67
68  //Fill a text with the hatch pattern
69  TexturePaint paint = HatchPaintLibrary.getHatchTexturePaint(HatchStyle.DiagonalCross, Color.RED, Color.YELLOW);
70  Font font = new Font("Arial", Font.BOLD, 96);
71  document.fillAndStrokeText("ABC", font, 200, 320, paint, Color.BLACK, stroke);
72
73  //Outline the text with the hatch pattern
74  paint = HatchPaintLibrary.getHatchTexturePaint(HatchStyle.Percent70, Color.BLUE, Color.WHITE);
75  document.outlineText("ABC", font, 200, 420, paint, new BasicStroke(5));
76
77  //Close current page
78  document.closePage();
79
80  //Save the document
81 document.save();请参阅在 .NET 中使用 PS 文档中的填充图案。
运行此代码的结果显示为
您可以从 GitHub下载示例和数据文件。