
在 PostScript 中使用剪辑 | Aspose.Page for .NET 开发者指南
在 PS 文档中添加剪辑
在 PS 文档中,剪辑是一条路径,用于限定当前图形状态的内容显示范围。超出范围的内容将被裁剪掉。
在 .NET 中,剪辑路径可以通过三种方式指定:
- 使用 System.Drawing.Drawing2D.GraphicsPath,它可以包含任意闭合形状;
- 使用文本轮廓;
- 使用 1 bpp(每像素位) 2 色图像作为模板遮罩;
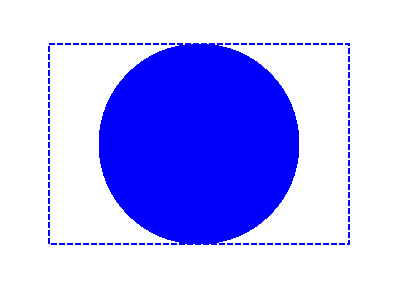
目前 Aspose.Page for .NET 库仅提供前两种剪辑方式。下面的示例中,我们从矩形创建一个圆形 System.Drawing.Drawing2D.GraphicsPath 作为剪辑路径,并在同一图形状态下裁剪一个填充蓝色的矩形。
在本示例中,为了在新的 PsDocument 中添加剪辑,我们执行以下步骤:
- 为生成的 PS 文件创建输出流。
- 创建带有默认选项的 PsSaveOptions 对象。
- 使用已创建的输出流和保存选项创建一个单页 PsDocument。
- 创建一个新的图形状态。
- 从矩形创建一个圆形 System.Drawing.Drawing2D.GraphicsPath。
- 使用此路径设置剪辑。
- 为当前 PsDocument 的图形状态设置绘画对象。
- 用当前绘画对象填充矩形路径。
- 从当前图形状态退出到上一级。
- 平移到已填充矩形的位置。
- 使用虚线在已填充矩形上方绘制同一矩形的边框,以显示剪辑后矩形的边界。
- 关闭页面。
- 保存文档。
 1// Demonstrates clipping by shape and clipping by text in PS document.
 2
 3string outputFileName = "ApplyClipByShape_outPS.ps";
 4
 5//Create save options with A4 size
 6PsSaveOptions options = new PsSaveOptions();
 7
 8// Create new 1-paged PS Document
 9PsDocument document = new PsDocument(OutputDir + outputFileName, options, false);
10
11//Create graphics path from the rectangle
12GraphicsPath rectanglePath = new GraphicsPath();
13rectanglePath.AddRectangle(new RectangleF(0, 0, 300, 200));
14
15////////////////////////////////////// Clipping by shape //////////////////////////////////////////////////////////////////////
16
17//Save graphics state in order to return back to this state after transformation
18document.WriteGraphicsSave();
19
20//Displace current graphics state on 100 points to the right and 100 points to the bottom.
21document.Translate(100, 100);
22
23//Create graphics path from the circle
24GraphicsPath circlePath = new GraphicsPath();
25circlePath.AddEllipse(new RectangleF(50, 0, 200, 200));
26
27//Add clipping by circle to the current graphics state
28document.Clip(circlePath);
29
30//Set paint in the current graphics state
31document.SetPaint(new SolidBrush(Color.Blue));
32
33//Fill the rectangle in the current graphics state (with clipping)
34document.Fill(rectanglePath);
35
36//Restore graphics state to the previus (upper) level
37document.WriteGraphicsRestore();
38
39//Displace upper level graphics state on 100 points to the right and 100 points to the bottom.
40document.Translate(100, 100);
41
42Pen pen = new Pen(new SolidBrush(Color.Blue), 2);
43pen.DashStyle = DashStyle.Dash;
44
45document.SetStroke(pen);
46
47//Draw the rectangle in the current graphics state (has no clipping) above clipped rectangle
48document.Draw(rectanglePath);
49
50//Close current page
51document.ClosePage();
52
53//Save the document
54document.Save();对于 Linux、macOS 以及其他非 Windows 操作系统,我们提供 Aspose.Page.Drawing NuGet 包。它使用 Aspose.Drawing 后端替代 System.Drawing 系统库。
因此请导入 Aspose.Page.Drawing 命名空间,而不是 System.Drawing。在上面的代码片段中,Aspose.Page.Drawing.Rectangle 将替代 System.Drawing.Rectangle,Aspose.Page.Drawing.Drawing2D.GraphicsPath 将替代 System.Drawing.Drawing2D.GraphicsPath,依此类推。我们在 GitHub 上的代码示例已包含所有必要的替换。
查看 Java 版在 PS 文档中使用剪辑的示例: /page/zh/java/ps/working-with-clips/。
结果如下所示:
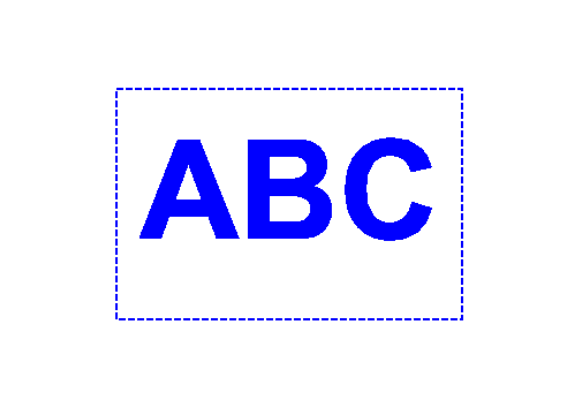
在下一个示例中,我们通过文本轮廓获取字体,以剪辑填充蓝色的矩形。
为了在新的 PsDocument 中通过文本添加剪辑,我们执行以下步骤:
- 为生成的 PS 文件创建输出流。
- 创建带有默认选项的 PsSaveOptions 对象。
- 使用已创建的输出流和保存选项创建一个单页 PsDocument。
- 创建一个新的图形状态。
- 创建一个字体对象。
- 使用文本及字体设置剪辑。
- 为当前 PsDocument 的图形状态设置绘画对象。
- 用当前绘画对象填充矩形路径。
- 从当前图形状态退出到上一级。
- 平移到已填充矩形的位置。
- 使用虚线在已填充矩形上方绘制同一矩形的边框,以显示剪辑后矩形的边界。
- 关闭页面。
- 保存文档。
 1// Demonstrates clipping by text in PS document.
 2
 3string outputFileName = "ApplyClipByText_outPS.ps";
 4
 5//Create save options with A4 size
 6PsSaveOptions options = new PsSaveOptions();
 7
 8// Create new 1-paged PS Document
 9PsDocument document = new PsDocument(OutputDir + outputFileName, options, false);
10
11//Create graphics path from the rectangle
12GraphicsPath rectanglePath = new GraphicsPath();
13rectanglePath.AddRectangle(new RectangleF(0, 0, 300, 200));
14
15//Save graphics state in order to return back to this state after transformation
16document.WriteGraphicsSave();
17
18//Displace current graphics state on 100 points to the right and 100 points to the bottom.
19document.Translate(100, 100);
20
21Pen pen = new Pen(new SolidBrush(Color.Blue), 2);
22pen.DashStyle = DashStyle.Dash;
23int fontSize = 120;
24System.Drawing.Font font = new System.Drawing.Font("Arial", fontSize, FontStyle.Bold);
25
26//Clip rectangle by text's outline
27document.ClipText("ABC", font, 20, fontSize + 10);
28
29//Set paint in the current graphics state
30document.SetPaint(new SolidBrush(Color.Blue));
31
32document.Fill(rectanglePath);
33
34document.WriteGraphicsRestore();
35
36document.Translate(100, 100);
37
38document.SetStroke(pen);
39//Draw the rectangle in the current graphics state (has no clipping) above clipped rectangle
40document.Draw(rectanglePath);
41
42//Close current page
43document.ClosePage();
44
45//Save the document
46document.Save();对于 Linux、macOS 以及其他非 Windows 操作系统,我们提供 Aspose.Page.Drawing NuGet 包。它使用 Aspose.Drawing 后端替代 System.Drawing 系统库。
因此请导入 Aspose.Page.Drawing 命名空间,而不是 System.Drawing。在上面的代码片段中,Aspose.Page.Drawing.Rectangle 将替代 System.Drawing.Rectangle,Aspose.Page.Drawing.Drawing2D.GraphicsPath 将替代 System.Drawing.Drawing2D.GraphicsPath,依此类推。我们在 GitHub 上的代码示例已包含所有必要的替换。
查看 Java 版在 PS 文档中使用剪辑的示例: /page/zh/java/ps/working-with-clips/。
结果如下所示:
您可以从 GitHub 下载示例和数据文件。