在 PostScript 中使用填充图案 | .NET
在 PS 文档中添加阴影图案
阴影图案是一种纹理平铺图案,通常用简单的双色(通常为黑白)小图像表示。这些小图像的主要内容是各种阴影线。
对于阴影绘制,.NET 平台提供了一个单独的类,该类派生自 System.Drawing.Brush 和 System.Drawing.HatchBrush。它与 System.Drawing.TextureBrush 的区别在于,它具有命名的预定义样式,定义了用于平铺的图像。.NET 平台提供了 53 种阴影样式,所有 52 种样式都可以在 PsDocument 中用于填充或描边(勾勒轮廓)。
为了在 Aspose.Page for .NET 库中使用填充图案绘制图形对象,只需将 System.Drawing.HatchBrush 传递给 SetPaint() 或接受 System.Drawing.Brush 作为参数的 FillText() 或 FillAndStrokeText() 方法即可。
为了在 Aspose.Page for .NET 库中使用填充图案勾勒图形对象的轮廓,需要创建新的 System.Drawing.Pen 对象,并传入 System.Drawing.HatchBrush ,然后将其传递给 SetStroke() 或接受 System.Drawing.Pen 作为参数的 OutlineText() 或 FillAndStrokeText() 方法。
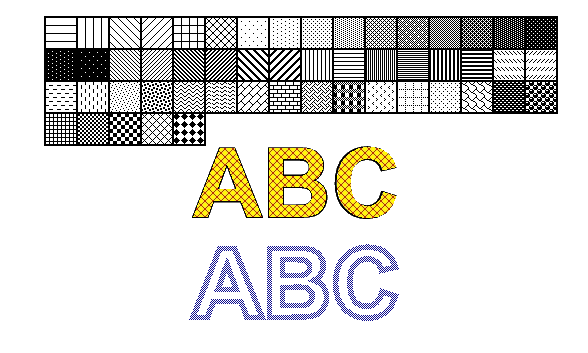
在下面的示例中,我们首先演示如何用阴影图案填充形状,然后演示 .NET 中的各种阴影样式,最后演示如何用阴影图案填充和勾勒文本轮廓。
在新的 PS 文档中使用填充图案绘制图形对象的算法包括以下步骤:
- 为生成的 PS 文件创建输出流。
- 创建 PsSaveOptions。
- 使用已创建的输出流和保存选项创建 PsDocument。
- 根据要填充或勾勒轮廓的对象,创建必要的图形路径或字体。
- 创建一个具有所需样式的 System.Drawing.HatchBrush 对象。
- 在 PsDocument 中将填充画笔设置为当前画笔。
- 使用当前画笔填充图形路径或填充文本。如果我们使用其中一种接受 System.Drawing.Brush 作为参数的文本填充方法,则可以忽略上一点。
- 关闭页面。
- 保存文档。
如果我们需要使用填充图案来描边(勾勒轮廓)图形对象,而不是最后四点,则需要执行以下操作:
创建带有填充画笔的 System.Drawing.Pen 对象。
在 PsDocument 中将此笔设置为当前描边。
使用当前描边勾勒图形路径或勾勒文本轮廓。如果我们使用其中一种接受 System.Drawing.Pen 作为参数的文本勾勒轮廓方法,则可以忽略上一点。
关闭页面。
保存文档。
 1// Demonstrates all embedded hatch patterns that can be used to paint or outline shapes or text in PS document.
 2
 3string outputFileName = "AddHatchPattern_outPS.ps";
 4
 5//Create save options with A4 size
 6PsSaveOptions options = new PsSaveOptions();
 7
 8// Create new 1-paged PS Document
 9PsDocument document = new PsDocument(OutputDir + outputFileName, options, false);
10
11int x0 = 20;
12int y0 = 100;
13int squareSide = 32;
14int width = 500;
15int sumX = 0;
16
17//Restore graphics state
18document.WriteGraphicsSave();
19
20//Translate to initial point
21document.Translate(x0, y0);
22
23//Create rectngle path for every pattern square
24GraphicsPath path = new GraphicsPath();
25path.AddRectangle(new RectangleF(0, 0, squareSide, squareSide));
26
27//Create pen for outlining pattern square
28Pen pen = new Pen(Color.Black, 2);
29
30//For every hatch pattern style
31for (HatchStyle hatchStyle = 0; hatchStyle <= (HatchStyle)52; hatchStyle++)
32{
33    //Set paint with current hatch brush style
34    document.SetPaint(new HatchBrush(hatchStyle, Color.Black, Color.White));
35
36    //Calculate displacement in order to don't go beyond the page bounds
37    int x = squareSide;
38    int y = 0;
39    if (sumX >= width)
40    {
41        x = -(sumX - squareSide);
42        y += squareSide;
43    }
44    //Translate current graphics state
45    document.Translate(x, y);
46    //Fill pattern square
47    document.Fill(path);
48    //Set stroke
49    document.SetStroke(pen);
50    //Draw square outline
51    document.Draw(path);
52
53    //Calculate distance from X0
54    if (sumX >= width)
55    {
56        sumX = squareSide;
57    }
58    else
59        sumX += x;
60}
61
62//Restore graphics state
63document.WriteGraphicsRestore();
64
65//Fill text with hatch pattern
66HatchBrush brush = new HatchBrush(HatchStyle.DiagonalCross, Color.Red, Color.Yellow);
67System.Drawing.Font font = new System.Drawing.Font("Arial", 96, FontStyle.Bold);
68document.FillAndStrokeText("ABC", font, 200, 300, brush, pen);
69
70//Outline text with hatch pattern
71brush = new HatchBrush(HatchStyle.Percent50, Color.Blue, Color.White);
72document.OutlineText("ABC", font, 200, 400, new Pen(brush, 5));
73
74//Close current page
75document.ClosePage();
76
77//Save the document
78document.Save();对于 Linux、MacOS 和其他非 Windows 操作系统,我们建议使用我们的 Aspose.Page.Drawing Nuget 软件包。它使用 Aspose.Drawing 后端,而不是 System.Drawing 系统库。
因此,请导入 Aspose.Page.Drawing 命名空间,而不是 System.Drawing 命名空间。在上面的代码片段中,将使用 Aspose.Page.Drawing.Rectangle 代替 System.Drawing.Rectangle, 将使用 Aspose.Page.Drawing.Drawing2D.GraphicsPath 代替 System.Drawing.Drawing2D.GraphicsPath,等等。我们在 GitHub 上的代码示例包含所有必要的替换。
请参阅如何在 Java 中使用 PS 文档中的填充图案。
运行此代码的结果显示为:
您可以从 GitHub 下载示例和数据文件。