在 PostScript 中使用纹理 | .NET
在 PS 文档中添加纹理平铺图案
纹理平铺图案是用于填充或绘制对象(例如形状或文本)的图像。如果图像尺寸小于对象尺寸,则会在 X 和 Y 方向上重复,以覆盖所有必要的区域。
在图形对象内部重复图像的过程称为平铺。为了在 PsDocument 中设置绘画或描边,我们必须将 System.Drawing.Brush 类的对象(用于绘画)和 System.Drawing.Pen 类的对象(用于描边)分别传递给相应的方法。
Aspose.Page for .NET 库处理 .NET 平台提供的所有 System.Drawing.Brush 子类。这些画笔分别是 System.Drawing.SolidBrush、System.Drawing.TextureBrush、System.Drawing.LinearGradientBrush、System.Drawing.PathGradientBrush 和 System.Drawing.HatchBrush。System.Drawing.Pen 类由于是密封类,因此无法扩展,但它包含 System.Drawing.Brush 属性,因此 Aspose.Page for .NET 库也可以使用一整套画笔来绘制线条、勾勒形状和文本的轮廓。
为了在 Aspose.Page for .NET 库中用纹理图案绘制图形对象,只需将 System.Drawing.TextureBrush 传递给 SetPaint() 或 FillText() 或 FillAndStrokeText() 方法(这些方法接受 System.Drawing.Brush 作为参数)即可。
为了在 Aspose.Page for .NET 库中使用纹理图案勾勒图形对象,您需要创建一个新的 System.Drawing.Pen 对象和 System.Drawing.TextureBrush 对象,并将其传递给 SetStroke() 函数,或者将 OutlineText() 或 FillAndStrokeText() 方法(这些方法接受 System.Drawing.Pen 作为参数)中的一个。
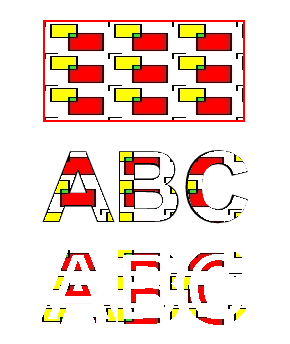
在下面的示例中,我们演示了如何使用纹理平铺图案填充形状和文本,以及如何勾勒文本的轮廓。
示例中使用纹理图案和 PsDocument 的步骤描述如下:
- 为生成的 PS 文件创建输出流。
- 使用默认选项创建 PsSaveOptions 对象。
- 创建一个单页 PsDocument,并配置已创建的输出流和保存选项。
- 创建一个新的图形状态并将其平移到所需位置。
- 从图像文件创建 System.Drawing.Bitmap。
- 从图像创建 System.Drawing.TextureBrush。
- 在纹理画笔中设置必要的变换。
- 在 PsDocument 的当前图形状态中,将纹理画笔设置为当前绘制。
- 创建一个矩形路径。
- 使用纹理画笔填充矩形。
- 将当前绘制保存为局部变量以备将来使用。
- 使用红色画笔设置当前描边。
- 使用当前画笔勾勒矩形的轮廓。
- 从当前图形状态退出到上一级图形状态。
- 创建系统字体。
- 填充并描边(勾勒)文本。填充使用纹理画笔,描边使用黑色钢笔。
- 使用新建的System.Drawing.Pen,并以纹理画笔作为画笔,在另一个位置勾勒文本轮廓。
- 关闭页面。
- 保存文档。
 1// Paint rectangle and text and outline text with tiled image (texture pattern) in PS document.
 2
 3string outputFileName = "AddTextureTilingPattern_outPS.ps";
 4
 5//Create save options with A4 size
 6PsSaveOptions options = new PsSaveOptions();
 7
 8// Create new 1-paged PS Document
 9PsDocument document = new PsDocument(OutputDir + outputFileName, options, false);
10
11document.WriteGraphicsSave();
12document.Translate(200, 100);
13
14//Create a Bitmap object from image file
15using (Bitmap image = new Bitmap(DataDir + "TestTexture.bmp"))
16{
17    //Create texture brush from the image
18    TextureBrush brush = new TextureBrush(image, WrapMode.Tile);
19
20    //Add scaling in X direction to the mattern
21    Matrix transform = new Matrix(2, 0, 0, 1, 0, 0);
22    brush.Transform = transform;
23
24    //Set this texture brush as current paint
25    document.SetPaint(brush);
26}
27
28//Create rectangle path
29GraphicsPath path = new GraphicsPath();
30path.AddRectangle(new RectangleF(0, 0, 200, 100));
31
32//Fill rectangle
33document.Fill(path);
34
35//Get current paint
36Brush paint = document.GetPaint();
37
38//Set red stroke
39document.SetStroke(new Pen(new SolidBrush(Color.Red), 2));
40//Stroke the rectangle
41document.Draw(path);
42
43document.WriteGraphicsRestore();
44
45//Fill text with texture pattern
46System.Drawing.Font font = new System.Drawing.Font("Arial", 96, FontStyle.Bold);
47document.FillAndStrokeText("ABC", font, 200, 300, paint, new Pen(Color.Black, 2));
48
49//Outline text with texture pattern
50document.OutlineText("ABC", font, 200, 400, new Pen(paint, 5));
51
52//Close current page
53document.ClosePage();
54
55//Save the document
56document.Save();对于 Linux、MacOS 和其他非 Windows 操作系统,我们建议使用我们的 Aspose.Page.Drawing Nuget 软件包。它使用 Aspose.Drawing 后端,而非 System.Drawing 系统库。
因此,请导入 Aspose.Page.Drawing 命名空间,而不是 System.Drawing 命名空间。在上面的代码片段中,将使用 Aspose.Page.Drawing.RectangleF 代替 System.Drawing.RectangleF,使用 Aspose.Page.Drawing.Drawing2D.GraphicsPath 代替 System.Drawing.Drawing2D.GraphicsPath,等等。我们在 GitHub 上的代码示例包含所有必要的替换。
请参阅 Java 中如何在 PS 文档中使用纹理。
运行此代码的结果显示为
您可以从 GitHub下载示例和数据文件。