在 PS 文件中处理形状 | Python
Contents
[
Hide
Show
]向 PS 文档添加形状
向 PS 文档添加矩形
要使用 Aspose.Page for Python 通过 .NET 库将矩形插入 PsDocument,请执行以下步骤:
- 为生成的 PS 文件创建输出流。
- 使用默认选项创建 PsSaveOptions 对象。
- 使用已创建的输出流和保存选项创建一个单页 PsDocument。
- 从该矩形创建一个矩形 aspose.pydrawing.GraphicsPath。
- 将 Paint 设置为 PsDocument 的当前图形状态。
- 填充矩形。
- 关闭页面。
- 保存文档。
要描边(勾勒)一个矩形,前 4 步和后 2 步相同,但第 5 步和第 6 步如下:
- 将描边设置为 PsDocument 的当前图形状态。
- 描边(勾勒)矩形。
 1# The path to the documents directory.
 2data_dir = Util.get_data_dir_working_with_shapes()
 3
 4# Create an output stream for the PostScript document
 5with open(data_dir + "AddRectangle_outPS.ps", "wb") as out_ps_stream:
 6    # Create save options with A4 size
 7    options = PsSaveOptions()
 8
 9    # Create a new 1-paged PS Document
10    document = PsDocument(out_ps_stream, options, False)
11
12    # Create a graphics path from the first rectangle
13    path = aspose.pydrawing.drawing2d.GraphicsPath()
14    path.add_rectangle(aspose.pydrawing.RectangleF(250, 100, 150, 100))
15    # Set the paint
16    document.set_paint(aspose.pydrawing.SolidBrush(aspose.pydrawing.Color.orange))
17    # Fill the rectangle
18    document.fill(path)
19
20    # Create a graphics path from the second rectangle
21    path = aspose.pydrawing.drawing2d.GraphicsPath()
22    path.add_rectangle(aspose.pydrawing.RectangleF(250, 300, 150, 100))
23    # Set stroke
24    document.set_stroke(GraphicsFactory.create_pen_by_brush_and_width(aspose.pydrawing.SolidBrush(aspose.pydrawing.Color.red), 3))
25    # Stroke (outline) the rectangle
26    document.draw(path)
27
28    # Close the current page
29    document.close_page()
30
31    # Save the document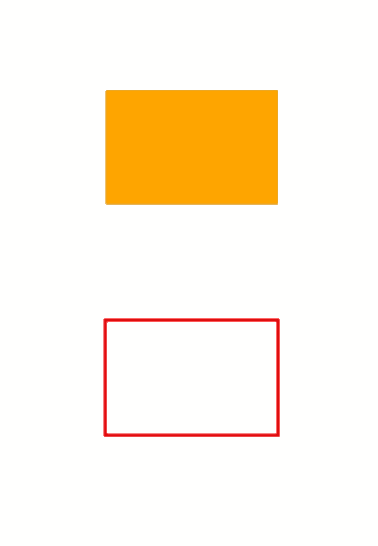
32 document.save()运行此代码的结果是
将椭圆添加到 PS
要将椭圆添加到 PsDocument,还需要执行 8 个步骤:
- 为生成的 PS 文件创建输出流。
- 使用默认选项创建 PsSaveOptions 对象。
- 创建一个单页 PsDocument,并设置已创建的输出流和保存选项。
- 使用 aspose.pydrawing.drawing2d.GraphicsPath 函数,根据矩形创建一个椭圆。
- 将 Paint 设置为 PsDocument 的当前图形状态。
- 填充椭圆路径。
- 关闭页面。
- 保存文档。
描边(轮廓)椭圆的前 4 步和后 2 步相同,但第 5 步和第 6 步如下:
- 将描边设置为 PsDocument 的当前图形状态。
- 描边(轮廓)椭圆。
1# The path to the documents directory.
2data_dir = Util.get_data_dir_working_with_shapes()
3
4# Create an output stream for PostScript document
5with open(data_dir + "AddEllipse_outPS.ps", "wb") as out_ps_stream:
6 # Create save options with the A4 size
7 options = PsSaveOptions()
8
9 # Create a new 1-paged PS Document
10 document = PsDocument(out_ps_stream, options, False)
11
12 # Create a graphics path from the first ellipse
13 path = aspose.pydrawing.drawing2d.GraphicsPath()
14 path.add_ellipse(aspose.pydrawing.RectangleF(250, 100, 150, 100))
15 # Set the paint
16 document.set_paint(aspose.pydrawing.SolidBrush(aspose.pydrawing.Color.orange))
17 # Fill the ellipse
18 document.fill(path)
19
20 # Create a graphics path from the second ellipse
21 path = aspose.pydrawing.drawing2d.GraphicsPath()
22 path.add_ellipse(aspose.pydrawing.RectangleF(250, 300, 150, 100))
23 # Set the stroke
24 document.set_stroke(GraphicsFactory.create_pen_by_brush_and_width(aspose.pydrawing.SolidBrush(aspose.pydrawing.Color.red), 3))
25 # Stroke (outline) the ellipse
26 document.draw(path)
27
28 # Close the current page
29 document.close_page()
30
31 # Save the document
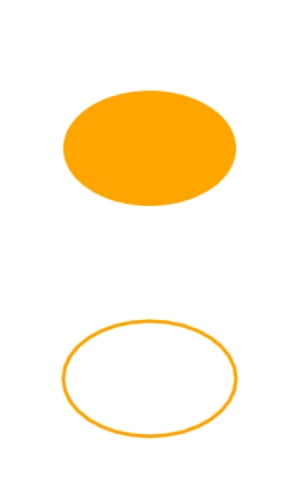
32 document.save()运行此代码的结果是:
如我们所见,任何形状,无论闭合与否,都可以用 PsDocument 填充或绘制。它也可以进行裁剪,但这部分内容将在另一篇文章中介绍。
您可以从 GitHub下载示例和数据文件。