在 PS 文件中处理纹理 | Python
在 PS 文档中添加纹理平铺图案
纹理平铺图案是指用于填充或绘制对象(例如形状或文本)的图像。当图像尺寸小于对象尺寸时,它会在 X 和 Y 方向上重复,以充分覆盖所需区域。
图像在图形对象中的这种重复称为平铺。要在 PsDocument 中设置绘画或描边,需要在相应的方法中提供一个 aspose.pydrawing.Brush 类的对象用于绘画,以及一个 aspose.pydrawing.Pen 类的对象用于描边。
Aspose.Page for Python via .NET 库处理 Python 平台提供的 aspose.pydrawing.Brush 实现的所有重要类。这些分别是 aspose.pydrawing.Color、aspose.pydrawing.TextureBrush、 aspose.pydrawing.drawing2d.LinearGradientBrush 和 aspose.pydrawing.drawing2d.PathGradientBrush。在 Python 中,描边颜色与 aspose.pydrawing.Pen 对象中的描边属性分开指定,并再次使用 aspose.pydrawing.Brush。 因此,通过 .NET 库构建的 Aspose.Page for Python 也可以使用一整套 Paint 实现来绘制线条、勾勒形状和文本的轮廓。
为了通过 .NET 库在 Aspose.Page for Python 中绘制带有纹理图案的图形对象,只需将 aspose.pydrawing.TextureBrush 对象传递给 set_paint() 或接受 aspose.pydrawing.Brush 作为参数的 fill_text() 或 fill_and_stroke_text() 方法即可。
为了勾勒带有纹理图案的图形对象轮廓,您还应该将 aspose.pydrawing.TextureBrush 对象传递给 set_paint() 或接受描边绘制作为参数的 outline_text() 或 fill_and_stroke_text() 方法。
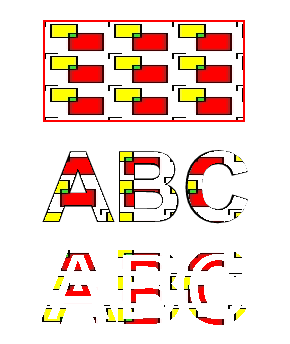
在下面的示例中,我们演示了如何填充形状和文本,以及如何使用纹理平铺图案勾勒文本轮廓。
以下是使用纹理图案和 PsDocument的步骤描述:
- 为生成的 PS 文件创建输出流。
- 使用默认选项启动 PsSaveOptions 对象。
- 使用已创建的输出流和保存选项创建一个单页 PsDocument。
- 创建新的图形状态并将其平移到所需位置。
- 从图像文件创建 aspose.pydrawing.Bitmap。
- 从图像创建 aspose.pydrawing.TextureBrush。
- 在纹理画笔中设置必要的变换。
- 将纹理绘制设置为 PsDocument 当前图形状态中的当前绘制。
- 创建矩形路径。
- 使用纹理绘制填充矩形。
- 将当前绘制保存为局部变量以备将来使用。
- 将当前画笔颜色设置为红色。
- 使用 aspose.pydrawing.Pen 设置 2 点宽度的描边。
- 使用当前描边勾勒矩形轮廓。
- 从当前图形状态退出到上一级图形状态。
- 创建 系统 字体。
- 填充并描边(勾勒)文本。填充使用纹理画笔,描边使用黑色画笔。
- 使用纹理画笔和新的 aspose.pydrawing.Pen 在另一个位置勾勒文本轮廓。
- 关闭页面。
- 保存文档。
 1# The path to the documents directory.
 2data_dir = Util.get_data_dir_working_with_textures()
 3
 4# Create an output stream for the PostScript document
 5with open(data_dir + "AddTextureTilingPattern_outPS.ps", "wb") as out_ps_stream:
 6    # Create the save options with the A4 size
 7    options = PsSaveOptions()
 8
 9    # Create a new 1-paged PS Document
10    document = PsDocument(out_ps_stream, options, False)
11
12
13    document.write_graphics_save()
14    document.translate(200, 100)
15
16    #Create a Bitmap object from an image file
17    with aspose.pydrawing.Bitmap(data_dir + "TestTexture.bmp") as image:
18        # Create a texture brush from the image
19        brush = aspose.pydrawing.TextureBrush(image, aspose.pydrawing.drawing2d.WrapMode.TILE)
20
21        # Add scaling in the X direction to the mattern
22        transform = aspose.pydrawing.drawing2d.Matrix(float(2), float(0), float(0), float(1), float(0), float(0))
23        brush.transform = transform
24
25        # Set this texture brush as a current paint
26        document.set_paint(brush)
27
28    # Create a rectangle path
29    path = aspose.pydrawing.drawing2d.GraphicsPath()
30    path.add_rectangle(aspose.pydrawing.RectangleF(0, 0, 200, 100))
31
32    # Fill the rectangle
33    document.fill(path)
34
35    # Get the current paint
36    paint = document.get_paint()
37
38    # Set a red stroke
39    pen1 = aspose.pydrawing.Pen(aspose.pydrawing.Color.red)
40    pen1.width = float(2)
41    document.set_stroke(pen1)
42
43    # Stroke the rectangle
44    document.draw(path)
45
46    document.write_graphics_restore()
47
48    # Fill the text with the texture pattern
49    font = aspose.page.ExternalFontCache.create_font_by_family_name("Arial", 96, aspose.pydrawing.FontStyle.BOLD)
50    pen2 = aspose.pydrawing.Pen(aspose.pydrawing.Color.black)
51    pen2.width = float(2)
52    document.fill_and_stroke_text("ABC", font, 200, 300, paint, pen2)
53
54    # Outline the text with the texture pattern
55    pen3 = aspose.pydrawing.Pen(aspose.pydrawing.Color.black)
56    pen3.brush = paint
57    pen3.width = float(5)
58    document.outline_text("ABC", font, 200, 400, pen3)
59
60    # Close the current page
61    document.close_page()
62
63    # Save the document
64 document.save()运行此代码的结果是:
您可以从 GitHub下载示例和数据文件。