Analyzing your prompt, please hold on...
An error occurred while retrieving the results. Please refresh the page and try again.
Aspose.SVG offers a Free Online Image Vectorizer that is browser-based and works on any platform. Using this App, you may apply a set of options for obtaining the perfect result. Save your time and check this free Image Vectorizer to get all the benefits of vector graphics!

Image vectorization is the process of converting raster images such as PNG, JPG, BMP, GIF, or TIFF into scalable SVG vector graphics. Unlike bitmap images, SVG files preserve quality at any resolution and are easier to edit, optimize, and scale for web, print, CAD, and graphic design workflows.
Using Aspose.SVG for .NET, you can programmatically vectorize raster images in C# without external graphics software or browser-based tools. The API provides flexible vectorization settings that allow you to control path smoothing, curve simplification, color reduction, and SVG output complexity.
This article demonstrates how to:
Note: The Aspose.Svg.ImageVectorization namespace works with common bitmap formats (JPG, PNG, BMP, TIFF, GIF) and always produces an SVG file.
The Aspose.SVG image vectorization API provides classes and methods that allow you to work with various image preprocessing options before saving them in vector format.The processing assumes control of the following vectorization options: TraceSimplifier, TraceSmoother, ColorsLimit, and LineWidth.
Let’s look at how the TraceSimplifier property affects image vectorization. First of all, you need to know that:
tolerance) constructor takes as a parameter the tolerance and initializes an instance of the ImageTraceSimplifier class.tolerance value determines the maximum error tolerance allowed for a point to be eliminated from the trace. It must be in the range of 0 to 4. The default value is 0.3.The following code snippet demonstrates the use of different values of the tolerance (TraceSimplifier) property for image to vector conversion.
1using System.IO;
2using Aspose.Svg.ImageVectorization;
3using Aspose.Svg.Saving; 1// Compare different SplinePathBuilder configurations for image vectorization with varying simplification levels
2
3// Initialize an instance of the ImageVectorizer class and specify configuration properties
4ImageVectorizer vectorizer1 = new ImageVectorizer
5{
6 Configuration =
7 {
8 PathBuilder = new SplinePathBuilder
9 {
10 TraceSimplifier = new ImageTraceSimplifier(0.1f),
11 TraceSmoother = new ImageTraceSmoother(2),
12 },
13 ColorsLimit = 2
14 }
15};
16
17ImageVectorizer vectorizer2 = new ImageVectorizer
18{
19 Configuration =
20 {
21 PathBuilder = new SplinePathBuilder
22 {
23 TraceSimplifier = new ImageTraceSimplifier(1),
24 TraceSmoother = new ImageTraceSmoother(2),
25 },
26 ColorsLimit = 2
27 }
28};
29
30ImageVectorizer vectorizer3 = new ImageVectorizer
31{
32 Configuration =
33 {
34 PathBuilder = new SplinePathBuilder
35 {
36 TraceSimplifier = new ImageTraceSimplifier(2),
37 TraceSmoother = new ImageTraceSmoother(2),
38 },
39 ColorsLimit = 2
40 }
41};
42
43// Prepare a path for a source image file
44string sourcePath = Path.Combine(DataDir, "formats.png");
45
46// Vectorize raster image from the specified file
47using SVGDocument document1 = vectorizer1.Vectorize(sourcePath);
48using SVGDocument document2 = vectorizer2.Vectorize(sourcePath);
49using SVGDocument document3 = vectorizer3.Vectorize(sourcePath);
50
51// Save the vectorized image as an SVG file
52document1.Save(Path.Combine(OutputDir, "formats1.svg"));
53document2.Save(Path.Combine(OutputDir, "formats2.svg"));
54document3.Save(Path.Combine(OutputDir, "formats3.svg"));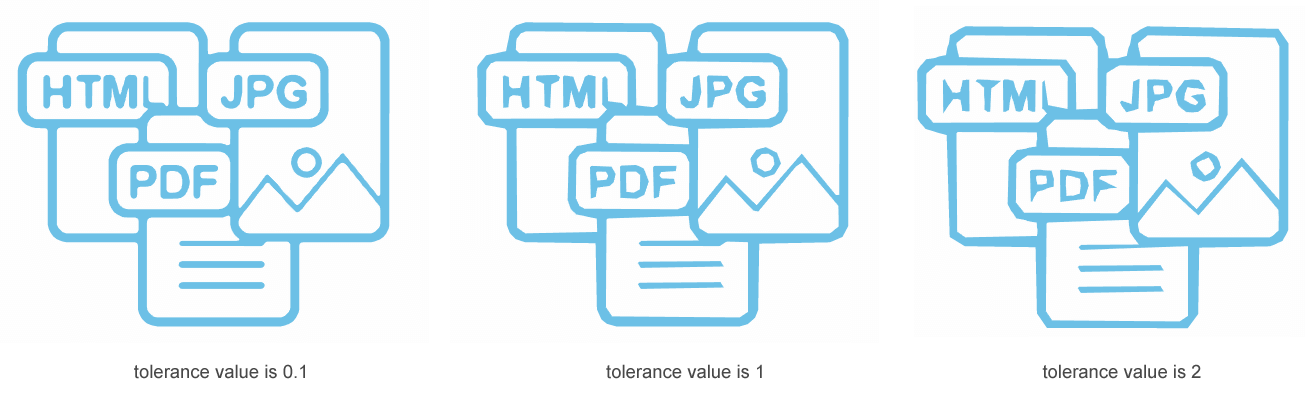
Sometimes fragments of contours look like sawtooth waves or appear jagged. Let’s look at how the TraceSmoother property affects contours’ smoothing. Before you start, know that:
severity) constructor takes as a parameter the severity and initializes an instance of the ImageTraceSmoother class;severity determines the extent of the region considered by query point. It must be in the range of 0 to 20.Let’s look at how the TraceSmoother property affects image vectorization:
1using System.IO;
2using Aspose.Svg.ImageVectorization;
3using Aspose.Svg.Saving; 1// Vectorize PNG to SVG using ImageVectorizer and custom parameters
2
3// Initialize an instance of the ImageVectorizer class
4ImageVectorizer vectorizer = new ImageVectorizer
5{
6 // Optionally set a configuration
7 Configuration =
8 {
9 // Optionally create an instance of the PathBuilder class
10 PathBuilder = new BezierPathBuilder
11 {
12 // Optionally set trace smoother
13 TraceSmoother = new ImageTraceSmoother(0),
14 ErrorThreshold = 30,
15 MaxIterations = 30
16 },
17 ColorsLimit = 10,
18 LineWidth = 1
19 }
20};
21// Vectorize image from the specified file
22using SVGDocument document = vectorizer.Vectorize(Path.Combine(DataDir, "flower.png"));
23
24// Save the vectorized image as an SVG file
25document.Save(Path.Combine(OutputDir, "flower.svg"));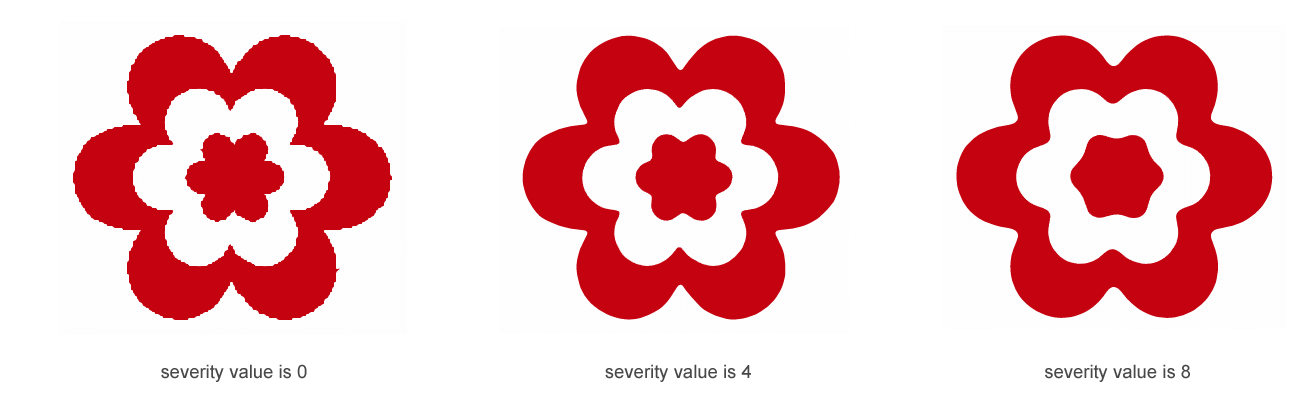
Is it possible to convert a photo in vector format to look identical to the photo?
SVG is not well suited for drawing photorealistic images. Vector pictures do not allow for natural color transitions yet. Vector graphics are the best for creating logos, illustrations, technical drawings. It is not the most suitable format for continuous-tone images with blends of color or to edit photographs. However, vectorizing photos can result in impressive artistic effects that can be interesting and useful.
In this section, we convert a photo to vector format and try to choose vectorization options so that the result looks identical to the photo:
1using System.IO;
2using Aspose.Svg.ImageVectorization;
3using Aspose.Svg.Saving; 1// Convert JPG to SVG in C#
2
3// Initialize an instance of the ImageVectorizer class
4ImageVectorizer vectorizer = new ImageVectorizer
5{
6 // Optionally set a configuration
7 Configuration =
8 {
9 // Optionally create an instance of the PathBuilder class
10 PathBuilder = new SplinePathBuilder
11 {
12 TraceSmoother = new ImageTraceSmoother(1),
13 TraceSimplifier = new ImageTraceSimplifier(0.3f)
14 },
15 ColorsLimit = 25,
16 LineWidth = 1
17 }
18};
19
20// Vectorize image from a specified file
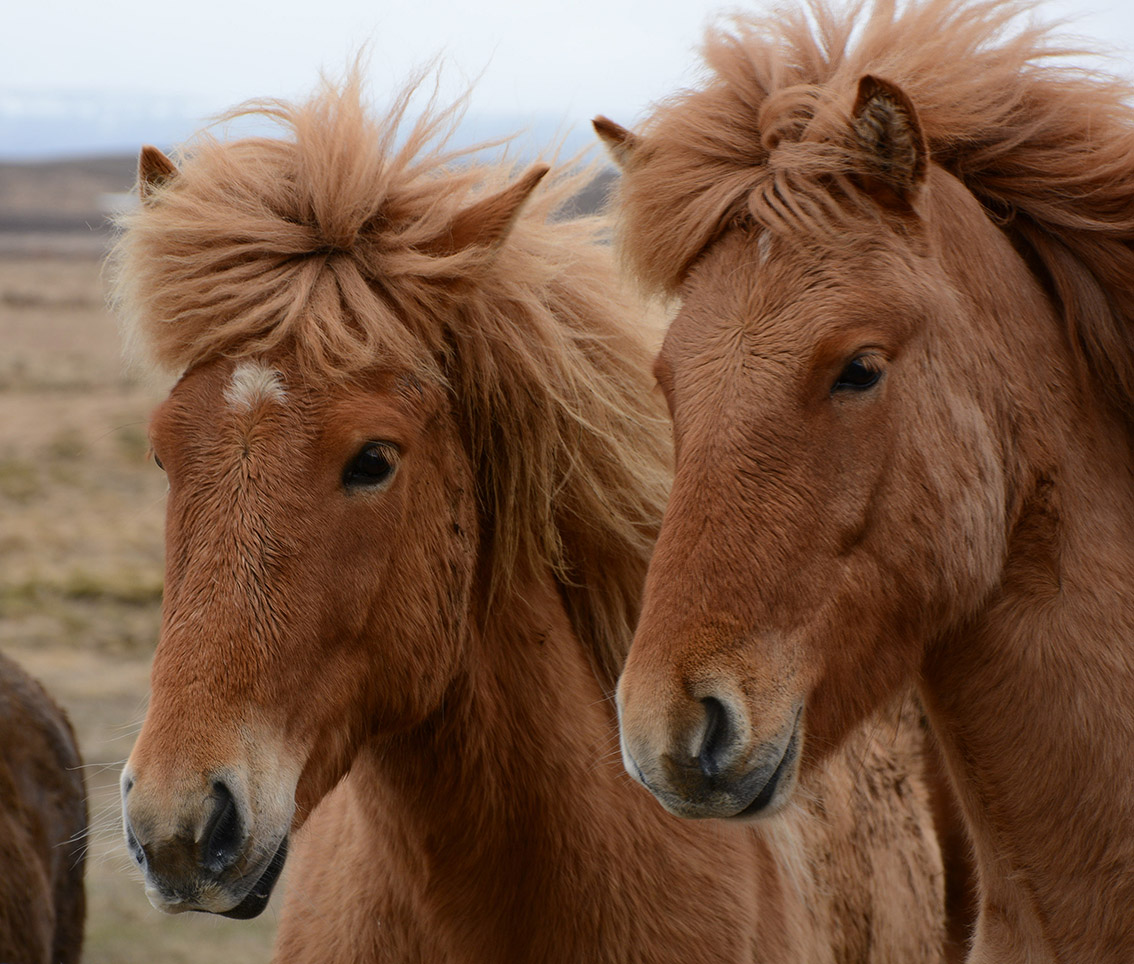
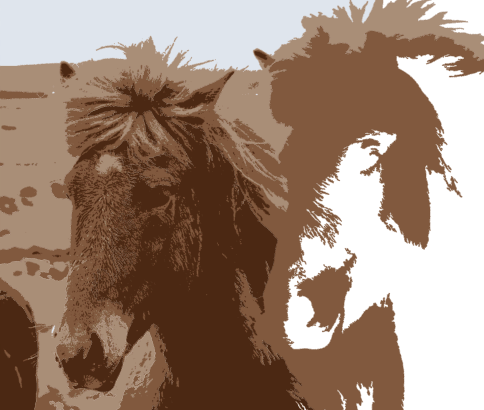
21using (SVGDocument document = vectorizer.Vectorize(Path.Combine(DataDir, "horses.jpg")))
22{
23 // Save the vectorized image as SVG
24 document.Save(Path.Combine(OutputDir, "horses-new.svg"));
25}The figure demonstrates the source photo (a), the vectorized image using the code snippet (b) and the manually improved vectorized image (c).
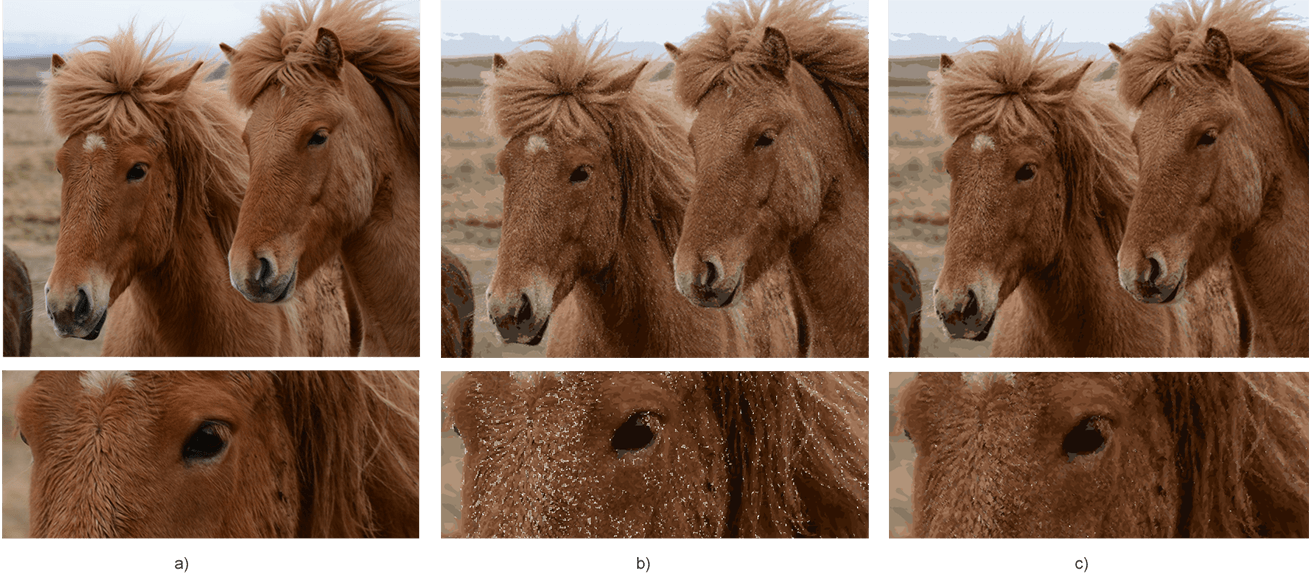
As mentioned above, SVG is not the most suitable format for continuous-tone images with blends of color, etc. The vectorization process uses color image quantization. All small same colored spots or pixels, we replace by geometric shapes or curves. As a result, the borders of such graphic elements do not fit snugly together; gaps appear between them. This is the reason for the form of white spots and dots in the vectorized image.
Tip: To fix this problem, you can manually edit the resulting SVG file. We suggest changing the stroke-width="100" value to "150" or another, as you like. Try to get the best result!

The source photo (a) and resulting SVG file (c) you may find and view in details by following the links – horses.jpg, horses.svg.
Aspose.SVG for .NET provides multiple configuration options that allow you to control SVG quality, path smoothness, color reduction, and output complexity during image vectorization.
Careful adjustment of vectorization parameters helps optimize SVG output for logos, icons, illustrations, line art, and other raster graphics.
The following configuration properties are commonly used in image vectorization workflows:
| Option | Description | Recommended Usage |
|---|---|---|
ColorsLimit | Defines the maximum number of colors used during image quantization. Lower values simplify the SVG structure, while higher values preserve more image details. | Use lower values for logos and icons; higher values for detailed illustrations and photos. |
ImageSizeLimit | Defines the maximum image dimension based on width × height. Large images may be automatically scaled before vectorization. | Increase this value for high-resolution source images to preserve details. |
PathBuilder | Specifies the SVG path generation algorithm used during vectorization. Different path builders affect curve smoothness and contour behavior. | Use SplinePathBuilder or BezierPathBuilder for smoother SVG paths. |
TraceSimplifier | Reduces the number of trace points and simplifies SVG geometry. | Helps reduce SVG file size and optimize path complexity. |
TraceSmoother | Smooths contour fragments and reduces jagged edges in vector paths. | Recommended for noisy or low-quality raster images. |
LineWidth | Defines the width of generated vector strokes. | Increase the value if thin contours disappear during vectorization. |
A free evaluation version of Aspose.SVG for .NET provides all the features for image vectorization except the following:
If you want to try Aspose.SVG for .NET without evaluation limitations request a 30-day temporary license. For more information, please refer to How to get a Temporary License?.
The figure shows the result of the photo to vector conversion without applying a license.
The resulting SVG file you may find and view in details by following the links – horses-license.svg.
| Problem | Possible Cause | Recommended Fix |
|---|---|---|
| The SVG contains many small gaps or disconnected shapes | ColorsLimit is too low, causing aggressive color reduction during tracing. | Increase ColorsLimit to preserve more color regions, for example 30–40. You can also slightly increase SVG stroke-width if necessary. |
| The generated SVG file is too large | TraceSimplifier tolerance is too low, so the algorithm preserves too many path points. | Increase the simplification tolerance to reduce path complexity. Typical values range from 0.7 to 1.0. |
| Vector edges appear rough or jagged | TraceSmoother is disabled or set too low. | Apply moderate smoothing values such as 5–10 to create cleaner SVG contours. |
| Some colors are missing in the output SVG | The evaluation version limits the number of processed dominant colors. | Apply a temporary or full Aspose.SVG license to enable full-color vectorization support. |
| The SVG contains too many unnecessary paths | The source image contains noise, gradients, or compression artifacts. | Preprocess the image before vectorization by reducing noise, increasing contrast, or using simpler source graphics. |
| Photo vectorization produces inaccurate results | Raster-to-vector tracing works best for logos, icons, and illustrations rather than detailed photographs. | Reduce the number of colors, increase smoothing, or use simplified artwork instead of photorealistic images. |
| Thin lines disappear after vectorization | Small details are removed during simplification or color reduction. | Lower the simplification tolerance and increase ColorsLimit to preserve fine details. |
1. How do I convert PNG to SVG in C#?
You can convert PNG images to SVG in C# using Aspose.SVG for .NET and the ImageVectorizer class. The API supports configurable vectorization settings for smoothing, simplification, and color reduction.
2. What is the difference between raster and vector images?
Raster images are composed of pixels and may lose quality when scaled. Vector graphics use mathematical paths and curves, allowing images to scale without quality loss.
3. How can I reduce SVG file size after vectorization?
You can reduce SVG complexity by increasing simplification tolerance, lowering the number of colors, and using smoother path generation settings.
4. Which images are best suited for vectorization?
Logos, icons, illustrations, line art, and simple graphics usually produce the best vectorization results because they contain clear edges and limited colors.
5. Can I customize the vectorization process?
Yes. Aspose.SVG for .NET allows you to configure color limits, path builders, smoothing, simplification, and image size settings to control SVG output quality.
Analyzing your prompt, please hold on...
An error occurred while retrieving the results. Please refresh the page and try again.