Analyzing your prompt, please hold on...
An error occurred while retrieving the results. Please refresh the page and try again.
SVG gradients allow you to create smooth transitions between colors or other visual properties in SVG graphics. Gradients are defined as gradually blending colors across an area. They are used to achieve various visual effects, such as shading, highlights, and more. SVG supports two main types of gradients: linear gradients and radial gradients that are defined by the <linearGradient> and <radialGradient> SVG elements.
The <linearGradient> or <radialGradient> element must be embedded within a <defs> tag to promote reusability. The <defs> element is often used to define gradients, patterns, filters, and other elements that can be referenced multiple times. The id attribute specifies a unique name for the SVG gradient. Other elements inside the file can reference it. The gradient can be applied for the fill or stroke properties for shapes, text, etc.
In this article, you will learn how to create linear and radial gradients in SVG code and walk through C# examples of implementing SVG gradients using the Aspose.SVG for .NET library.
Linear gradient is defined by a <linearGradient> element. Linear gradients create a smooth transition between colors along a straight line – gradient vector. The linear gradient vector connects starting and ending points onto which the gradient stops are mapped. The attributes x1, y1, x2, and y2 set the linear gradient vector. Their values can be either numbers or percentages.
The <linearGradient> has nested children <stop> elements that control the colors used in the gradient. Each color is specified with a stop-color attribute. An offset attribute of the <stop> element indicates where the gradient stop is placed. For linear gradients, it represents a location along the gradient vector.
 1<svg xmlns="http://www.w3.org/2000/svg">
 2	<defs>
 3		<linearGradient id="linear-gradient" x1="0%" y1="0%" x2="100%" y2="0%">
 4			<stop offset="10%" stop-color="#c71700" />
 5			<stop offset="60%" stop-color="orange" />
 6			<stop offset="100%" stop-color="#5a2100" />
 7		</linearGradient>
 8	</defs>
 9    <rect x="30" y="30" height="150" width="370" fill="url(#linear-gradient)" />
10</svg>
In the example above, the linear gradient id="linear-gradient" is referenced by the <rect> element in the fill attribute. There are three <stop> nodes inside the linear gradient. In each of them, an offset attribute sets the position where the SVG gradient gets a stop-color value. The resulting SVG image looks like this:

This C# example creates an SVG file with a rectangle filled with a linear gradient similar to the one we saw earlier.
RootElement property of the SVGDocument class points to the document’s root <svg> element.<defs> element and add it to the <svg> element:<defs> element to the <svg> element.<linearGradient> element with attributes and add it to the <defs> element:name, value) method to set x1, y1, x2, and y2 attributes.id attribute. Referring to the url name of the id attribute in the <linearGradient> allows applying the SVG gradient to fill and stroke shapes or SVG text.<linearGradient> to the <defs> element.<stop> elements, set their attributes, and add the stops to the <linearGradient> element:offset and stop-color attributes.<linearGradient> element.<rect> element that will be filled with the linear gradient. It is given a fill attribute that is set to url(#linear-gradient) referencing the previously defined SVG gradient with the Id = "linear-gradient".1using Aspose.Svg;
2using System.IO; 1// Create an SVG linear gradient and apply it to a rectangle programmatically in C#
2
3// Set SVG Namespace Url
4string SvgNamespace = "http://www.w3.org/2000/svg";
5
6// Initialize an SVG document
7using (SVGDocument document = new SVGDocument())
8{
9 SVGSVGElement svgElement = document.RootElement;
10
11 // Create a <defs> element and add it to the <svg> element
12 SVGDefsElement defsElement = (SVGDefsElement)document.CreateElementNS(SvgNamespace, "defs");
13 svgElement.AppendChild(defsElement);
14
15 // Create a <linearGradient> element and add it to the <defs> element
16 SVGLinearGradientElement linearGradient = (SVGLinearGradientElement)document.CreateElementNS(SvgNamespace, "linearGradient");
17 linearGradient.Id = "linear-gradient";
18 linearGradient.X1.BaseVal.ValueAsString = "0%";
19 linearGradient.Y1.BaseVal.ValueAsString = "0%";
20 linearGradient.X2.BaseVal.ValueAsString = "100%";
21 linearGradient.Y2.BaseVal.ValueAsString = "0%";
22 defsElement.AppendChild(linearGradient);
23
24 // Add color stops to the gradient
25 SVGStopElement stop1 = (SVGStopElement)document.CreateElementNS(SvgNamespace, "stop");
26 stop1.SetAttribute("offset", "10%");
27 stop1.SetAttribute("stop-color", "#c71700");
28 linearGradient.AppendChild(stop1);
29
30 SVGStopElement stop2 = (SVGStopElement)document.CreateElementNS(SvgNamespace, "stop");
31 stop2.SetAttribute("offset", "70%");
32 stop2.SetAttribute("stop-color", "orange");
33 linearGradient.AppendChild(stop2);
34
35 SVGStopElement stop3 = (SVGStopElement)document.CreateElementNS(SvgNamespace, "stop");
36 stop3.SetAttribute("offset", "100%");
37 stop3.SetAttribute("stop-color", "#5a2100");
38 linearGradient.AppendChild(stop3);
39
40 // Create a rectangle and apply the linear gradient
41 SVGRectElement rectElement = (SVGRectElement)document.CreateElementNS(SvgNamespace, "rect");
42 rectElement.X.BaseVal.Value = 30;
43 rectElement.Y.BaseVal.Value = 30;
44 rectElement.Width.BaseVal.Value = 370;
45 rectElement.Height.BaseVal.Value = 150;
46 rectElement.SetAttribute("fill", "url(#linear-gradient)");
47
48 // Append the rectangle to the SVG document
49 svgElement.AppendChild(rectElement);
50
51 // Save the document
52 document.Save(Path.Combine(OutputDir, "linear-gradient.svg"));
53}The resulting linear-gradient.svg file looks exactly like the image above – the rectangle with the red-orange-brown linear gradient.
Radial gradients create a smooth transition between colors radiating from a center point. A <radialGradient> element defines a radial gradient and its attributes. Like linear gradients, <stop> elements define color stops along the radial gradient.
cx, cy, and r attributes define the end circle for the radial gradient. The gradient will be drawn such that the 100% gradient stop is mapped to the perimeter of this end circle.fx, fy, and fr attributes define the start circle for the radial gradient. The gradient will be drawn such that the 0% gradient stop is mapped to the perimeter of this start circle.A radial gradient is more difficult than a linear one. The colors change circularly rather than linearly in it. Radial gradient is defined by a <radialGradient> element.
cx and cy attributes set the coordinates of the center of the gradient circle. The value “0.5” corresponds to the center of the element. Both default to 0.5 if omitted.r attribute sets the radius of the gradient circle as a proportion of the element’s size. The value “0.8” corresponds to 80% of the element’s size.fx and fy attributes set the coordinates of the focal point of the gradient ellipse. The focal point is where the gradient’s emphasis is directed. For example, the fx value “25%” indicates that the focal point horizontally at 25% of the element’s width.In this example, the centers of the end and start circles of the radial gradient do not match.
 1<svg xmlns="http://www.w3.org/2000/svg">
 2    <defs>
 3		<radialGradient id="radial-gradient" cx="0.5" cy="0.5" r="0.8" fx="25%" fy="25%" >
 4            <stop offset="10%" stop-color="chocolate" />
 5            <stop offset="30%" stop-color="silver" />
 6            <stop offset="60%" stop-color="chocolate" />
 7            <stop offset="90%" stop-color="maroon" />
 8        </radialGradient>
 9    </defs>
10    <g fill="url(#radial-gradient)">
11		<circle cx="100" cy="100" r="90" />
12		<rect x="570" y="10" height="130" width="200" />
13		<ellipse cx="300" cy="150" rx="150" ry="50" />
14		<ellipse cx="490" cy="140" rx="50" ry="130" />
15	</g>
16</svg>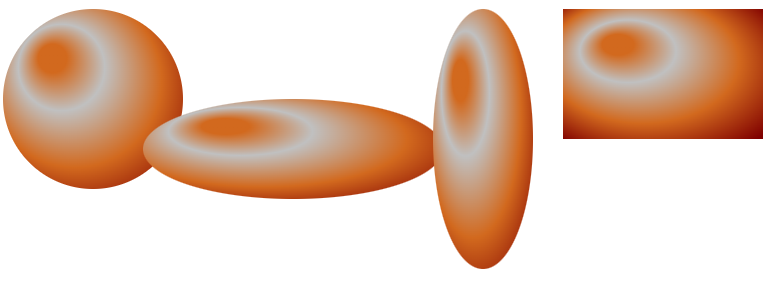
As you can see in the figure, the perception of the radial gradient depends on the shape it is applied to. The radial gradient can create a compelling illusion of 3D lighting and depth in a circle or ellipse. At the same time, we do not observe such an effect in the rectangle. Here, the gradient gives varying degrees of visual emphasis and lighting effects on flat surfaces.
A radial gradient creates a smooth color transition that radiates from the center point to the outer edges of the shape. The following C# code snippet shows how to create a radial gradient. In this example, the centers of the innermost and outermost border of the SVG gradient are the same and by default is 0.5. Let’s consider the C# code step by step:
RootElement property of the SVGDocument class points to the document’s root <svg> element.<defs> element and add it to the <svg> element:namespaceURI, qualifiedName) method to create an instance of the
SVGDefsElement class.<defs> element to the <svg> element.<radialGradient> element with attributes and add it to the <defs> element:x1, y1, x2, and y2 attributes.id attribute. Referring to the url name of the id attribute in the <radialGradient> allows applying the SVG gradient to fill and stroke shapes or SVG text.<radialGradient> to the <defs> element.<stop> elements, set their attributes, and add the stops to the <radialGradient> element:offset and stop-color attributes.<radialGradient> element.<rect> and <circle> elements that will be filled with the radial gradient. It is given a fill attribute that is set to url(#RadialGradient) referencing the previously defined SVG gradient with the Id = "RadialGradient".1using Aspose.Svg;
2using System.IO; 1// Create and apply a radial gradient to SVG shapes programmatically using Aspose.SVG
2
3// Set SVG Namespace Url
4string SvgNamespace = "http://www.w3.org/2000/svg";
5
6// Initialize an SVG document
7using (SVGDocument document = new SVGDocument())
8{
9 SVGSVGElement svgElement = document.RootElement;
10
11 // Create a <defs> element and add it to the <svg> element
12 SVGDefsElement defsElement = (SVGDefsElement)document.CreateElementNS(SvgNamespace, "defs");
13 svgElement.AppendChild(defsElement);
14
15 // Create a <radialGradient> element and add it to the <defs> element
16 SVGRadialGradientElement radialGradient = (SVGRadialGradientElement)document.CreateElementNS(SvgNamespace, "radialGradient");
17 radialGradient.Id = "RadialGradient";
18 radialGradient.R.BaseVal.ValueAsString = "0.7";
19 defsElement.AppendChild(radialGradient);
20
21 // Add color stops to the radial gradient
22 SVGStopElement stop1 = (SVGStopElement)document.CreateElementNS(SvgNamespace, "stop");
23 stop1.SetAttribute("offset", "0%");
24 stop1.SetAttribute("stop-color", "silver");
25 radialGradient.AppendChild(stop1);
26
27 SVGStopElement stop2 = (SVGStopElement)document.CreateElementNS(SvgNamespace, "stop");
28 stop2.SetAttribute("offset", "55%");
29 stop2.SetAttribute("stop-color", "darkgreen");
30 radialGradient.AppendChild(stop2);
31
32 SVGStopElement stop3 = (SVGStopElement)document.CreateElementNS(SvgNamespace, "stop");
33 stop3.SetAttribute("offset", "100%");
34 stop3.SetAttribute("stop-color", "black");
35 radialGradient.AppendChild(stop3);
36
37 // Create a rectangle and apply the radial gradient
38 SVGRectElement rectElement = (SVGRectElement)document.CreateElementNS(SvgNamespace, "rect");
39 rectElement.X.BaseVal.Value = 50;
40 rectElement.Y.BaseVal.Value = 50;
41 rectElement.Width.BaseVal.Value = 200;
42 rectElement.Height.BaseVal.Value = 150;
43 rectElement.SetAttribute("fill", "url(#RadialGradient)");
44
45 // Create a <circle> element and set its attributes
46 SVGCircleElement circleElement = (SVGCircleElement)document.CreateElementNS(SvgNamespace, "circle");
47 circleElement.Cx.BaseVal.Value = 520;
48 circleElement.Cy.BaseVal.Value = 125;
49 circleElement.R.BaseVal.Value = 90;
50 circleElement.SetAttribute("fill", "url(#RadialGradient)");
51
52 // Append the rectangle and circle to SVG
53 svgElement.AppendChild(rectElement);
54 svgElement.AppendChild(circleElement);
55
56 // Save the document
57 document.Save(Path.Combine(OutputDir, "radial-gradient.svg"));
58}The resulting image, radial-gradient.svg, looks like this.
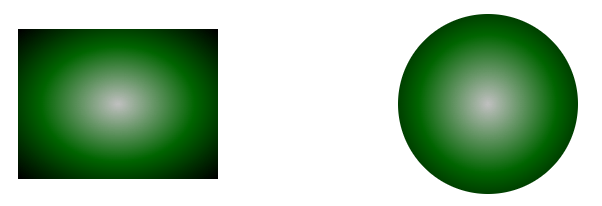
As you see in the figure, when the radial gradient is applied to a circle and a rectangle, the perception of the shapes differs.
Applying the radial gradient to a rectangle produces a different visual effect than a circle. While the gradient can still add a sense of depth and highlight the rectangle, the 3D feel is less strong than with the circle. Instead, a gradient can accentuate the center of a rectangle or create lighting effects more typical of flat surfaces.
When applied to a circle, a radial gradient can create a breathtaking 3D effect. The center point of the gradient corresponds to the center of the circle. As the gradient extends from the center to the outer edges of the circle, it simulates the illusion of a light source shining on a rounded surface. Colors fade from the color at the center to the color at the outer edge, mimicking the behavior of light falling on a curved object. This effect can add depth and dimension, making the circle appear more realistic as if it were a spherical object lit from a specific direction.
See also
You can download the complete examples and data files from GitHub.
About downloading from GitHub and running examples, you find out from the How to Run the Examples section.
For more information about SVG Gradients, see the W3C Paint Servers: Gradients and Patterns page and the SVG Gradients article.
Analyzing your prompt, please hold on...
An error occurred while retrieving the results. Please refresh the page and try again.