
Analyzing your prompt, please hold on...
An error occurred while retrieving the results. Please refresh the page and try again.
Quick Answer: To convert a PNG, JPG, BMP, TIFF, or GIF image to vector SVG in Python, create an ImageVectorizer, configure tracing options, call vectorize(input_path), and save the returned SVGDocument as SVG. Use colors_limit for color quantization and BezierPathBuilder settings to balance path detail and smoothness.
Image vectorization traces raster pixels and represents visible regions as SVG paths and shapes. It works best for logos, icons, line art, maps, diagrams, and illustrations with clearly separated colors. The resulting SVG can be scaled without pixelation and edited as vector markup. Photographs can also be vectorized, but the result is an approximation rather than a lossless replacement for the original photo. More colors and paths may preserve additional detail, while also producing a larger and more complex SVG.
Aspose.SVG for Python via .NET supports vectorization of PNG, JPG, BMP, TIFF, and GIF images through the aspose.svg.imagevectorization namespace.
Use image vectorization when the source is a raster file and the target output should be scalable SVG markup. The same ImageVectorizer workflow accepts common image formats, but the best settings depend on the kind of source image.
| Input image | Good fit | Starting approach |
|---|---|---|
| PNG | Logos, icons, flat artwork, transparent graphics | Start with a low colors_limit and set background_color if transparency affects edges |
| JPG | Photos, previews, complex artwork | Use more colors, reduce image size when needed, and expect a stylized approximation |
| BMP | Simple bitmap graphics | Treat like PNG and tune color count based on the palette |
| TIFF | Scans, publishing images, image-processing workflows | Resize large inputs first if the generated SVG becomes too complex |
| GIF | Simple raster images and limited-color artwork | Start with low color limits and inspect small details after tracing |
| API | Purpose |
|---|---|
| ImageVectorizer | Converts a raster image into an SVG document |
| ImageVectorizerConfiguration | Controls colors, line width, image size, and path building |
| BezierPathBuilder | Builds and approximates vector paths |
| ImageTraceSmoother | Smooths traced contours |
| SVGDocument.save() | Saves the vectorization result as SVG |
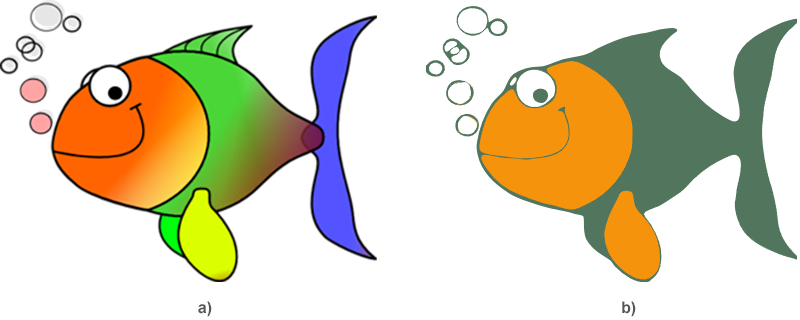
PNG is often the best raster input for logos, icons, flat illustrations, and images with transparent areas. The following example vectorizes fish.png and saves the result as a simplified three-color SVG. It configures path smoothing, curve approximation, color quantization, and line width before calling ImageVectorizer.vectorize().
 1import os
 2from aspose.svg.imagevectorization import ImageVectorizer, ImageTraceSmoother, BezierPathBuilder
 3
 4# Vectorize a PNG image to a simplified three-color SVG
 5input_folder = "data/"
 6output_folder = "output/"
 7input_path = os.path.join(input_folder, "fish.png")
 8output_path = os.path.join(output_folder, "fish-vectorized.svg")
 9os.makedirs(output_folder, exist_ok=True)
10
11path_builder = BezierPathBuilder()
12path_builder.trace_smoother = ImageTraceSmoother(3)
13path_builder.error_threshold = 10.0
14path_builder.max_iterations = 20
15
16vectorizer = ImageVectorizer()
17vectorizer.configuration.path_builder = path_builder
18vectorizer.configuration.colors_limit = 3
19vectorizer.configuration.line_width = 1.5
20
21with vectorizer.vectorize(input_path) as document:
22    document.save(output_path)
The output contains vector paths grouped by the quantized colors. The comparison below shows the raster source and the resulting simplified SVG.
JPG is useful when the source is a photo or continuous-tone raster image, but the SVG result will be an approximation. The vectorizer represents tones with quantized color regions and paths, so a JPG-to-SVG workflow usually needs more colors and careful simplification.
The next example vectorizes lioness.jpg and saves a vector SVG approximation. It uses more colors and less smoothing than the logo-style example to retain additional tonal detail.
 1import os
 2from aspose.svg.imagevectorization import ImageVectorizer, ImageTraceSmoother, BezierPathBuilder
 3
 4# Vectorize a JPG photo to a vector SVG approximation
 5input_folder = "data/"
 6output_folder = "output/"
 7input_path = os.path.join(input_folder, "lioness.jpg")
 8output_path = os.path.join(output_folder, "lioness.svg")
 9os.makedirs(output_folder, exist_ok=True)
10
11path_builder = BezierPathBuilder()
12path_builder.trace_smoother = ImageTraceSmoother(1)
13path_builder.error_threshold = 30.0
14path_builder.max_iterations = 30
15
16vectorizer = ImageVectorizer()
17vectorizer.configuration.path_builder = path_builder
18vectorizer.configuration.colors_limit = 25
19vectorizer.configuration.line_width = 1.5
20
21with vectorizer.vectorize(input_path) as document:
22    document.save(output_path)
The result preserves the overall composition but represents continuous tones with quantized color regions and vector paths.
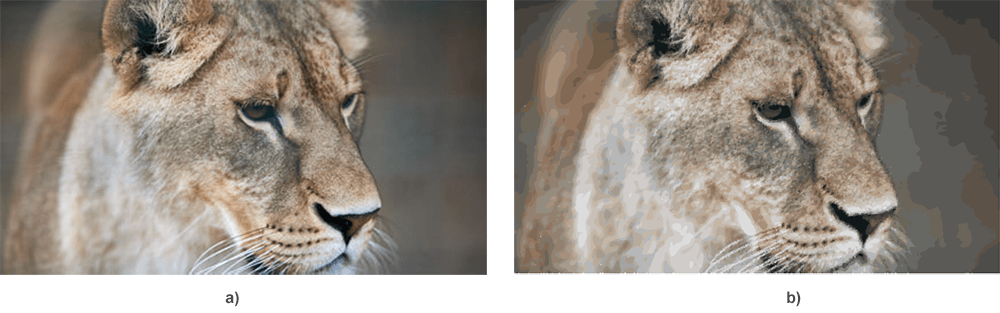
You can inspect the source JPG and the resulting SVG to compare raster detail with the generated paths.
BMP, TIFF, and GIF use the same vectorization workflow as PNG and JPG. Change only the input file path and output SVG path. For example, pass diagram.bmp, scan.tiff, or icon.gif to vectorizer.vectorize(input_path) and save the returned document as .svg.
For large TIFF files or detailed scans, reduce the input dimensions before vectorization if processing time or SVG complexity becomes too high. For GIF and simple bitmap artwork, start with a low colors_limit and increase it only when important regions disappear.
There is no single best configuration for every image. For a first pass, use fewer colors for flat artwork, more colors for detailed JPG images, and inspect the SVG at the target display size before keeping the result.
For detailed guidance on colors_limit, smoothing, error_threshold, line_width, image size, and background handling, see
Image Vectorization Options in Python.
| Problem | Likely cause | Fix |
|---|---|---|
| The SVG contains too many paths | The source is noisy or too many colors and details are retained | Reduce colors_limit, resize the source, or increase smoothing |
| Small details disappear | Simplification or smoothing is too aggressive | Lower smoothing and use a lower error_threshold |
| Colors differ from the source | Vectorization includes color quantization | Increase colors_limit or preprocess the source palette |
| A photo produces a very large SVG | Continuous-tone images require many color regions and paths | Reduce image dimensions and colors, or use PNG/JPG when photorealism is required |
| Transparent edges look incorrect | The background used during tracing does not match the source | Set configuration.background_color explicitly and verify the source alpha channel |
A free evaluation version supports image vectorization with these restrictions:
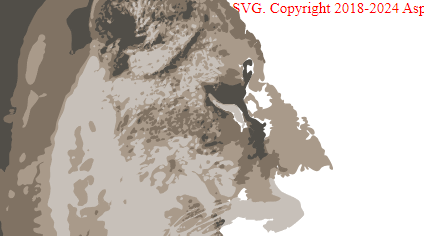
To evaluate the complete result, request a 30-day temporary license. The following image shows a photo vectorization result produced without a license.
Use the free online Image Vectorizer to test raster-to-SVG conversion and compare settings before implementing them in Python.

How do I vectorize an image in Python?
Use ImageVectorizer.vectorize() with a PNG, JPG, BMP, TIFF, or GIF input file, then save the returned SVGDocument as an .svg file.
Can I convert PNG to SVG in Python?
Yes. PNG is a common input format for image vectorization. Pass the PNG path to ImageVectorizer.vectorize() and save the returned SVG document.
Can I convert JPG to SVG in Python?
Yes. JPG images can be vectorized to SVG, but continuous-tone photos become approximate vector artwork with quantized colors and paths.
Can Aspose.SVG vectorize JPG photos?
Yes, but vectorization approximates a photo with quantized colors and paths. PNG or JPG remains more suitable when the output must stay photorealistic.
Can I convert BMP, TIFF, or GIF to SVG?
Yes. Pass the raster image path to ImageVectorizer.vectorize() and save the returned document as SVG. Large TIFF files may need resizing first.
How can I reduce the generated SVG file size?
Reduce the input dimensions or colors_limit, increase contour smoothing, and avoid retaining detail that is not needed at the target display size.
Which settings are best for a logo?
Start with a low colors_limit, moderate smoothing, and a low enough error_threshold to preserve recognizable edges. Then compare the SVG with the source at several sizes.
Why does the evaluation result look incomplete?
The evaluation version limits color quantization and saves only part of the generated SVG nodes. Apply a valid or temporary license to inspect the full output.
Analyzing your prompt, please hold on...
An error occurred while retrieving the results. Please refresh the page and try again.