彩色滤光片 – Color Filters – C# 代码
在本文中,您将了解主要的颜色滤镜 – <feColorMatrix> 和 <feComponentTransfer>。在这里,您将找到展示如何编写 SVG 代码来创建饱和度、hueRotate 和 luminanceToAlpha 效果的示例,以及使用
Aspose.Svg.Filters 命名空间将颜色滤镜应用到 SVG 元素或的详细 C# 示例。位图。
彩色滤光片 – Color Filters
Aspose.SVG for .NET 可让您创建几乎所有现代浏览器都支持的各种 SVG 滤镜效果。当谈到颜色处理时,<feColorMatrix>是最好的选择。它是一种颜色滤镜,使用矩阵影响每个 RGBA 通道的颜色值。 <feComponentTransfer> 是最强大的 SVG 过滤器基元之一。它可以控制图像的各个 RGBA 通道,允许您创建类似 Photoshop 的 SVG 效果;例如,它可用于对图像进行色调分离。
颜色矩阵 – <feColorMatrix> 滤镜基元
<feColorMatrix> 是主要的滤色器之一。该滤波器基元将矩阵变换应用于输入图像中每个像素的 RGBA 通道。结果,生成了一组新的颜色和 alpha 值。在常见情况下,颜色矩阵被编写为<feColorMatrix>元素的type属性的操作。在颜色矩阵的特殊情况下,使用type的辅助操作:saturate、hueRotate、luminanceToAlpha。
饱和效果 – Saturation Effect
饱和度效果是使用颜色矩阵的一种特殊情况。让我们看一下<feColorMatrix>滤镜原语的type属性中使用的 saturate 操作的示例:
1<svg xmlns="http://www.w3.org/2000/svg">
2    <image filter="url(#saturation-effect)" href="http://docs.aspose.com/svg/net/images/api/lighthouse.jpg" x="20" y="20" height="440" width="330" />
3    <defs>
4        <filter id="saturation-effect">
5            <feColorMatrix in="SourceGraphic" type="saturate" values="2"></feColorMatrix>
6        </filter>
7    </defs>
8</svg>
上面的 SVG 代码说明了饱和效果的创建,并提醒您在 SVG 中,过滤器是由设置在 <defs> 元素内的<filter>元素定义的。它永远不会自行渲染,并且在概念上被描述为一个包含其子元素(即过滤器基元)的元素。
以下 C# 代码创建一个 SVG 文件,其中的图像饱和度增加,使颜色显得更加鲜艳。饱和度效果是通过<feColorMatrix>滤镜原语以及代码中指定的值来实现的。
 1using Aspose.Svg;
 2using System.IO;
 3using Aspose.Svg.Filters;
 4using Aspose.Svg.DataTypes;
 5...
 6
 7    // Set SVG Namespace Url
 8    string SvgNamespace = "http://www.w3.org/2000/svg";
 9
10    using (var document = new SVGDocument())
11    {
12        var svgElement = document.RootElement;
13
14        // Create an <image> element and add to the <svg> element
15        var imageElement = (SVGImageElement)document.CreateElementNS(SvgNamespace, "image");
16        imageElement.Href.BaseVal = "http://docs.aspose.com/svg/net/images/api/lighthouse.jpg";
17        imageElement.Height.BaseVal.ConvertToSpecifiedUnits(SVGLength.SVG_LENGTHTYPE_PX);
18        imageElement.Width.BaseVal.ConvertToSpecifiedUnits(SVGLength.SVG_LENGTHTYPE_PX);
19        imageElement.Height.BaseVal.Value = 440;
20        imageElement.Width.BaseVal.Value = 330;
21        imageElement.X.BaseVal.Value = 20;
22        imageElement.Y.BaseVal.Value = 20;
23        imageElement.SetAttribute("filter", "url(#saturation)");
24        svgElement.AppendChild(imageElement);
25
26        // Create a <defs> element and add to the <svg> element
27        var defsElement = (SVGDefsElement)document.CreateElementNS(SvgNamespace, "defs");
28        svgElement.AppendChild(defsElement);
29
30        // Creating a <filter> element and add to the <defs> element
31        var filterElement = (SVGFilterElement)document.CreateElementNS(SvgNamespace, "filter");
32        filterElement.Id = "saturation";
33        defsElement.AppendChild(filterElement);
34
35        // Creating a <feColorMatrix> element and add to the <filter> element
36        var feColorMatrixElement = (SVGFEColorMatrixElement)document.CreateElementNS(SvgNamespace, "feColorMatrix");
37        feColorMatrixElement.In1.BaseVal = "SourceGraphic";
38        feColorMatrixElement.SetAttribute("type", "saturate");
39        feColorMatrixElement.SetAttribute("values", "2");
40        filterElement.AppendChild(feColorMatrixElement);
41
42        // Save the document
43        document.Save(Path.Combine(OutputDir, "saturation-effect.svg"));
44    }
让我们逐步考虑一下代码:
- 创建 SVGDocument 类的实例。
- SVGDocument 类的 RootElement 属性指向文档的根
<svg>元素。 - 创建一个带有属性的
<image>元素并将其添加到<svg>元素:- 您可以使用
CreateElementNS(
namespaceURI, QualifiedName) 方法创建 SVGImageElement 类的实例。 - 设置指定其来源、位置和大小的属性。使用
imageElement的filter属性引用filterElement中id属性的 URL 名称,可以将 SVG 滤镜效果应用于图像。 - 要将
imageElement添加到svgElement,您可以使用 AppendChild()方法。
- 您可以使用
CreateElementNS(
- 创建一个
<defs>元素并将其添加到<svg>元素:- 使用 CreateElementNS() 方法创建 SVGDefsElement 类的实例。
- 使用 AppendChild() 方法将
<defs>元素添加到<svg>元素。
- 创建一个
<filter>元素,设置一个id属性,并将<filter>添加到<defs>元素:- 使用 CreateElementNS() 方法创建 SVGFilterElement 类的实例。
- 为
<filter>元素设置一个filterElement.Id,它可以应用于图像。 - 使用 AppendChild() 方法将
<filter>添加到<defs>元素。
- 创建一个
<feColorMatrix>元素,设置属性,并将其添加到<filter>元素:- 使用 CreateElementNS() 方法创建 SVGFEColorMatrix 类的实例。
- 调用
SetAttribute(
name, value) 方法设置type和value属性。 - 不要忘记设置
in1属性。使用 SVGAnimatedLength 类型的属性,可以通过构造feColorMatrixElement.In1.BaseVal = "SourceGraphic"来设置或读取其静态数据。 - 使用 AppendChild() 方法将
<feColorMatrix>添加到<filter>元素。
- 调用 Save()方法将带有饱和图像的SVG文档保存到path指定的本地文件中。
HueRotate
颜色矩阵的具体情况是沿着
色轮 的图像旋转。 type="hueRotate" 操作用于更改图像或元素的色调。使用 hueRotate ,您可以创建生动、丰富的色彩效果并自定义网站元素的外观。 hueRotate 采用一个 value – 旋转角度(以度为单位)。该角度表示色轮旋转的角度。该值可以在 0 到 360 之间,其中 0 到 360 表示原始色调,180 表示 180 度旋转(颜色反转)。
以下 SVG 示例说明了在<feColorMatrix>滤镜基元中使用 type="hueRotate" 操作:
1<defs>
2    <filter id="hueRotate">
3        <feColorMatrix in="SourceGraphic" type="hueRotate" values="150"></feColorMatrix>
4    </filter>
5</defs>
下面的 C# 代码创建一个<feColorMatrix>滤镜基元,并将其添加到现有的 SVG<filter>元素,以使用 Aspose.SVG for .NET API 应用hueRotate 效果。色调旋转效果改变输入图形的色调,有效地围绕色轮改变其颜色。
1    // Creating a <feColorMatrix> element and add to the <filter> element
2    var feColorMatrixElement = (SVGFEColorMatrixElement)document.CreateElementNS(SvgNamespace, "feColorMatrix");
3    feColorMatrixElement.In1.BaseVal = "SourceGraphic";
4    feColorMatrixElement.SetAttribute("type", "hueRotate");
5    feColorMatrixElement.SetAttribute("values", "150");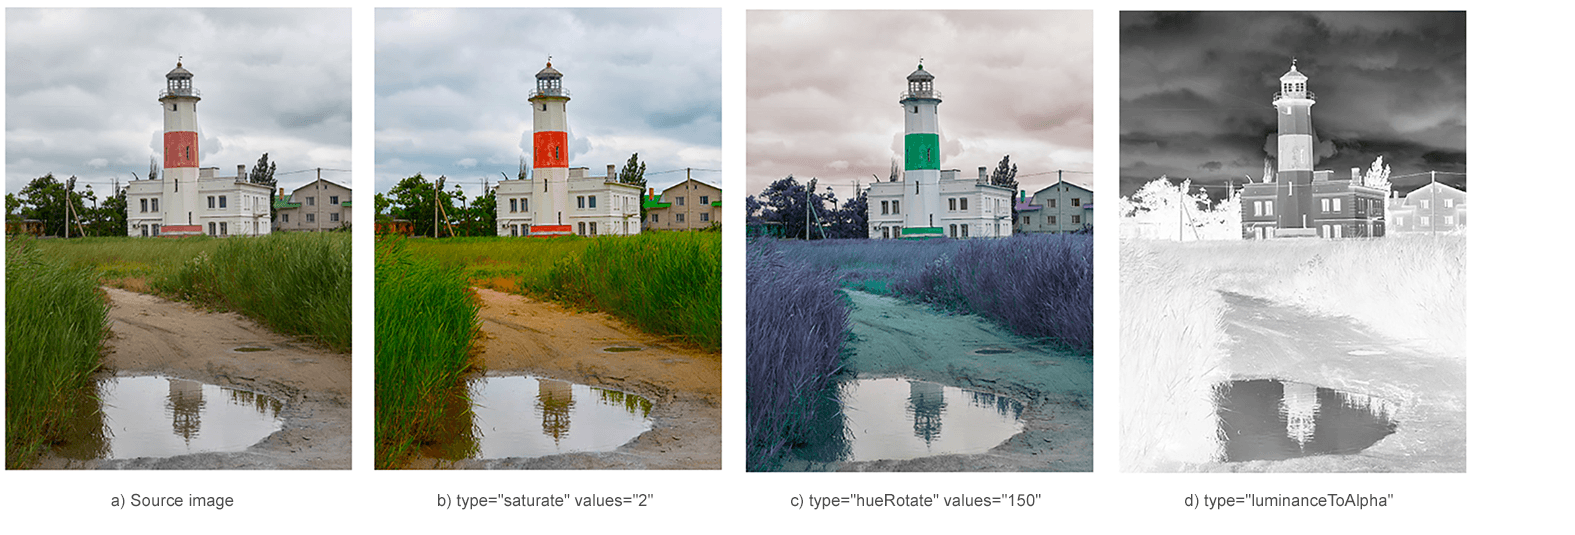
6 filterElement.AppendChild(feColorMatrixElement);该图是一系列具有各种type属性值的图像。该图演示了源图像 (a)、应用饱和度效果 (b)、hueRotate (c) 和luminanceToAlpha (d) 之后由 feColorMatrix 滤镜处理的图像。
颜色通道 – <feComponentTransfer> 滤镜原语
<feComponentTransfer> 过滤器基元是一个功能强大的 SVG 元素,它允许您对图像通道执行线性、表格、离散操作,并更改每个通道 (RGBA) 的伽玛值。这可以实现各种颜色调整和效果,例如对比度变化、伽马校正、颜色反转、亮度调整等。
通常,子元素<feFuncR>、<feFuncG>、<feFuncB>和<feFuncA>与<feComponentTransfer>一起使用。它们分别定义红色、绿色、蓝色和 alpha 通道的变换函数,并且可以包含定义变换行为的属性,例如type、tableValues、slope、intercept、amplitude、exponent和offset。在type属性中,确定了允许修改该组件的函数的类型。有五种函数类型:identity, table, discrete, linear 和 gamma*。当type="linear"时,slope属性表示线性函数的斜率。如果未指定该属性,则效果就像指定了值 1 一样。让我们看一个 SVG 示例:
 1<svg xmlns="http://www.w3.org/2000/svg">
 2	<image href="http://docs.aspose.com/svg/images/api/seaside.jpg" height="330" width="440" x="10" y="10" filter="url(#rgba)" />
 3    <defs>
 4		<filter id="rgba">
 5			<feComponentTransfer>
 6				<feFuncR type="linear" slope="1.1"/>
 7				<feFuncG type="linear" slope="1.5"/>
 8				<feFuncB type="linear" slope="2.0"/>
 9				<feFuncA type="identity"/>
10			</feComponentTransfer>
11		</filter>
12	</defs>
13</svg>
这里我们将编写 C# 代码来创建与上述 SVG 代码相同的图像通道线性变换效果。
1using Aspose.Svg;
2using System.IO;
3using Aspose.Svg.Filters;
4...
5
6 // Set SVG Namespace Url
7 string SvgNamespace = "http://www.w3.org/2000/svg";
8
9 using (var document = new SVGDocument())
10 {
11 var svgElement = document.RootElement;
12
13 // Create an <image> element and add to the <svg> element
14 var imageElement = (SVGImageElement)document.CreateElementNS(SvgNamespace, "image");
15 imageElement.Href.BaseVal = "http://docs.aspose.com/svg/images/api/seaside.jpg";
16 imageElement.Height.BaseVal.Value = 330;
17 imageElement.Width.BaseVal.Value = 440;
18 imageElement.X.BaseVal.Value = 10;
19 imageElement.Y.BaseVal.Value = 10;
20 imageElement.SetAttribute("filter", "url(#rgba)");
21 svgElement.AppendChild(imageElement);
22
23 // Create a <defs> element and add to the <svg> element
24 var defsElement = (SVGDefsElement)document.CreateElementNS(SvgNamespace, "defs");
25 svgElement.AppendChild(defsElement);
26
27 // Creating a <filter> element and add to the <defs> element
28 var filterElement = (SVGFilterElement)document.CreateElementNS(SvgNamespace, "filter");
29 filterElement.Id = "rgba";
30 defsElement.AppendChild(filterElement);
31
32 // Creating a <feComponentTransfer> element and add to the <filter> element
33 var feComponentTransferElement = (SVGFEComponentTransferElement)document.CreateElementNS(SvgNamespace, "feComponentTransfer");
34 filterElement.AppendChild(feComponentTransferElement);
35
36 // Creating a <feFuncR> element and add to the <feComponentTransfer> element
37 var feFuncRElement = (SVGFEFuncRElement)document.CreateElementNS(SvgNamespace, "feFuncR");
38 feFuncRElement.SetAttribute("type", "linear");
39 feFuncRElement.SetAttribute("slope", "1.1");
40 feComponentTransferElement.AppendChild(feFuncRElement);
41
42 // Creating a <feFuncG> element and add to the <feComponentTransfer> element
43 var feFuncGElement = (SVGFEFuncGElement)document.CreateElementNS(SvgNamespace, "feFuncG");
44 feFuncGElement.SetAttribute("type", "linear");
45 feFuncGElement.SetAttribute("slope", "1.5");
46 feComponentTransferElement.AppendChild(feFuncGElement);
47
48 // Creating a <feFuncB> element and add to the <feComponentTransfer> element
49 var feFuncBElement = (SVGFEFuncBElement)document.CreateElementNS(SvgNamespace, "feFuncB");
50 feFuncBElement.SetAttribute("type", "linear");
51 feFuncBElement.SetAttribute("slope", "2.0");
52 feComponentTransferElement.AppendChild(feFuncBElement);
53
54 // Creating a <feFuncA> element and add to the <feComponentTransfer> element
55 var feFuncAElement = (SVGFEFuncAElement)document.CreateElementNS(SvgNamespace, "feFuncA");
56 feFuncAElement.SetAttribute("type", "identity");
57 feComponentTransferElement.AppendChild(feFuncAElement);
58
59 // Save the document
60 document.Save(Path.Combine(OutputDir, "rgba.svg"));
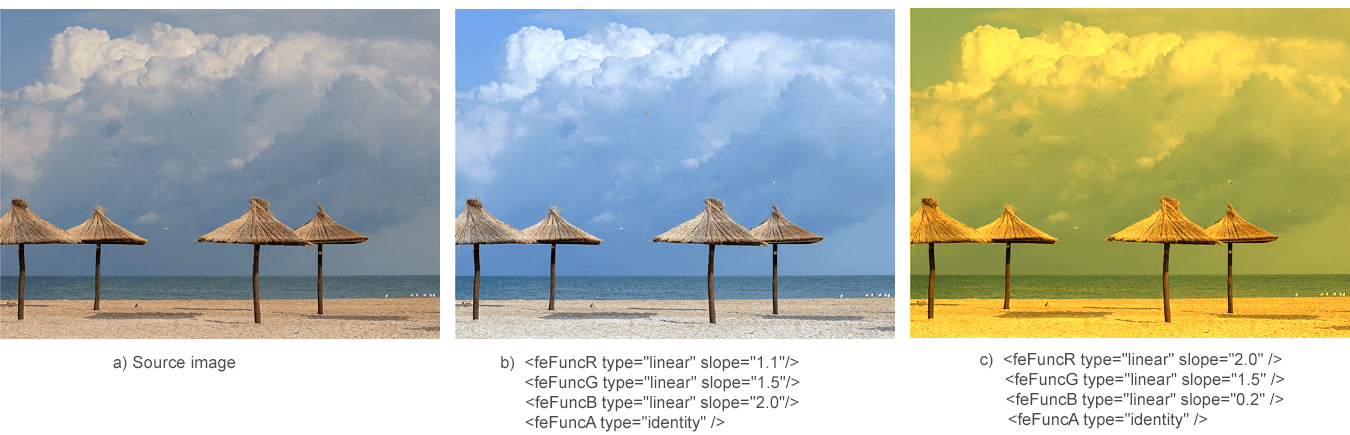
61 }该图展示了源图像 (a) 和 feComponentTransfer 过滤器处理的图像 (b, c)。
也可以看看
您可以从 GitHub下载完整的示例和数据文件。
关于从 GitHub 下载并运行示例,您可以在 如何运行示例 部分找到。
有关滤镜基元的更多信息,请参阅 W3C Filter Effects Module 页面和 SVG 滤镜和渐变 文章。
Aspose.SVG 提供免费的 SVG Web 应用程序,用于转换 SVG 或图像文件、合并 SVG、图像矢量化、SVG 精灵生成、SVG 到 Base64 数据编码等。这些在线应用程序可以在任何带有网络浏览器的操作系统上运行,并且不需要安装额外的软件。这是一种快速、简单的方法,可以高效、有效地解决您的 SVG 相关任务!