Analyzing your prompt, please hold on...
An error occurred while retrieving the results. Please refresh the page and try again.
Aspose.SVG for .NET 允许您打开、创建或编辑 SVG 文档并更改其内容。您可以对 SVG 元素或位图应用许多可用的 SVG 过滤器以获得所需的结果。 Aspose.Svg.Filters 命名空间包含 SVG 规范中与滤镜效果相关的类和接口。要创建投影效果,您可以使用一些滤镜基元:
<feDropShadow> 元素来实现投影效果;<feOffset> 元素来偏移 SVG 中的图层;<feGaussianBlur>元素来实现高斯模糊效果;<feBlend>元素来混合两个或多个对象。在本文中,您将学习如何编写 SVG 代码来创建投影滤镜,并考虑使用 Aspose.Svg.Filters 命名空间将投影效果应用于 SVG 元素或位图的详细 C# 示例。
SVG 中的阴影效果是一种常见的视觉效果,用于在 SVG 元素后面创建阴影的错觉。它使 SVG 内容看起来像是漂浮在背景之上,从而为 SVG 内容提供深度和真实感。此外,还可以使用投影效果使图像脱颖而出。在 SVG 中实现阴影效果有多种方法。让我们看一下其中的两个。
注意: 在 SVG 中,过滤器由<filter>元素定义,该元素在<defs>元素内设置。它永远不会自行渲染,并且在概念上被描述为包含其子元素(过滤器基元)的元素。 <filter> 元素有一组属性。过滤器基元所需的属性是x, y, width, height和id。他们设置将应用滤镜的图片区域。属性id为 SVG 元素提供唯一标识符,并标识 SVG 文档中的元素。
feOffset + feGaussianBlur + feBlend 滤镜基元我们认为,最有效的是使用三个滤镜来实现阴影效果。这将允许您微调效果,即使它需要更多代码:
1<svg height="200" width="200" xmlns="http://www.w3.org/2000/svg">
2 <defs>
3 <filter id="shadow" x="-20" y="-20" height="150" width="150" >
4 <feOffset result="offset" in="SourceAlpha" dx="10" dy="10" />
5 <feGaussianBlur result="blur" in="offset" stdDeviation="3" />
6 <feBlend in="SourceGraphic" in2="blur" mode="normal" />
7 </filter>
8 </defs>
9 <rect x="40" y="40" width="100" height="100" fill="orange" filter="url(#shadow)" />
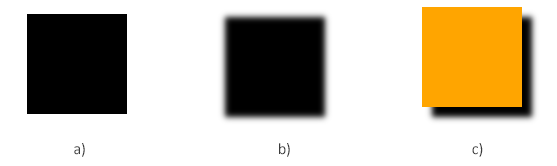
10</svg>使用三个滤镜来创建投影效果(图 c):
<feOffset> 过滤器原语用于偏移 SVG 中的图层。它采用 in="SourceAlpha",将结果向右移动 10 像素,向下移动 10 像素,并将结果作为“偏移”存储在缓冲区中。请注意,形状的 Alpha 通道用作输入。值 SourceAlpha 会产生黑色结果(图 a)。<feGaussianBlur> 采用 in="offset",应用 stdDeviation="3" 的模糊,并将结果存储在名为 "blur" 的临时缓冲区中。<feBlend> 过滤器混合两个对象;它需要两个输入 in =“SourceGraphic” 和 in2 =“blur” ,然后将 SourceGraphic 混合在偏移黑色模糊图像的顶部(图b)。它的 mode 属性指定混合模式。下图说明了阴影创建的逐步过程:
feDropShadow 过滤器基元在 SVG 中,可以使用<filter>元素上的 feDropShadow 滤镜基元来实现阴影效果。 <feDropShadow>元素具有创建阴影所需的属性,例如 dx、dy 和 stdDeviation,此外它还允许您向阴影添加颜色和透明度!这是使用属性 flood-color和 flood-opacity来实现的。让我们看看如何使用 feDropShadow 滤镜基元创建阴影效果:
1<svg height="200" width="200" xmlns="http://www.w3.org/2000/svg">
2	<defs>
3        <filter id="shadow-red" x="-20" y="-20" height="100" width="100" >
4			<feDropShadow dx="10" dy="10" stdDeviation="3"  flood-color="CornflowerBlue" />
5		</filter>
6	</defs>
7    <rect x="40" y="40" width="100" height="100" fill="orange" filter="url(#shadow-red)" />
8</svg>
注意: 如果flood-color属性没有指定或者指定不正确,那么默认阴影将为黑色。
在这里,我们将编写 С# 代码,使用三个滤镜基元为橙色矩形创建阴影效果。
以下代码片段展示了如何使用 Aspose.SVG for .NET API 创建投影效果。
<svg>元素。<defs> 元素并将其添加到 <svg> 元素:<defs> 元素添加到 <svg> 元素。<filter> 元素,设置属性,并将其添加到 <defs> 元素中:name, value) 方法设置 x, y, height 和 width 属性。id属性。<filter> 添加到 <defs> 元素。<feOffset>元素,设置属性,并将其添加到<filter>元素:name, value) 方法设置 dx、dy 和 result 属性。in1属性。使用 SVGAnimatedLength 类型的属性,可以通过构造 feOffsetElement.In1.BaseVal = "SourceAlpha" 来设置或读取其静态数据。<feOffset> 添加到 <filter> 元素。<filter>元素添加 <feGaussianBlur> 和 <feBlend> 等元素。<rect>元素,该元素将是具有投影效果的 SVG 形状。它被赋予 fill 颜色(#ffa500 – 橙色),并且 filter 属性设置为 url(#shadow) ,引用先前定义的带有 Id =“shadow”的过滤器。1using Aspose.Svg;
2using System.IO;
3using Aspose.Svg.Filters; 1// Apply drop shadow effect for an SVG rectangle using C#
2
3// Set SVG Namespace Url
4string SvgNamespace = "http://www.w3.org/2000/svg";
5
6// Initialize an SVG document
7using (SVGDocument document = new SVGDocument())
8{
9 SVGSVGElement svgElement = document.RootElement;
10
11 // Create a <defs> element and add it to the svgElement
12 SVGDefsElement defsElement = (SVGDefsElement)document.CreateElementNS(SvgNamespace, "defs");
13 svgElement.AppendChild(defsElement);
14
15 // Create a <filter> element and add it to the defsElement
16 SVGFilterElement filterElement = (SVGFilterElement)document.CreateElementNS(SvgNamespace, "filter");
17 filterElement.Id = "shadow";
18 filterElement.SetAttribute("x", "-20px");
19 filterElement.SetAttribute("y", "-20px");
20 filterElement.SetAttribute("height", "150px");
21 filterElement.SetAttribute("width", "150px");
22 defsElement.AppendChild(filterElement);
23
24 // Create a <feOffset> filter primitive and add it to the filterElement
25 SVGFEOffsetElement feOffsetElement = (SVGFEOffsetElement)document.CreateElementNS(SvgNamespace, "feOffset");
26 feOffsetElement.In1.BaseVal = "SourceAlpha";
27 feOffsetElement.SetAttribute("result", "offset");
28 feOffsetElement.SetAttribute("dx", "10");
29 feOffsetElement.SetAttribute("dy", "10");
30 filterElement.AppendChild(feOffsetElement);
31
32 // Create a <feGaussianBlur> filter primitive and add it to the filterElement
33 SVGFEGaussianBlurElement feGaussianBlurElement = (SVGFEGaussianBlurElement)document.CreateElementNS(SvgNamespace, "feGaussianBlur");
34 feGaussianBlurElement.In1.BaseVal = "offset";
35 feGaussianBlurElement.StdDeviationX.BaseVal = 3;
36 feGaussianBlurElement.StdDeviationY.BaseVal = 3;
37 feGaussianBlurElement.SetAttribute("result", "blur");
38 filterElement.AppendChild(feGaussianBlurElement);
39
40 // Create a <feBlend> filter primitive and add it to the filterElement
41 SVGFEBlendElement feBlendElement = (SVGFEBlendElement)document.CreateElementNS(SvgNamespace, "feBlend");
42 feBlendElement.In1.BaseVal = "SourceGraphic";
43 feBlendElement.In2.BaseVal = "blur";
44 feBlendElement.SetAttribute("mode", "normal");
45 filterElement.AppendChild(feBlendElement);
46
47 // Create a <rect> element and set the "fill" and "filter" attributes
48 SVGRectElement rectElement = (SVGRectElement)document.CreateElementNS(SvgNamespace, "rect");
49 rectElement.X.BaseVal.Value = 40;
50 rectElement.Y.BaseVal.Value = 40;
51 rectElement.Width.BaseVal.Value = 100;
52 rectElement.Height.BaseVal.Value = 100;
53 rectElement.SetAttribute("fill", "#ffa500");
54 rectElement.SetAttribute("filter", "url(#shadow)");
55 svgElement.InsertBefore(rectElement, svgElement.FirstChild);
56
57 // Save the document
58 document.Save(Path.Combine(OutputDir, "drop-shadow-effect.svg"));
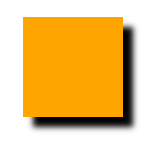
59}当您运行此 C# 代码时,它将生成一个带有橙色矩形阴影效果的 SVG 文件。阴影将为黑色,与源矩形水平偏移 10 个单位,垂直偏移 10 个单位。生成的 drop-shadow-effect.svg 文件类似于图 c – 带有黑色阴影的橙色矩形。
Aspose.SVG Builder API 旨在简化 C# 中 SVG 元素的创建和更新。 让我们看一个使用 SVG Builder API 实现投影效果的 С# 示例(与上一段中的示例完全相同)。 此代码展示了如何使用 流畅的构建器模式(fluent builder pattern) 创建简洁且可读的 SVG 文档,并利用 Aspose.SVG 库的功能:
1using Aspose.Svg.Builder;
2using System.Drawing;
3using System.IO; 1// Create an SVG <rect> with drop shadow using SVG Builder in C#
2
3// Initialize an SVG document
4using (SVGDocument document = new SVGDocument())
5{
6 // Create an instance of SVGSVGElementBuilder to facilitate the construction of the <svg> element and its child elements using a fluent builder pattern
7 SVGSVGElement svg = new SVGSVGElementBuilder()
8 //.Width(400).Height(400)
9 .AddDefs(d => d
10 .AddFilter(f => f.Id("shadow").Width(150).Height(150)
11 .AddFeDropShadow(sh => sh
12 .Dx(10).Dy(10)
13 .StdDeviation(3)
14 )
15 )
16 )
17 .AddRect(r => r
18 .Rect(40, 40, 100, 100)
19 .Filter(f => f.FilterId("shadow"))
20 .Style(s => s.Fill(Color.Orange))
21 )
22 // Call the Build() method on the SVGSVGElementBuilder to construct the <svg> element with its child elements
23 .Build(document.FirstChild as SVGSVGElement);
24 //.Build(document.FirstChild as SVGSVGElement);
25 document.Save(Path.Combine(OutputDir, "drop-shadow-builder.svg"));
26}流畅的构建器模式允许您以更简洁和可读的方式创建 SVG 元素并应用过滤器。 每个方法调用,例如 .AddFilter或 .AddRect都清楚地说明了其目的,让您一目了然地了解SVG文档的结构。 此示例演示了使用 SVG Builder 创建 SVG 文档的更具表现力的方法,与 上一个示例中显示的手动创建元素的方法相比,提供了更高的可读性、可维护性和灵活性。 代码运行的结果是,我们得到了带有黑色阴影的相同橙色矩形:
此 C# 示例创建一个 SVG 文件,类似于我们之前在
feDropShadow 滤镜原语 部分中看到的文件。仅在这里,我们使用 feDropShadow 滤镜基元为 SVG 文本(而不是橙色矩形)创建彩色阴影。
以下代码片段展示了如何使用 Aspose.SVG for .NET API 创建文本阴影:
1using Aspose.Svg;
2using System.IO;
3using Aspose.Svg.Filters; 1// Add a colored drop shadow effect to <text> in SVG programmatically
2
3// Set SVG Namespace Url
4string SvgNamespace = "http://www.w3.org/2000/svg";
5
6// Initialize an SVG document
7using (SVGDocument document = new SVGDocument())
8{
9 SVGSVGElement svgElement = document.RootElement;
10
11 // Create a <defs> element and add it to the svgElement
12 SVGDefsElement defsElement = (SVGDefsElement)document.CreateElementNS(SvgNamespace, "defs");
13 svgElement.AppendChild(defsElement);
14
15 // Create a <filter> element and add it to the defsElement
16 SVGFilterElement filterElement = (SVGFilterElement)document.CreateElementNS(SvgNamespace, "filter");
17 filterElement.Id = "text-shadow";
18 filterElement.SetAttribute("x", "-20px");
19 filterElement.SetAttribute("y", "-20px");
20 filterElement.SetAttribute("height", "150px");
21 filterElement.SetAttribute("width", "150px");
22 defsElement.AppendChild(filterElement);
23
24 // Create a <feDropShadow> filter primitive and add it to the filterElement
25 SVGFEDropShadowElement feDropShadowElement = (SVGFEDropShadowElement)document.CreateElementNS(SvgNamespace, "feDropShadow");
26 feDropShadowElement.StdDeviationX.BaseVal = 3;
27 feDropShadowElement.StdDeviationY.BaseVal = 3;
28 feDropShadowElement.SetAttribute("dx", "3");
29 feDropShadowElement.SetAttribute("dy", "3");
30 feDropShadowElement.SetAttribute("flood-color", "LightCoral");
31 filterElement.AppendChild(feDropShadowElement);
32
33 // Create a <text> element and add it to the svgElement
34 SVGTextElement textElement = (SVGTextElement)document.CreateElementNS(SvgNamespace, "text");
35 textElement.Style.FontSize = "4em";
36 textElement.SetAttribute("x", "20px");
37 textElement.SetAttribute("fill", "CornflowerBlue");
38 textElement.SetAttribute("y", "100px");
39 textElement.TextContent = "Drop Shadow Effect";
40 textElement.SetAttribute("filter", "url(#text-shadow)");
41 svgElement.InsertBefore(textElement, svgElement.FirstChild);
42
43 // Save the document
44 document.Save(Path.Combine(OutputDir, "text-drop-shadow.svg"));
45}与带有彩色阴影的文本的示例完全相同,但我们使用 Aspose.SVG Builder 实现它:
1using Aspose.Svg.Builder;
2using System.Drawing;
3using System.IO; 1// Add a colored drop shadow effect to <text> in SVG using SVG Builder
2
3// Initialize an SVG document
4using (SVGDocument document = new SVGDocument())
5{
6 // Create an instance of SVGSVGElementBuilder to facilitate the construction of the <svg> element and its child elements using a fluent builder pattern
7 SVGSVGElement svg = new SVGSVGElementBuilder()
8 .AddDefs(d => d
9 .AddFilter(f => f.Id("shadow").Width(150).Height(150)
10 .AddFeDropShadow(sh => sh
11 .Dx(3).Dy(3)
12 .StdDeviation(3)
13 .FloodColor(Color.LightCoral)
14 )
15 )
16 )
17 .AddText(t => t.X(20).Y(100).Fill(Color.CornflowerBlue).FontSize(48, LengthType.Pt)
18 .Filter(f => f.FilterId("shadow"))
19 .AddContent("Drop Shadow Effect")
20 )
21
22 // Call the Build() method on the SVGSVGElementBuilder to construct the <svg> element with its child elements
23 .Build(document.FirstChild as SVGSVGElement);
24 document.Save(Path.Combine(OutputDir, "text-drop-shadow-builder.svg"));
25}生成的 text-drop-shadow.svg 和 text-drop-shadow-builder.svg 图像如下所示:

文本有一个阴影,填充颜色为 LightCoral,模糊半径为 3 个单位。阴影将与文本水平偏移 3 个单位,垂直偏移 3 个单位,从而创建视觉上吸引人的阴影效果。
也可以看看
Analyzing your prompt, please hold on...
An error occurred while retrieving the results. Please refresh the page and try again.