Analyzing your prompt, please hold on...
An error occurred while retrieving the results. Please refresh the page and try again.
Aspose.SVG for .NET 允许您编辑 SVG 文件并更改其内容。 API 的文档对象模型 (DOM) 与官方 SVG 规范 完全兼容,意味着可以完全控制 SVG 节点及其字段进行编辑。您可以通过附加新节点、删除或编辑现有节点的内容来修改文档。
在本文中,我们将展示如何使用 Aspose.SVG for .NET 库编辑 SVG,并考虑如何向 SVG 文档添加元素并编辑它们的详细 C# 示例。
Aspose.SVG for .NET API 允许您向文档添加各种元素。首先,您将创建一个新元素或节点;然后,您可以将元素添加到文档中。
您可以使用
SVGDocument 类的
CreateElementNS(namespaceURI, qualifiedName) 方法创建
Element 类的实例 – 给定限定的所需元素名称和命名空间 URI。 namespaceURI 设置对
W3C SVG 规范的引用。 qualifiedName 必须包含元素的字符串标签名称。请记住,您必须使用类型转换(显式转换)来获取相应的元素。
要向 SVG 文档添加元素,API 提供了
Node 类的
InsertBefore(node, child) 方法,该方法在现有子节点之前插入 node 或如果“child”为空,则位于子级列表的末尾。
SVGDocument 类的
RootElement 属性指向文档的根 <svg> 元素。以下代码片段说明了如何创建 <g> 元素并将其添加为 SVG 文档中的第一个子元素。
1    var svgElement = document.RootElement;
2    var gElement = (SVGGElement)document.CreateElementNS("http://www.w3.org/2000/svg", "g");
3    svgElement.InsertBefore(gElement, svgElement.FirstChild);
我们可以使用 Element 类的
SetAttribute(name, value)、
GetAttribute(name)、
HasAttribute(name)、
RemoveAttribute(name) 方法来指定元素属性及其值。
例如,如果您创建一组图形元素并将它们放入<g>元素中,则可以设置公共参数:
1    gElement.SetAttribute("fill", "#8A8D8F");
2    gElement.SetAttribute("stroke", "magenta");
3 gElement.SetAttribute("stroke-width", "4");可以使用
CreateElementNS(namespaceURI, qualifiedName) 方法创建基本的 SVG 形状。 qualifiedName 必须包含 SVG 图形元素的字符串标记名称。
这样你就可以创建SVG圆形(SVGCircleElement class, qualifiedName = “circle”),椭圆(SVGEllipseElement class, qualifiedName = “ellipse”),矩形(SVGRectElement class, qualifiedName = “rect”),线条(SVGLineElement class, qualifiedName = “line”)、折线(SVGPolylineElement 类,qualifiedName = “polyline”)、多边形(SVGPolygonElement class, qualifiedName = “polygon”)和贝塞尔曲线(SVGPathElement class, qualifiedName = “path”)。
每个图形元素都有自己特定的属性(property),通过这些属性可以控制其参数和特性。
Cx, Cy, R 是
SVGAnimatedLength 类型的圆属性,可以通过构造 element.X.BaseVal.Value 来设置或读取其静态数据。
以下代码片段显示了如何创建 SVG 圆圈并将其添加到现有 SVG 文件的 <svg> 元素中:
1using Aspose.Svg;
2using System.IO;
3using Aspose.Svg.Dom; 1// Add <circle> element to SVG using C#
2
3// Set SVG Namespace Url
4string SvgNamespace = "http://www.w3.org/2000/svg";
5
6// Load an SVG document from a file
7using (SVGDocument document = new SVGDocument(Path.Combine(DataDir, "basic-shapes.svg")))
8{
9 // Get root <svg> element of the document
10 SVGSVGElement svgElement = document.RootElement;
11
12 // Create a <circle> element
13 SVGCircleElement circleElement = (SVGCircleElement)document.CreateElementNS(SvgNamespace, "circle");
14 circleElement.Cx.BaseVal.Value = 100F;
15 circleElement.Cy.BaseVal.Value = 100F;
16 circleElement.R.BaseVal.Value = 50F;
17 circleElement.SetAttribute("fill", "Salmon");
18
19 // Add the <circle> element as the first child to <svg> element
20 svgElement.InsertBefore(circleElement, svgElement.FirstChild);
21
22 // Work with the document here...
23 // Add a polyline and change stroke attributes for all circle and ellipse elements (see later)
24
25 // Save the document
26 document.Save(Path.Combine(OutputDir, "basic-shapes_add-circle.svg"));
27}椭圆 (Cx, Cy, Rx, Ry),矩形 (X, Y, Width, Height, Rx, Ry) 和直线 (X1, Y1, X2, Y2) 都有自己的属性可以类似地设置。
SVGPolygonElement 和
SVGPolylineElement 具有
SVGPointList 类型的 Points 属性,该属性提供对 points 属性基本内容的访问,该属性唯一匹配 SVG 语法。
以下代码片段说明了创建 SVG 折线的简单示例:
 1    // Set SVG Namespace Url
 2    string SvgNamespace = "http://www.w3.org/2000/svg";
 3
 4    // Create a <polyline> element and set attributes values:
 5	var polylineElement = (SVGPolylineElement)document.CreateElementNS(SvgNamespace, "polyline");
 6    SVGPoint point1 = svgElement.CreateSVGPoint();
 7    point1.X = 270;
 8    point1.Y = 240;
 9    SVGPoint point2 = svgElement.CreateSVGPoint();
10    point2.X = 290;
11    point2.Y = 220;
12    SVGPoint point3 = svgElement.CreateSVGPoint();
13    point3.X = 310;
14    point3.Y = 240;
15    polylineElement.Points.AppendItem(point1);
16    polylineElement.Points.AppendItem(point2);
17    polylineElement.Points.AppendItem(point3);
18    polylineElement.SetAttribute("stroke", "grey");
19    polylineElement.SetAttribute("stroke-width", "5");
20    polylineElement.SetAttribute("fill", "none");
21
22	// Add the SVG polyline to children of the <svg> element
23	svgElement.AppendChild(polylineElement);
CreateSVGPoint() 方法生成
SVGPoint 类的实例,您可以在其中通过同名属性设置 X 和 Y 值。默认对象被初始化为自定义坐标系中的点 (0,0)。
AppendItem(T newItem) 方法在列表末尾插入一个新点。直线连接列表中的这些点并形成折线或多边形 – 由闭合折线形成的平面几何形状。
AppendChild(node) 方法将新子节点添加到该节点的子节点列表的末尾。代码片段显示,指定了 stroke、stroke-width 和 fill 属性,并且 polylineElement 作为最后一个子元素插入到 <svg> 元素中。
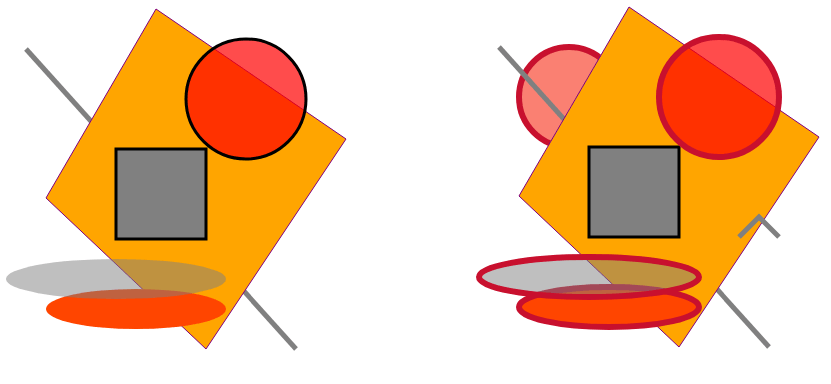
考虑编辑现有 SVG 文件 basic-shapes.svg 的示例:我们将添加上述圆形和折线,并更改所有圆形和椭圆形的笔划属性。以下代码片段显示了如何查找 <svg> 元素中的所有圆形和椭圆形并替换它们的描边属性:
1    // Set stroke attributes for all <circle> and <ellipse> elements
2    foreach (Element element in svgElement.Children)
3    {
4        if (element is SVGCircleElement || element is SVGEllipseElement)
5        {
6            element.SetAttribute("stroke-width", "6");
7            element.SetAttribute("stroke", "#C8102E");
8        }
9    }
该图显示了原始 SVG 文件 basic-shapes.svg 和编辑(修改)的文件的可视化。
要使用 Aspose.SVG API 创建 SVG 路径,您需要使用 CreateElementNS(namespaceURI, qualifiedName) 方法创建
SVGPathElement 类的实例。
方法
CreateSVGPathSegMovetoAbs(x, y)、
CreateSVGPathSegCurvetoQuadraticAbs(x, y, x1, y1) 和
CreateSVGPathSegCurvetoQuadraticSmoothAbs(x, y) 采用以下参数路径数据命令“M、C”和“T”作为它们自己的参数。 SVGPathSegList 类型的
PathSegList 属性提供对 d 属性内容的访问,以路径段列表的形式,与 SVG 语法匹配(详细信息请参阅文章
SVG Path Data)。
以下代码片段显示了如何创建 SVG 路径并将其添加到 <svg> 元素中:
 1    // Create a <path> element
 2    var pathElement = (SVGPathElement)document.CreateElementNS(SvgNamespace, "path");
 3
 4	// Set d attribute parameters – SVG path data
 5	SVGPathSeg pathSeg1 = pathElement.CreateSVGPathSegMovetoAbs(10, 200);
 6	SVGPathSeg pathSeg2 = pathElement.CreateSVGPathSegCurvetoQuadraticAbs(180, 200, 25, 210);
 7	SVGPathSeg pathSeg3 = pathElement.CreateSVGPathSegCurvetoQuadraticSmoothAbs(300, 250);
 8	SVGPathSeg pathSeg4 = pathElement.CreateSVGPathSegCurvetoQuadraticSmoothAbs(420, 250);
 9	SVGPathSeg pathSeg5 = pathElement.CreateSVGPathSegCurvetoQuadraticSmoothAbs(490, 150);
10	pathElement.PathSegList.AppendItem(pathSeg1);
11	pathElement.PathSegList.AppendItem(pathSeg2);
12	pathElement.PathSegList.AppendItem(pathSeg3);
13	pathElement.PathSegList.AppendItem(pathSeg4);
14	pathElement.PathSegList.AppendItem(pathSeg5);
15
16	// Set fill and stroke attributes
17	pathElement.SetAttribute("stroke", "magenta");
18	pathElement.SetAttribute("fill", "none");
19	pathElement.SetAttribute("stroke-width", "4");
20
21	// Add the path as the first child in the <svg> element
22	svgElement.InsertBefore(pathElement, svgElement.FirstChild);
您可以在 DOM、编程、文档处理和文件导航方面使用此类详细且完整的代码。使用
SetAttribute() 方法,您可以在一行上编写 SVG 路径数据 d 设置的代码。
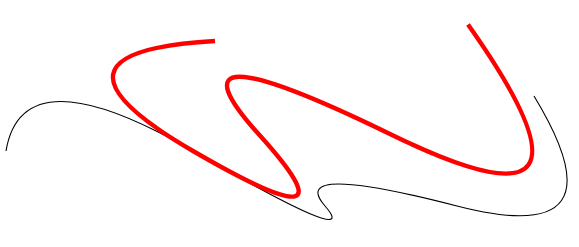
在下面的示例中,我们使用一行代码创建相同的路径(原始 SVG 路径)。此外,我们将在原始路径中编辑 moveto(x,y) M 和 T(x,y) 命令的参数以接收新路径。
1using Aspose.Svg;
2using System.IO;
3using Aspose.Svg.Paths; 1// Edit SVG path data in C# programmatically
2
3// Set SVG Namespace Url
4string SvgNamespace = "http://www.w3.org/2000/svg";
5
6using (SVGDocument document = new SVGDocument())
7{
8 SVGSVGElement svgElement = document.RootElement;
9
10 // Create a <path> element
11 SVGPathElement pathElement = (SVGPathElement)document.CreateElementNS(SvgNamespace, "path");
12
13 // Set d attribute parameters – SVG path data
14 pathElement.SetAttribute("d", "M 10 200 Q 25 110 180 200 T 300 250 T 420 250 T 490 150");
15
16 // Edit SVG path
17 foreach (SVGPathSeg pathSeg in pathElement.PathSegList)
18 {
19 // Editing T commands parameters
20 if (pathSeg is SVGPathSegCurvetoQuadraticSmoothAbs)
21 {
22 SVGPathSegCurvetoQuadraticSmoothAbs pathSegCurvetoQuadraticSmoothAbs = pathSeg as SVGPathSegCurvetoQuadraticSmoothAbs;
23
24 pathSegCurvetoQuadraticSmoothAbs.X -= 60;
25 pathSegCurvetoQuadraticSmoothAbs.Y -= 65;
26 }
27
28 // Editing M command parameters
29 if (pathSeg is SVGPathSegMovetoAbs)
30 {
31 SVGPathSegMovetoAbs pathSegMovetoAbs = pathSeg as SVGPathSegMovetoAbs;
32
33 pathSegMovetoAbs.X = 200;
34 pathSegMovetoAbs.Y = 100;
35 }
36 }
37 // Set fill and stroke attributes
38 pathElement.SetAttribute("stroke", "red");
39 pathElement.SetAttribute("fill", "none");
40 pathElement.SetAttribute("stroke-width", "4");
41
42 // Add the <path> element as the first child to the <svg> element
43 svgElement.InsertBefore(pathElement, svgElement.FirstChild);
44
45 // Save the document
46 document.Save(Path.Combine(OutputDir, "edit-svg-path-data.svg"));
47}该图展示了原始路径(黑色)和修改后的路径(红色)。您可以通过链接 – edit-svg-path-data.svg 查看并保存编辑后的 SVG 文件。
要编辑 SVG 文件,您必须首先在文档中找到要编辑的元素。有多种方法可以做到这一点,例如 CSS 选择器或 XPath 查询。有关如何使用文档导航来编辑 SVG 文件的详细信息,请参阅 Navigation & Inspection SVG 文章。
如果您想更改元素的 SVG 颜色,请参阅 如何更改 SVG 颜色 文章中的详细信息。在这里,您将学习如何使用 Aspose.SVG for .NET 库处理 SVG 颜色,并考虑如何更改元素的 SVG 颜色或更改 SVG 文件中的背景颜色。
位图可以用作绘图的背景。您可以附加 SVG 形状、路径或文本。例如,下图是在位图上添加圆圈和文字作为背景而成的:
1<svg xmlns="http://www.w3.org/2000/svg">
2	<image href="http://docs.aspose.com/svg/images/api/seaside.jpg" height="480" width="640" x="20" y="20"/>
3	<text style="font-size: 1.4em;" x="420px" fill="gold" y="280px">The beach is beautiful...</text>
4	<circle cx="520" cy="120" r="60" stroke="gold" stroke-width="70" fill="none" stroke-dasharray="2,14"/>
5</svg>
以下 C# 代码从头开始创建上面的 SVG 文档。我们向文档添加一些 SVG 元素,例如图像、文本和圆形元素,然后将 SVG 文档保存到文件中:
<image> 元素,设置所需的属性,并将其添加到 <svg> 元素中。namespaceURI, qualifiedName) 方法创建
SVGImageElement 类的实例。element.X.BaseVal.Value:设置href、height、width、x 和y 属性。<text> 元素并设置所需的属性。使用
Style 属性设置字体大小,使用
SetAttribute(name, value) 方法指定 x、y 和 fill 等属性。<circle> 元素。 cx、cy 和 r 属性定义圆的中心坐标和半径。其他属性,如stroke, stroke-width, fill 和 stroke-dasharray,用于设置圆形的样式。1using Aspose.Svg;
2using System.IO;
3using Aspose.Svg.Paths; 1// SVG Drawing on existing bitmap
2
3// Set SVG Namespace Url
4string SvgNamespace = "http://www.w3.org/2000/svg";
5
6using (SVGDocument document = new SVGDocument())
7{
8 SVGSVGElement svgElement = document.RootElement;
9
10 // Create an <image> element and add it into svgElement
11 SVGImageElement imageElement = (SVGImageElement)document.CreateElementNS(SvgNamespace, "image");
12 imageElement.Href.BaseVal = "http://docs.aspose.com/svg/images/api/seaside.jpg";
13 imageElement.Height.BaseVal.ConvertToSpecifiedUnits(SVGLength.SVG_LENGTHTYPE_PX);
14 imageElement.Width.BaseVal.ConvertToSpecifiedUnits(SVGLength.SVG_LENGTHTYPE_PX);
15 imageElement.Height.BaseVal.Value = 480;
16 imageElement.Width.BaseVal.Value = 640;
17 imageElement.X.BaseVal.Value = 20;
18 imageElement.Y.BaseVal.Value = 20;
19 svgElement.AppendChild(imageElement);
20
21 // Create a <text> element, set its attributes, and it into svgElement
22 SVGTextElement textElement = (SVGTextElement)document.CreateElementNS(SvgNamespace, "text");
23 textElement.Style.FontSize = "1.4em";
24 textElement.SetAttribute("x", "420px");
25 textElement.SetAttribute("fill", "gold");
26 textElement.SetAttribute("y", "280px");
27 textElement.TextContent = "The beach is beautiful...";
28 svgElement.AppendChild(textElement);
29
30 // Create a <circle> element, set its attributes, and add it into svgElement
31 SVGCircleElement circleElement = (SVGCircleElement)document.CreateElementNS(SvgNamespace, "circle");
32 circleElement.Cx.BaseVal.Value = 520;
33 circleElement.Cy.BaseVal.Value = 120;
34 circleElement.R.BaseVal.Value = 60;
35 circleElement.SetAttribute("stroke", "gold");
36 circleElement.SetAttribute("stroke-width", "70");
37 circleElement.SetAttribute("fill", "none");
38 circleElement.SetAttribute("stroke-dasharray", "2,14");
39 svgElement.AppendChild(circleElement);
40
41 // Save the document
42 document.Save(Path.Combine(OutputDir, "svg-drawing-on-bitmap.svg"));
43}我们使用较大的“笔画宽度”值绘制了 SVG 圆。应用 stroke-dasharray 属性将圆的笔划转换为虚线。通过选择填充未填充区域的值,可以达到所需的视觉效果。有关样式属性属性的更多信息,请参阅文章
SVG 中的填充和描边。

Analyzing your prompt, please hold on...
An error occurred while retrieving the results. Please refresh the page and try again.