Analyzing your prompt, please hold on...
An error occurred while retrieving the results. Please refresh the page and try again.
Aspose.SVG for .NET 将 SVG 作为结构化矢量文档进行编辑。将 SVG 文件加载到
SVGDocument 中,通过 DOM API 查找或创建 SVG 元素,修改几何形状、属性、文本、样式或路径数据,然后在不进行栅格化的情况下保存编辑后的文件。
典型的 SVG 编辑流程如下:
SVGDocument。CreateElementNS() 创建新元素。Save() 保存编辑后的 SVG 文档。以下示例加载一个 SVG 文件,向其根 <svg> 元素添加蓝色圆形,并保存修改后的文档:
 1using System.IO;
 2using Aspose.Svg;
 3
 4string inputPath = Path.Combine(DataDir, "shapes.svg");
 5string outputPath = Path.Combine(OutputDir, "shapes-with-circle.svg");
 6const string SvgNamespace = "http://www.w3.org/2000/svg";
 7
 8using (SVGDocument document = new SVGDocument(inputPath))
 9{
10    // Access the root <svg> element, which is present in an SVG document.
11    SVGSVGElement svgElement = document.RootElement;
12
13    // Create a circle and define its geometry and appearance.
14    SVGCircleElement circle = (SVGCircleElement)document.CreateElementNS(SvgNamespace, "circle");
15    circle.Cx.BaseVal.Value = 50;
16    circle.Cy.BaseVal.Value = 50;
17    circle.R.BaseVal.Value = 40;
18    circle.SetAttribute("fill", "#3A86FF");
19
20    // Add the circle to the document tree and save the edited SVG file.
21    svgElement.AppendChild(circle);
22    document.Save(outputPath);
23}
如果尚未确定要编辑的元素位置,请参阅 检查和导航 SVG 中的 CSS 选择器和 XPath 示例。有关文档加载方式,请参阅 创建和加载 SVG 文档。
RootElement 属性返回根 <svg> 元素。必须在 SVG 命名空间中创建新的 SVG 元素;然后,可以将其追加到容器,或插入到文档树中的指定位置。
以下代码片段创建一个 <g> 元素,并将其插入为根元素的第一个子元素:
 1const string SvgNamespace = "http://www.w3.org/2000/svg";
 2
 3SVGSVGElement svgElement = document.RootElement;
 4SVGGElement groupElement = (SVGGElement)document.CreateElementNS(SvgNamespace, "g");
 5
 6// Apply common styles to every graphic element later added to the group.
 7groupElement.SetAttribute("fill", "#8A8D8F");
 8groupElement.SetAttribute("stroke", "magenta");
 9groupElement.SetAttribute("stroke-width", "4");
10
11svgElement.InsertBefore(groupElement, svgElement.FirstChild);
使用
SetAttribute() 为新建或现有元素设置或更新 fill、stroke、transform、class 或 d 等 SVG 属性。
可以使用
Element 类的
SetAttribute(name, value)、
GetAttribute(name)、
HasAttribute(name) 和
RemoveAttribute(name) 方法管理属性值。
Aspose.SVG for .NET 为标准 SVG 形状提供类型化 DOM 类,包括
SVGCircleElement、
SVGEllipseElement、
SVGRectElement、
SVGLineElement、
SVGPolylineElement、
SVGPolygonElement 和
SVGPathElement。借助这些类型化属性,代码可以直接编辑几何形状;例如,Cx.BaseVal.Value、Cy.BaseVal.Value 和 R.BaseVal.Value 用于定义圆形,而内容仍保持为可编辑的矢量图形。
圆形由类型化属性 Cx、Cy 和 R 控制。以下完整示例向现有 SVG 文档添加一个圆形:
1using Aspose.Svg;
2using System.IO;
3using Aspose.Svg.Dom; 1// Add a circle element to an existing SVG document in C#
2
3// Set the SVG namespace URI
4string SvgNamespace = "http://www.w3.org/2000/svg";
5
6// Load an SVG document from a file
7using (SVGDocument document = new SVGDocument(Path.Combine(DataDir, "basic-shapes.svg")))
8{
9 // Get the root <svg> element of the document
10 SVGSVGElement svgElement = document.RootElement;
11
12 // Create a <circle> element
13 SVGCircleElement circleElement = (SVGCircleElement)document.CreateElementNS(SvgNamespace, "circle");
14 circleElement.Cx.BaseVal.Value = 100F;
15 circleElement.Cy.BaseVal.Value = 100F;
16 circleElement.R.BaseVal.Value = 50F;
17 circleElement.SetAttribute("fill", "Salmon");
18
19 // Add the <circle> element as the first child to <svg> element
20 svgElement.InsertBefore(circleElement, svgElement.FirstChild);
21
22 // Work with the document here...
23 // Add a polyline and change stroke attributes for all circle and ellipse elements (see later)
24
25 // Save the document
26 document.Save(Path.Combine(OutputDir, "basic-shapes_add-circle.svg"));
27}椭圆(Cx, Cy, Rx, Ry)、矩形(X, Y, Width, Height, Rx, Ry)和直线(X1, Y1, X2, Y2)都有各自的属性,可以采用类似方式设置。
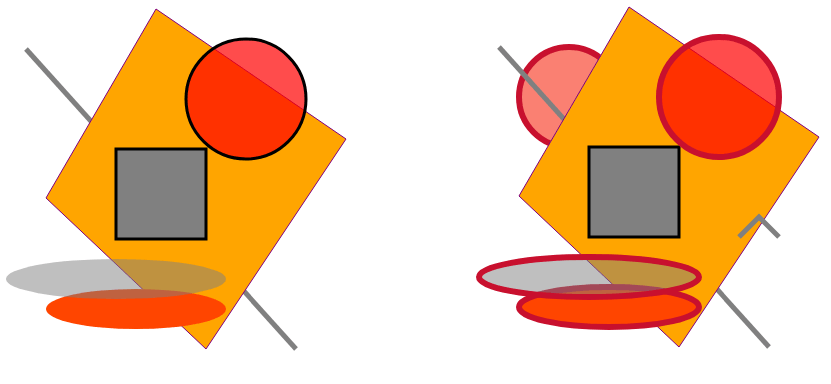
SVG <polyline> 元素将顶点坐标存储在 points 属性中。在 Aspose.SVG 中,SVGPolylineElement.Points 列表提供对这些坐标的类型化访问。使用
CreateSVGPoint(),无需手动构建属性字符串即可添加点:
 1const string SvgNamespace = "http://www.w3.org/2000/svg";
 2
 3SVGSVGElement svgElement = document.RootElement;
 4SVGPolylineElement polylineElement = (SVGPolylineElement)document.CreateElementNS(SvgNamespace, "polyline");
 5
 6SVGPoint point1 = svgElement.CreateSVGPoint();
 7point1.X = 270;
 8point1.Y = 240;
 9SVGPoint point2 = svgElement.CreateSVGPoint();
10point2.X = 290;
11point2.Y = 220;
12SVGPoint point3 = svgElement.CreateSVGPoint();
13point3.X = 310;
14point3.Y = 240;
15
16polylineElement.Points.AppendItem(point1);
17polylineElement.Points.AppendItem(point2);
18polylineElement.Points.AppendItem(point3);
19polylineElement.SetAttribute("stroke", "grey");
20polylineElement.SetAttribute("stroke-width", "5");
21polylineElement.SetAttribute("fill", "none");
22
23// Add the new polyline to the SVG root element
24svgElement.AppendChild(polylineElement);
25
26// Update strokes of circle and ellipse elements already in the SVG document
27foreach (Element element in svgElement.Children)
28{
29    if (element is SVGCircleElement || element is SVGEllipseElement)
30    {
31        element.SetAttribute("stroke-width", "6");
32        element.SetAttribute("stroke", "#C8102E");
33    }
34}
下图显示了原始文件 basic-shapes.svg,以及添加形状和修改描边属性后的结果。
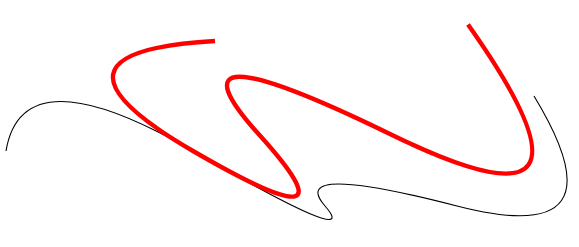
<path> 元素的几何形状存储在其 d 属性中。创建类型化的
SVGPathElement,更新其路径数据,然后像添加其他元素一样将其添加到 SVG 文档:
 1const string SvgNamespace = "http://www.w3.org/2000/svg";
 2
 3SVGPathElement pathElement =
 4    (SVGPathElement)document.CreateElementNS(SvgNamespace, "path");
 5
 6// Set the path geometry and its visible style.
 7pathElement.SetAttribute("d", "M 10 200 Q 25 210 180 200 T 300 250 T 420 250 T 490 150");
 8pathElement.SetAttribute("stroke", "magenta");
 9pathElement.SetAttribute("fill", "none");
10pathElement.SetAttribute("stroke-width", "4");
11
12document.RootElement.InsertBefore(pathElement, document.RootElement.FirstChild);如果代码逐段创建或调整路径命令,SVGPathElement 还提供路径段操作。以下示例创建路径,并更改现有 SVG 文件中选定命令的坐标:
1using Aspose.Svg;
2using System.IO;
3using Aspose.Svg.Paths; 1// Edit SVG path data programmatically in C#
2
3// Set the SVG namespace URI
4string SvgNamespace = "http://www.w3.org/2000/svg";
5
6using (SVGDocument document = new SVGDocument())
7{
8 SVGSVGElement svgElement = document.RootElement;
9
10 // Create a <path> element
11 SVGPathElement pathElement = (SVGPathElement)document.CreateElementNS(SvgNamespace, "path");
12
13 // Set d attribute parameters – SVG path data
14 pathElement.SetAttribute("d", "M 10 200 Q 25 110 180 200 T 300 250 T 420 250 T 490 150");
15
16 // Edit SVG path
17 foreach (SVGPathSeg pathSeg in pathElement.PathSegList)
18 {
19 // Editing T commands parameters
20 if (pathSeg is SVGPathSegCurvetoQuadraticSmoothAbs)
21 {
22 SVGPathSegCurvetoQuadraticSmoothAbs pathSegCurvetoQuadraticSmoothAbs = pathSeg as SVGPathSegCurvetoQuadraticSmoothAbs;
23
24 pathSegCurvetoQuadraticSmoothAbs.X -= 60;
25 pathSegCurvetoQuadraticSmoothAbs.Y -= 65;
26 }
27
28 // Editing M command parameters
29 if (pathSeg is SVGPathSegMovetoAbs)
30 {
31 SVGPathSegMovetoAbs pathSegMovetoAbs = pathSeg as SVGPathSegMovetoAbs;
32
33 pathSegMovetoAbs.X = 200;
34 pathSegMovetoAbs.Y = 100;
35 }
36 }
37 // Set fill and stroke attributes
38 pathElement.SetAttribute("stroke", "red");
39 pathElement.SetAttribute("fill", "none");
40 pathElement.SetAttribute("stroke-width", "4");
41
42 // Add the <path> element as the first child to the <svg> element
43 svgElement.InsertBefore(pathElement, svgElement.FirstChild);
44
45 // Save the document
46 document.Save(Path.Combine(OutputDir, "edit-svg-path-data.svg"));
47}下图比较了原始黑色路径和编辑后的红色路径。您还可以打开编辑后的示例文件: edit-svg-path-data.svg。
有关路径命令语法和绘制行为的信息,请参阅 SVG 路径数据。
SVG 文档可以使用 <image> 元素引用栅格图像,并在其上方放置可编辑的矢量文本或形状。这不会更改位图像素;背景图像和 SVG 叠加内容仍是矢量文档中的独立部分。
当照片、扫描图或其他栅格资源需要添加标签、标记、徽章或装饰图形,而且这些内容仍需要以 SVG 形式编辑时,此方法非常有用。在 SVG 中,绘制顺序遵循元素顺序:先追加 <image>,再追加文本或形状,矢量元素就会显示在位图背景上方。
1<svg xmlns="http://www.w3.org/2000/svg">
2    <image href="/svg/images/api/seaside.jpg" height="480" width="640" x="20" y="20"/>
3    <text style="font-size: 1.4em;" x="420" y="280" fill="gold">The beach is beautiful...</text>
4    <circle cx="520" cy="120" r="60" stroke="gold" stroke-width="70" fill="none" stroke-dasharray="2,14"/>
5</svg>
使用 Aspose.SVG for .NET 创建此组合:
SVGDocument,并通过
RootElement 访问根 <svg> 元素。CreateElementNS() 创建
SVGImageElement,设置图像引用、位置和大小,然后将其作为背景追加到根元素。SVGTextElement,指定显示文本、位置、字体样式和填充颜色,然后在图像之后追加该元素。SVGCircleElement,设置位置、半径和描边属性,然后在背景图像之后追加该元素。在本示例中,较粗的虚线描边产生类似太阳的装饰效果。Save() 写入 SVG 文档。保存后的文件仍将引用的位图、添加的文本和圆形保留为可编辑 SVG 元素。以下示例执行这些步骤并保存 SVG 输出:
1using Aspose.Svg;
2using System.IO;
3using Aspose.Svg.Paths; 1// Draw SVG shapes and text on an existing bitmap in C#
2
3// Set the SVG namespace URI
4string SvgNamespace = "http://www.w3.org/2000/svg";
5
6using (SVGDocument document = new SVGDocument())
7{
8 SVGSVGElement svgElement = document.RootElement;
9
10 // Create an <image> element and add it into svgElement
11 SVGImageElement imageElement = (SVGImageElement)document.CreateElementNS(SvgNamespace, "image");
12 imageElement.Href.BaseVal = "http://docs.aspose.com/svg/images/api/seaside.jpg";
13 imageElement.Height.BaseVal.ConvertToSpecifiedUnits(SVGLength.SVG_LENGTHTYPE_PX);
14 imageElement.Width.BaseVal.ConvertToSpecifiedUnits(SVGLength.SVG_LENGTHTYPE_PX);
15 imageElement.Height.BaseVal.Value = 480;
16 imageElement.Width.BaseVal.Value = 640;
17 imageElement.X.BaseVal.Value = 20;
18 imageElement.Y.BaseVal.Value = 20;
19 svgElement.AppendChild(imageElement);
20
21 // Create a <text> element, set its attributes, and add it to the <svg> element
22 SVGTextElement textElement = (SVGTextElement)document.CreateElementNS(SvgNamespace, "text");
23 textElement.Style.FontSize = "1.4em";
24 textElement.SetAttribute("x", "420px");
25 textElement.SetAttribute("fill", "gold");
26 textElement.SetAttribute("y", "280px");
27 textElement.TextContent = "The beach is beautiful...";
28 svgElement.AppendChild(textElement);
29
30 // Create a <circle> element, set its attributes, and add it to the <svg> element
31 SVGCircleElement circleElement = (SVGCircleElement)document.CreateElementNS(SvgNamespace, "circle");
32 circleElement.Cx.BaseVal.Value = 520;
33 circleElement.Cy.BaseVal.Value = 120;
34 circleElement.R.BaseVal.Value = 60;
35 circleElement.SetAttribute("stroke", "gold");
36 circleElement.SetAttribute("stroke-width", "70");
37 circleElement.SetAttribute("fill", "none");
38 circleElement.SetAttribute("stroke-dasharray", "2,14");
39 svgElement.AppendChild(circleElement);
40
41 // Save the document
42 document.Save(Path.Combine(OutputDir, "svg-drawing-on-bitmap.svg"));
43}有关描边宽度、虚线图案和其他 SVG 外观属性的详细信息,请参阅 SVG 中的填充和描边。

1. 使用 Aspose.SVG 编辑 SVG 文件会将其转换为位图吗?
不会。通过 SVGDocument 编辑时,修改的是 SVG 元素、属性和路径数据,文档仍保持为矢量内容。只有显式将 SVG 转换或渲染为 PNG、JPEG 或 WebP 等图像格式时,才会生成栅格输出。
2. 如何编辑现有 SVG 元素,而不是添加新元素?
使用 CSS 选择器或 XPath 查询定位所需元素,然后更改其属性或类型化 SVG 属性。例如,选择一个 <circle> 后,代码可以更新其半径、位置、填充或描边。请参阅
检查和导航 SVG 和
如何更改 SVG 颜色。
3. 能否在同一工作流程中编辑 SVG 文档并转换修改后的结果?
可以。将源文件加载到 SVGDocument 中,进行所需修改,为目标格式创建保存选项,然后调用 Converter.ConvertSVG(document, options, outputPath)。例如,PDF 输出使用 PdfSaveOptions,PNG、JPEG、TIFF、GIF、BMP 或 WebP 输出使用 ImageSaveOptions。完整示例请参阅
在 C# 中转换 SVG 文件。
4. 能否使用不同元素替换现有 SVG 形状?
可以。使用选择器或 XPath 查询找到现有元素,使用 CreateElementNS() 创建替代元素,将新元素插入同一个父节点,然后删除旧节点。例如,可以将圆形标记替换为矩形,而不改变 SVG 文档的其他部分。有关示例,请参阅
检查和导航 SVG。
Analyzing your prompt, please hold on...
An error occurred while retrieving the results. Please refresh the page and try again.