Analyzing your prompt, please hold on...
An error occurred while retrieving the results. Please refresh the page and try again.
Aspose.SVG for .NET 允许您打开或创建、编辑 SVG 文档并更改其内容。您可以修改文档,包括应用许多可用的过滤器来获得所需的结果。
Aspose.Svg.Filters 命名空间包含 SVG 规范中与滤镜效果相关的类和接口。
SVGFEGaussianBlurElement 类对应于 <feGaussianBlur>元素来实现高斯模糊效果。
在 SVG 中,过滤器由 <filter>元素定义,该元素在 <defs>元素内设置。它永远不会自行渲染,并且在概念上被描述为包含其子元素(过滤器基元)的元素。 <filter> 元素有一组属性。过滤器基元所需的属性是x、y、width、height和id。他们设置将应用滤镜的图片区域。属性id为 SVG 元素提供唯一标识符,并标识 SVG 文档中的元素。
在本文中,您将学习如何编写 SVG 代码来创建高斯模糊滤镜,并考虑使用 SVGFEGaussianBlurElement 类将高斯模糊效果应用于 SVG 元素和位图的详细 C# 示例。
高斯模糊 SVG 滤镜是一种使用高斯分布将模糊效果应用于 SVG 元素内容的滤镜。这是 SVG 中最常用的滤镜之一,可创建柔和、平滑且具有视觉吸引力的效果。 <feGaussianBlur> 滤镜创建柔和的模糊效果。 stdDeviation 属性指定表征模糊操作的标准偏差的数字。如果提供两个数字,第一个 数字 表示沿坐标系 x 轴的标准偏差值,第二个数字表示 y 轴上的标准偏差值。每个过滤器都需要一个源图像来处理。否则,过滤器将没有任何内容可渲染,因此无法工作。过滤器原语的输入数据在 in属性中指定。默认为 in="SourceGraphic"。
以下是将具有各种 stdDeviation属性值的高斯模糊 SVG 过滤器应用于 SVG 矩形元素的示例:
 1<svg height="150" width="750" xmlns="http://www.w3.org/2000/svg">
 2    <defs>
 3        <filter id="f1" x="-20" y="-20" height="100" width="100">
 4            <feGaussianBlur in="SourceGraphic" stdDeviation="10" />
 5        </filter>
 6        <filter id="f2" x="-20" y="-20" height="100" width="100">
 7            <feGaussianBlur in="SourceGraphic" stdDeviation="10, 0" />
 8        </filter>
 9        <filter id="f3" x="-20" y="-20" height="100" width="100">
10            <feGaussianBlur in="SourceGraphic" stdDeviation="0,10" />
11        </filter>
12		<filter id="f4" x="-20" y="-20" height="100" width="100">
13            <feGaussianBlur in="SourceGraphic" stdDeviation="20" />
14        </filter>
15		<filter id="f5" x="-20" y="-20" height="100" width="100">
16            <feGaussianBlur in="SourceGraphic" stdDeviation="5" />
17        </filter>
18    </defs>
19    <g fill="#ffa500">
20        <rect x="40" y="40" width="60" height="60" />
21        <rect x="40" y="40" width="60" height="60" transform="translate(120)" filter="url(#f1)" />
22        <rect x="40" y="40" width="60" height="60" transform="translate(240)" filter="url(#f2)" />
23        <rect x="40" y="40" width="60" height="60" transform="translate(360)" filter="url(#f3)" />
24		<rect x="40" y="40" width="60" height="60" transform="translate(480)" filter="url(#f4)" />
25		<rect x="40" y="40" width="60" height="60" transform="translate(600)" filter="url(#f5)" />
26    </g>
27</svg>
如您所见,stdDeviation值控制高斯分布的扩展。较大的stdDeviation值会导致更加模糊,而较小的值会产生更柔和的效果。 注意: 在形状周围添加的模糊通常会使输出图片比源图片大。我们需要对x和y使用负数,以避免剪切过滤器添加的图形。在上面的示例中,我们使用 x="-20" 和 y="-20"。
在前面的 SVG 代码示例中,我们详细讨论了如何创建高斯模糊滤镜,现在我们知道要使用哪些元素和属性。让我们使用 Aspose.SVG for .NET API 创建 C# 代码来实现此类过滤器。
根据 SVG 语法, <filter>元素应位于 <defs>元素中,而 <feGaussianBlur>滤镜基元仅位于 <filter>元素内部。因此,要对 SVG 滤镜进行编程,您必须正确创建和嵌套所需的元素。
<svg>元素。<rect>元素,设置所需的属性,并将其添加到 <svg>元素中。namespaceURI, qualifiedName) 方法创建
SVGRectElement 的实例。name, value) 方法。另一种方法是使用
SVGAnimatedLength 类型的属性来采用 SVG DOM 点访问器方法,可以通过构造 element.X.BaseVal.Value来设置或读取其静态数据。<rect> 元素添加到 <svg> 元素。<defs>元素并将其添加到 <svg>元素中。<filter>元素,请使用相同的算法:使用 CreateElementNS() 方法创建
SVGFilterElement 的实例。请记住使用 SetAttribute() 方法设置x、y、height、width和id属性,并将 <filter>添加到 <defs>元素。<feGaussianBlur>元素并设置 in和 stdDeviation属性。然后将其添加到 <filter>元素中。In1属性,请使用SVGAnimatedLength类型的属性,可以通过构造feGaussianBlurElement.In1.BaseVal = "SourceGraphic"来设置或读取其静态数据。<feGaussianBlur> 添加到 <filter> 元素。1using Aspose.Svg;
2using System.IO;
3using Aspose.Svg.Filters; 1// Apply Gaussian blur filter to a <rect> element in SVG programmatically
2
3// Set SVG Namespace Url
4string SvgNamespace = "http://www.w3.org/2000/svg";
5
6// Initialize an SVG document
7using (SVGDocument document = new SVGDocument())
8{
9 SVGSVGElement svgElement = document.RootElement;
10
11 // Create a <rect> element and set the "fill" and "filter" attributes
12 SVGRectElement rectElement = (SVGRectElement)document.CreateElementNS(SvgNamespace, "rect");
13 rectElement.X.BaseVal.Value = 40;
14 rectElement.Y.BaseVal.Value = 40;
15 rectElement.Width.BaseVal.Value = 60;
16 rectElement.Height.BaseVal.Value = 60;
17 rectElement.SetAttribute("fill", "#ffa500");
18 rectElement.SetAttribute("filter", "url(#GaussianBlur)");
19 svgElement.AppendChild(rectElement);
20
21 // Create a <defs> element and add it to the <svg> element
22 SVGDefsElement defsElement = (SVGDefsElement)document.CreateElementNS(SvgNamespace, "defs");
23 svgElement.AppendChild(defsElement);
24
25 // Create a <filter> element and add it to the <defs> element
26 SVGFilterElement filterElement = (SVGFilterElement)document.CreateElementNS(SvgNamespace, "filter");
27 filterElement.SetAttribute("x", "-20px");
28 filterElement.SetAttribute("y", "-20px");
29 filterElement.SetAttribute("height", "100px");
30 filterElement.SetAttribute("width", "100px");
31 filterElement.Id = "GaussianBlur";
32 defsElement.AppendChild(filterElement);
33
34 // Create a feGaussianBlur element and add it to the <filter> element
35 SVGFEGaussianBlurElement feGaussianBlurElement = (SVGFEGaussianBlurElement)document.CreateElementNS(SvgNamespace, "feGaussianBlur");
36 feGaussianBlurElement.In1.BaseVal = "SourceGraphic";
37 feGaussianBlurElement.StdDeviationX.BaseVal = 10;
38 feGaussianBlurElement.StdDeviationY.BaseVal = 10;
39 filterElement.AppendChild(feGaussianBlurElement);
40
41 // Save the document
42 document.Save(Path.Combine(OutputDir, "gaussian-blur-rect.svg"));
43}如果渲染结果文件,您将看到一个模糊的橙色矩形,与上图中的矩形完全相同,按顺序排列第二个,stdDeviation=“10”。
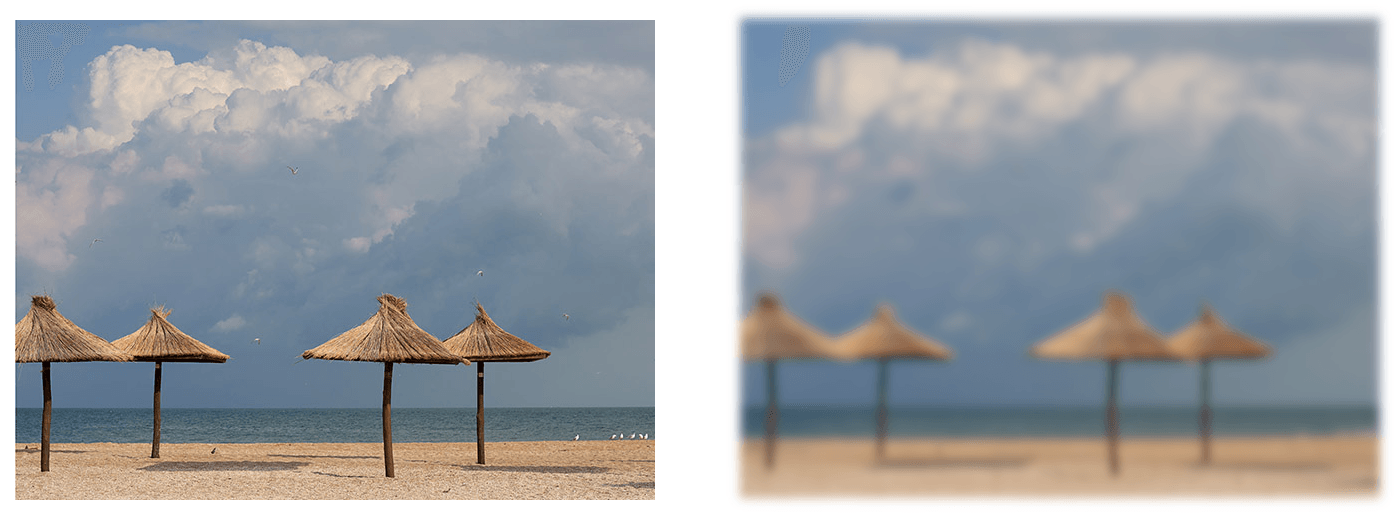
要使用高斯模糊 SVG 滤镜进行背景模糊,您可以将该滤镜应用于充当主要内容后面的背景的 SVG 元素。例如,它可以是任何位图。模糊滤镜可让您创建视觉上吸引人的背景模糊效果,同时保持前景内容清晰且清晰。
要使用 SVG 实现背景图像模糊,请按照以下几个步骤操作。它们与前面的 C# 示例中描述的步骤类似:
<svg>元素。namespaceURI, qualifiedName) 方法创建
SVGImageElement、
SVGDefsElement、
SVGFilterElement 的实例,和
SVGFEGaussianBlurElement 类。imageElement 添加到 svgElement,您可以使用
AppendChild() 方法。使用引用 filterElement 的 url 名称(在id属性中)的 imageElement的 filter属性,可以将 SVG 滤镜效果应用于图像。<filter>元素设置 filterElement.Id后,即可将其应用于图像。这是一个说明模糊背景图像实现的示例:
1using Aspose.Svg;
2using System.IO;
3using Aspose.Svg.Filters; 1// Blur background image using SVG filters in C#
2
3// Set SVG Namespace Url
4string SvgNamespace = "http://www.w3.org/2000/svg";
5
6// Initialize an SVG document
7using (SVGDocument document = new SVGDocument())
8{
9 SVGSVGElement svgElement = document.RootElement;
10
11 // Create an <image> element and add to the svgElement
12 SVGImageElement imageElement = (SVGImageElement)document.CreateElementNS(SvgNamespace, "image");
13 imageElement.Href.BaseVal = "http://docs.aspose.com/svg/images/api/seaside.jpg";
14 imageElement.Height.BaseVal.ConvertToSpecifiedUnits(SVGLength.SVG_LENGTHTYPE_PX);
15 imageElement.Width.BaseVal.ConvertToSpecifiedUnits(SVGLength.SVG_LENGTHTYPE_PX);
16 imageElement.Height.BaseVal.Value = 480;
17 imageElement.Width.BaseVal.Value = 640;
18 imageElement.X.BaseVal.Value = 20;
19 imageElement.Y.BaseVal.Value = 20;
20 imageElement.SetAttribute("filter", "url(#F1)");
21 svgElement.AppendChild(imageElement);
22
23 // Create a <defs> element and add it to the <svg> element
24 SVGDefsElement defsElement = (SVGDefsElement)document.CreateElementNS(SvgNamespace, "defs");
25 svgElement.AppendChild(defsElement);
26
27 // Create a <filter> element and add it to the defsElement
28 SVGFilterElement filterElement = (SVGFilterElement)document.CreateElementNS(SvgNamespace, "filter");
29 filterElement.Id = "F1";
30 defsElement.AppendChild(filterElement);
31
32 // Create a <feGaussianBlur> element and add it to the filterElement
33 SVGFEGaussianBlurElement feGaussianBlurElement = (SVGFEGaussianBlurElement)document.CreateElementNS(SvgNamespace, "feGaussianBlur");
34 feGaussianBlurElement.In1.BaseVal = "SourceGraphic";
35 feGaussianBlurElement.StdDeviationX.BaseVal = 5;
36 feGaussianBlurElement.StdDeviationY.BaseVal = 5;
37 filterElement.AppendChild(feGaussianBlurElement);
38
39 // Save the document
40 document.Save(Path.Combine(OutputDir, "blur-background-image.svg"));
41}
Aspose.SVG Builder API 旨在简化 C# 中 SVG 元素的创建和更新。 让我们看一个使用 SVG Builder API 实现背景模糊的 С# 示例(与上一段中的示例完全相同)。 此代码展示了如何使用 流畅的构建器模式 (fluent builder pattern) 来创建简洁且可读的 SVG 文档,并利用 Aspose.SVG 库的功能:
1using Aspose.Svg.Builder;
2using System.IO; 1// Blur background image using SVG Builder API in C#
2
3string svgContent = "<svg xmlns=\"http://www.w3.org/2000/svg\"></svg>";
4using (SVGDocument document = new SVGDocument(svgContent, "."))
5{
6 // Create an instance of SVGSVGElementBuilder to facilitate the construction of the <svg> element and its child elements using a fluent builder pattern
7 SVGSVGElement svg = new SVGSVGElementBuilder()
8 .AddDefs(d => d
9 .AddFilter(f => f.Id("gaussian-blur")
10 .AddFeGaussianBlur(g => g
11 .StdDeviation(5, 5)
12 )
13 )
14 )
15 .AddImage(i => i
16 .X(20).Y(20).Height(480).Width(640)
17 .Href("http://docs.aspose.com/svg/images/api/seaside.jpg")
18 .Filter(fl => fl
19 .FilterId("gaussian-blur")
20 )
21 )
22 // Call the Build() method on the SVGSVGElementBuilder to construct the <svg> element with its child elements
23 .Build(document.FirstChild as SVGSVGElement);
24 document.Save(Path.Combine(OutputDir, "gaussian-blur-builder.svg"));
25}流畅的构建器模式允许您更简洁、更易读地创建 SVG 元素并应用过滤器。 每个方法调用都清楚地表明其目的,让您一目了然地了解SVG文档的结构。 此示例演示了使用 SVG Builder 创建 SVG 文档的更具表现力的方法,与 上一个示例中显示的手动创建元素的方法相比,提供了更高的可读性、可维护性和灵活性。
也可以看看
Analyzing your prompt, please hold on...
An error occurred while retrieving the results. Please refresh the page and try again.