
Analyzing your prompt, please hold on...
An error occurred while retrieving the results. Please refresh the page and try again.
快速解答: 要在 Python 中绘制 SVG 文本,请使用
create_element_ns() 创建 <text> 元素,使用
set_attribute() 设置 x、y、font-family、font-size、fill 和 text-anchor 属性,设置 text_content,将文本追加到 SVG 根元素,然后保存文档。
1from aspose.svg import SVGDocument
2
3with SVGDocument() as document:
4    text = document.create_element_ns("http://www.w3.org/2000/svg", "text")
5    text.set_attribute("x", "20")
6    text.set_attribute("y", "40")
7    text.text_content = "Hello SVG"
8    document.root_element.append_child(text)
9    document.save("text.svg")
在本文中,您将学习如何:
<text> 元素;x 和 y 坐标定位文本;font-family、font-size、fill 和 text-anchor 属性;<tspan> 元素创建简单的多行文本。SVG 文本在 SVG 标记中仍然是真实文本。它可以被选择、搜索、本地化、设置样式并在以后继续编辑。如果需要将文本转换为矢量轮廓,以便用于最终图稿或不依赖字体的渲染,请改用 文本矢量化。有关更广泛的 SVG 标记背景,请参阅 SVG Text 指南。
| 属性或元素 | 用途 |
|---|---|
x、y | 定位文本基线 |
font-family | 选择请求的字体系列 |
font-size | 以 SVG 单位设置文本大小 |
fill | 设置文本颜色 |
text-anchor | 相对于 x 坐标对齐文本 |
<tspan> | 添加定位片段或简单多行文本 |
当生成的 SVG 图形需要标签、说明文字、徽章或图表内文本时,请使用以下工作流:
SVGDocument。width、height 和 viewBox。create_element_ns() 创建 <text> 元素。set_attribute() 设置 x、y、font-size、font-family、fill 和 text-anchor 等位置和样式属性。text_content,或追加 <tspan> 子元素。append_child() 将文本元素追加到 SVG 根元素,并使用
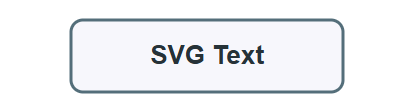
document.save() 保存文档。下面的示例创建一个带背景矩形和居中文本的小型 SVG 标签。当 x 坐标应表示文本的水平中心时,请使用 text-anchor="middle"。
 1import os
 2from aspose.svg import SVGDocument
 3
 4namespace_uri = "http://www.w3.org/2000/svg"
 5
 6output_folder = "output/"
 7output_path = os.path.join(output_folder, "svg-text-label.svg")
 8os.makedirs(output_folder, exist_ok=True)
 9
10with SVGDocument() as document:
11    svg = document.root_element
12    svg.set_attribute("width", "320")
13    svg.set_attribute("height", "120")
14    svg.set_attribute("viewBox", "0 0 320 120")
15
16    background = document.create_element_ns(namespace_uri, "rect")
17    background.set_attribute("x", "24")
18    background.set_attribute("y", "24")
19    background.set_attribute("width", "272")
20    background.set_attribute("height", "72")
21    background.set_attribute("rx", "12")
22    background.set_attribute("fill", "#f7f7fb")
23    background.set_attribute("stroke", "#546e7a")
24    background.set_attribute("stroke-width", "3")
25    svg.append_child(background)
26
27    label = document.create_element_ns(namespace_uri, "text")
28    label.set_attribute("x", "160")
29    label.set_attribute("y", "68")
30    label.set_attribute("text-anchor", "middle")
31    label.set_attribute("font-family", "Arial, sans-serif")
32    label.set_attribute("font-size", "26")
33    label.set_attribute("font-weight", "700")
34    label.set_attribute("fill", "#263238")
35    label.text_content = "SVG Text"
36    svg.append_child(label)
37
38    document.save(output_path)
文本基线由 y 控制,而不是由字母顶部边缘控制。如果垂直位置需要精确的视觉居中,请调整 y 值,或在自己的布局逻辑中使用字体度量。
下图展示运行示例后的结果:圆角矩形作为简单标签背景,text-anchor="middle" 将 SVG Text 文本围绕中心 x 坐标对齐。
<tspan> 创建多行 SVG 文本当一个文本块需要多行或独立定位的片段时,请使用 <tspan>。下一个示例创建一个 <text> 元素,并追加两个具有不同 y 位置的 <tspan> 子元素。
 1import os
 2from aspose.svg import SVGDocument
 3
 4namespace_uri = "http://www.w3.org/2000/svg"
 5
 6output_folder = "output/"
 7output_path = os.path.join(output_folder, "svg-multiline-text.svg")
 8os.makedirs(output_folder, exist_ok=True)
 9
10with SVGDocument() as document:
11    svg = document.root_element
12    svg.set_attribute("width", "400")
13    svg.set_attribute("height", "120")
14    svg.set_attribute("viewBox", "0 0 400 120")
15
16    text = document.create_element_ns(namespace_uri, "text")
17    text.set_attribute("x", "200")
18    text.set_attribute("y", "48")
19    text.set_attribute("font-family", "Arial, sans-serif")
20    text.set_attribute("font-size", "22")
21    text.set_attribute("text-anchor", "middle")
22    text.set_attribute("fill", "#263238")
23
24    first_line = document.create_element_ns(namespace_uri, "tspan")
25    first_line.set_attribute("x", "200")
26    first_line.set_attribute("y", "48")
27    first_line.text_content = "Generated SVG Text"
28    text.append_child(first_line)
29
30    second_line = document.create_element_ns(namespace_uri, "tspan")
31    second_line.set_attribute("x", "200")
32    second_line.set_attribute("y", "84")
33    second_line.set_attribute("fill", "#2e86de")
34    second_line.text_content = "with Aspose.SVG for Python via .NET"
35    text.append_child(second_line)
36
37    svg.append_child(text)
38    document.save(output_path)
两行文本属于同一个 <text> 元素,但每个 <tspan> 都有自己的位置,并且可以覆盖 fill 等样式属性。
下图展示两行 SVG 文本输出。第一个 <tspan> 绘制深色标题,第二个 <tspan> 使用单独的 y 位置和蓝色 fill 值绘制副标题。

| 问题 | 修复 |
|---|---|
| 文本不可见 | 设置 fill,检查 x 和 y,并确保文本位于 viewBox 内 |
| 文本位置过高或过低 | 记住 y 定位的是文本基线,而不是顶部边缘 |
| 居中对齐不起作用 | 设置 text-anchor="middle",并将需要的中心位置作为 x 值 |
| 多行文本重叠 | 为每个 <tspan> 设置单独的 y 值,或谨慎使用 dy 间距 |
| 文本在另一台机器上渲染不同 | 使用常见字体,或在需要字体无关输出时将最终图稿转换为矢量路径 |
使用 create_element_ns() 创建 <text> 元素,设置 x、y、font-family、font-size 和 fill 属性,设置 text_content,将其追加到 SVG 根元素,然后保存 SVG。
设置 text-anchor="middle",并将 x 设置为所需的水平中心。再调整 y 来控制基线位置。
可以。使用一个 <text> 元素和多个 <tspan> 子元素。为每个 <tspan> 设置自己的 x 和 y 值,或使用受控的 dy 间距。
当文本需要保持可编辑、可搜索或可本地化时,请绘制普通 SVG 文本。只有在最终图稿必须保留精确字形轮廓,并且不能依赖已安装字体时,才矢量化文本。

Analyzing your prompt, please hold on...
An error occurred while retrieving the results. Please refresh the page and try again.