Konvertieren Sie Microsoft Project MPP -Datei in PDF
PDF oder tragbares Dokumentformat ist ein von Adobe 1992 entwickeltes Dateiformat, um Dokumente einschließlich Textformatierung und Bilder vorzustellen. Mit Microsoft Project kann der Benutzer die Daten des Projekts in das PDF -Format exportieren.
Dies sind Schritte zum Exportieren von Projektdaten in das PDF -Format:
Angenommen, Sie haben Ihr Projekt im Microsoft -Projekt eröffnet.
- Wählen Sie “Datei \ speichern als” Menüelement
- Wählen Sie den Speicherort (z. B. “dieser PC”)
- In “Dialog” speichern “wählen Sie ‘PDF -Dateien (*. PDF) -Format in” als Typ speichern “Dropdown.
- Klicken Sie auf “Speichern”
- Wählen Sie im Dialogfeld “Exportoptionen für Dokumente Export” veröffentlichen und klicken Sie auf “OK”.
Die aktuell ausgewählte Ansicht wird in die PDF -Datei gerendert. Hier ist ein Beispiel für die Ausgabedatei:

Aspose.Tasks für .NET bietet auch die Möglichkeit, das Projekt des Projekts im PDF -Format programmgesteuert zu vermitteln. In diesem Fall müssen Sie kein Microsoft -Projekt auf Ihrem Computer installieren lassen. Dieser Artikel gibt einen detaillierten Überblick über die Vielfalt der in Asposes verfügbaren Optionen zum Exportieren von Projekten nach PDF.
Speichern einer MP -Projekt -MPP -Datei als PDF
Die Projekt Klasse enthält die Save -Methode, mit der ein Projekt in verschiedenen Formaten speichert wird. Mit der Methode Save können Sie Projektdaten mit dem Type SaveFileFirformat auf PDF übertragen.
Um ein Projekt vor PDF zu speichern:
- Laden Sie eine Microsoft -Projekt -MPP -Datei.
- Nehmen Sie optional Änderungen am geladenen Projekt vor.
- Speichern Sie das Projekt in PDF mit einem von Project.Save -Methodenüberlastungen. Sie können entweder saveFileForformat.pdf verwenden, um das Projekt mit Standardeinstellungen oder PDFSaveOptions zu speichern, um Exportoptionen anzupassen.
- Bitte beachten Sie, dass Sie keine Werte gegen die Felder und Produzent ** aufgrund von ASSON LTD. und ASSONE.TASSS für .NET X.x.x angeben können.
Die folgenden Codezeilen zeigen, wie dies mit C#erreicht werden kann.
1Project project = new Project("New Project.mpp");
2project.Save("SaveProjectAsPDF_out.pdf", SaveFileFormat.PDF);Specifying a View to save to PDF
Microsoft Project supports different view such as ‘Gantt Chart’, ‘Task Usage’, ‘Resource Usage’, etc. Each view can be customized and these settings are stored in MPP file. Aspose.Tasks for .NET allows the user to examine and change these settings using Project.Views collection.
There are 3 ways to specify the View which will be exported to PDF:
- Do not specify a View explicitly. In this case Project.DefaultView will be rendered. If default view is missing, Gantt Chart view will be rendered.
- Use SaveOptions.PresentationFormat to specify value of PresentationFormat enumeration. In this case the view with the correspondent Screen property will be selected from Project.Views collection. If View is missing, the default settings are used.
- Use SaveOptions.ViewSettings property to explicitly specify the View object to render. If View object is specified, the value of SaveOptions.PresentationFormat is ignored.
Fitting Contents to Cell Size
Commonly, a task (or resource) name is so long that it is truncated when project views are rendered. Aspose.Tasks for .NET provides the FitContent property in the SaveOptions class to avoid truncation of task and resource names. The code example below renders a project to PDF format with the FitContent property set to true.
1Project project = new Project("New Project.mpp");
2SaveOptions options = new PdfSaveOptions();
3
4// Set option fit content to true
5options.FitContent = true;
6options.Timescale = Timescale.Months;
7options.PresentationFormat = PresentationFormat.TaskUsage;
8project.Save("FitContentsToCellSize_out.pdf", options);Printing or Hiding Legends when Rendering
To let you print or hide the legends on each page, the SaveOptions class provides the LegendOnEachPage property. If this flag is set to true, legends are printed on each page in the output file.
1SaveOptions options = new PdfSaveOptions();
2
3// Set the LegendOnEachPage property to false to hide legends
4options.LegendOnEachPage = false;Supported Graphical Column Indicators
Aspose.Tasks draws graphical column indicators when rendering project data to output PDF. The following graphical indicators are supported by Aspose.Tasks:
| Indicator Type | Graphical Indicator |
|---|---|
| Task Indicators | 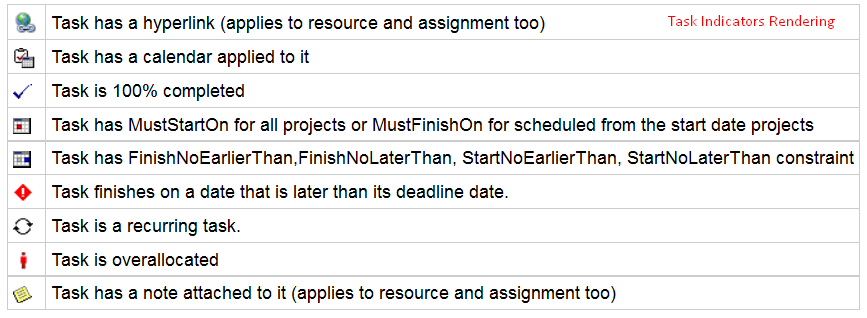 |
| Resource Indicators | 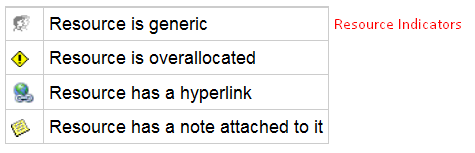 |
| Assignment Indicators |  |
Saving to Multiple PDF Files
To save project data to multiple PDF files, set the SaveToSeparateFiles flag to true.
1Project project = new Project("New Project.mpp");
2PdfSaveOptions options = new PdfSaveOptions();
3options.SaveToSeparateFiles = true;
4options.Pages = new List<int>();
5options.Pages.Add(1);
6options.Pages.Add(4);
7project.Save("SaveToMultiplePDFFiles_out.pdf", (SaveOptions)options);Customizing TextStyle for Project Data
Aspose.Tasks for .NET API allows developers to customize the text style for over-allocated resources. By default, the style used for overallocated resources is similar to Microsoft Project (MSP), that is, red and bold. TextItemType.OverallocatedResources makes it possible to customize the color and style for the overallocated resources.
 1Project project = new Project("New Project.mpp");
 2SaveOptions options = new PdfSaveOptions();
 3options.PresentationFormat = PresentationFormat.ResourceSheet;
 4
 5TextStyle style = new TextStyle();
 6style.Color = Color.OrangeRed;
 7style.FontStyle = FontStyle.Bold;
 8style.FontStyle |= FontStyle.Italic;
 9style.ItemType = TextItemType.OverallocatedResources;
10
11options.TextStyles = new List<TextStyle>();
12options.TextStyles.Add(style);
13project.Save("CustomizeTextStyle_out.pdf", options);Customizing Date Formats
Aspose.Tasks for .NET API allows developers to customize the date format using the DateFormat enumerator when rendering project data.
 1Project project = new Project("New Project.mpp");
 2project.Set(Prj.StartDate, new DateTime(2014, 9, 22));
 3
 4// By default project.DateFormat == DateFormat.Date_ddd_mm_dd_yy (Mon 09/22/14) customize DateFormat (September 22, 2014)
 5project.Set(Prj.DateFormat, DateFormat.DateMmmmDdYyyy);
 6project.Save("CustomizeDateFormats1_out.pdf", SaveFileFormat.PDF);
 7
 8// Export to date format 19/07/2016
 9project.Set(Prj.DateFormat, DateFormat.DateDdMmYyyy);
10project.Save("CustomizeDateFormats2_out.pdf", SaveFileFormat.PDF);Setting Default Font
Setting default font during rending of documents helps when a font is not found. In such a case, the default font replaces the missing font and output is not affected. Aspose.Tasks for .NET API lets you specify the default font using the DefaultFontName property of the PdfSaveOptions as shown in the following code sample.
 1Project project = new Project("New Project.mpp");
 2
 3PdfSaveOptions options = new PdfSaveOptions
 4{
 5    PresentationFormat = PresentationFormat.GanttChart,
 6    FitContent = true,
 7    UseProjectDefaultFont = false,
 8    DefaultFontName = "Segoe UI Black"
 9};
10project.Save("CreateProject2_out.pdf", (SaveOptions)options);